Deb's Kitchen - Farm, Food, Wine & Lifestyle Adventures
  • Facebook
  • Google
  • Twitter
  • Instagram
  • Pinterest
  • Email
Menu
Skip to content
  • Home
  • Blog
  • Events
    • Classes
    • Tours & Adventures
  • Edible Gardening
  • Preserving
  • Recipes
    • Appetizers
    • Soups and Salads
    • Main Dishes
    • Side Dishes
    • Desserts
  • About
    • Whats In Your Pantry
    • Ask Debbi
    • Deb’s Kitchen Botanicals
    • Press
  • Contact

Category Archives: General Info (Gardening)

What to Plan/Plant for Your Fall Garden

8 / 2 / 21

Fall into Winter Gardens

Remove any summer crops that are starting to fade and prepare soil with mulch, mycorrhiza, compost.  Re-plant with fall/winter crops or cover crops.

Plant last round of heat loving crops

(early) tomatoes with harvest dates within 50-60 day range

Summer/winter squash (same requirements)

Peppers

Mid-season planting in August

Basil

Beans

Beets

Broccoli

Brussels sprouts

Cabbage

Carrots

Cauliflower

Chives

Cilantro

Cucumber

Dill

Lettuce

Kale

Mustard Greens

Onion, Shallots, Green onions

Radish

Peas, plant 2 rounds, August and again in Sept for fall/spring harvest

Spinach

Turnips, baby white turnips & regular

Late summer (end of Sept) plant cover crops for any areas where you won’t be planting any winter crops.


Some cool season vegetables should probably be protected from the hot months of Sept into Oct. But by planting these vegetables/fruits now they will benefit from the warmth of the soil and the longer days. If you wait too long, late Oct, the soil is already cooling down and the sun is leaning towards winter, the days growing shorter.

Need more help? Send me an email with questions. I have video’s available for guidance, contact me, [email protected]


Leave a comment
Share
  • Pin it
  • Share
  • Tweet
  • Share
  • Email

Spring Garden Workshops

4 / 2 / 214 / 2 / 21

It’s not too late to plant that spring garden! Are you new to gardening or just have unanswered questions? I have the answers!

Spring Raised Bed Gardens

I’ll give you ideas on how to design your spring kitchen garden, where to put the garden and how to plant so you’ll have a big harvest of fresh organic vegetables. Downloadable pdf’s for you to keep! We’ll answer questions on where to buy your plants or how to start seeds, how to care for your babies, fertilizing and harvesting.

You’re invited! This will be a Zoom class, we hope to return to in person teaching soon

Sun, April 11th

11:00 – 12:30, $30.00

You can sign up here


NEW NEW NEW

Zoom Class

Sun. April 18th

11 – 12:30, $30.00

All about Growing Tomatoes

Learn to grow big, juicy, ripe tomatoes

Sign up below


Leave a comment
Share
  • Pin it
  • Share
  • Tweet
  • Share
  • Email

Herb Gardening

10 / 19 / 2010 / 19 / 20

Starting An Herb Garden

An herb garden doesn’t have to be big so you don’t need much space to grow one. You can even start a potted herb garden on your windowsill! This way you’ll have the aroma of fresh herbs right inside your kitchen or on your patio.

When growing herbs, location is key. Some like it sunny and dry, while others prefer filtered sunlight and moist soil. Regardless, make sure to use well-drained fertile soil. Most herbs will survive in poor sandy soil, but few will tolerate wet clay soil. If your yard is all sun, try planting shade-loving plants east of taller varieties like sunflowers. The tall plants will generate shade for the smaller ones.

Basil, Chives, Dill, Oregano, Rosemary, Tarragon, and Thyme prefer full sun, while Chervil, Lemon Balm, and Mint prefer partial shade in your herb garden.

Water newly planted herbs regularly but once they are established, most are naturally drought resistant. Watering and drainage goes hand in hand. Rather give your herbs too little than too much water. After a good soaking, allow the water to drain away and the soil to dry out slightly. Water again when the top 1″ or so of soil is dry to the touch.

During the growing season fertilize about once a month with a weak solution of fish emulsion. Compost 4 times a year (at the beginning of each season, will also provide the plants with the nutrients they need.  Don’t fertilize dormant plants, such as tarragon, some thyme and sometimes chives, just add a little compost around them and wait for them to wake up in the spring.

If you over feed your herbs and make them happy and beautiful they may lack some flavor. Hold back a little water and a little fertilizer to help concentrate the oils in the leaves thus increasing their flavor, aroma and medicinal value.

Pruning is essential to encourage healthy, bushy growth. Remove dead leaves and flowers on a regular basis. Should you frequently use your herbs, pruning may not be necessary, as you would be pruning automatically.

Be sure to let some of your herbs flower and ‘go to seed’, it will encourage good bugs, butterflies and hummingbirds into the garden.


Leave a comment
Share
  • Pin it
  • Share
  • Tweet
  • Share
  • Email

Fall Gardening & Cooking

9 / 18 / 20


Even though it still feels like summer (technically it is) fall will be upon us soon. Fall is the best gardening season in Southern California; the ground is still warm enough to germinate seeds quickly yet cool enough at night as not to kill the delicate plants. If you want to start a small kitchen garden now is the time. Here are some easy plants to grow with a little information on how to get them started. If you’d like more information just send me an email, [email protected] 

Vegetables for  Fall into Winter & Spring
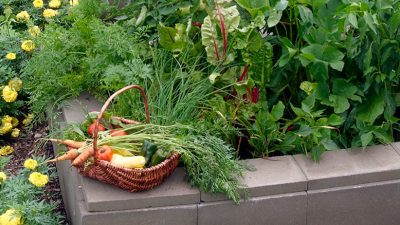
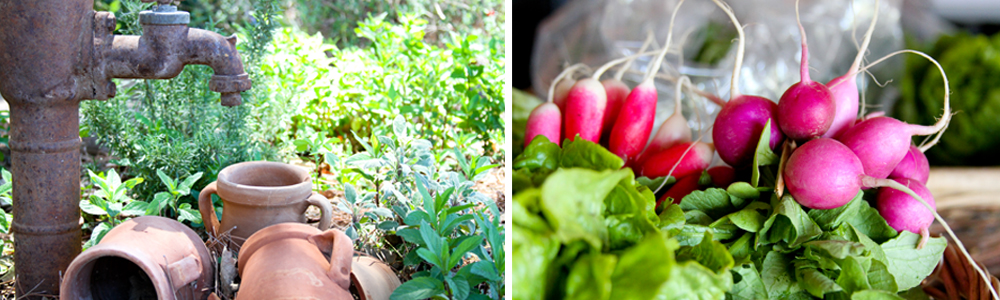
Carrots and Radish

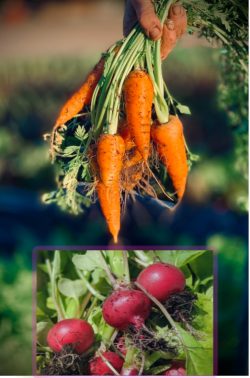
Grow carrots and radish in cool weather, that means fall through spring in Southern California. Succession plant carrots and radish every couple of weeks for continual harvest. They both like full sun to light shade and very, very loose soil. Rocks and clumps will cause the carrot to deform.

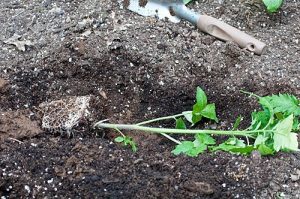
Carrots and radish grow well in containers as well. The seeds are very small, plant them about one-quarter inch deep. Carrots do best if direct seeded in the garden, but I’ve grown them in peat pots that you can just plop right into the garden after they sprout. This gives me more control to germinate the seeds which like to be moist, (not wet) and it’ll take up to 15 days for them to sprout.

After you’ve planted the carrots, plant the radish see directly around the carrot. The radish will help keep the soil loose around the top part of the carrot. Radishes grow quickly and will sprout in about 3 or 4 days and can be pulled in about 4 weeks.

Thinning: If too many plants come up in the planting bed don’t pull out the extra, cut it off so as not to disturb the plant next to it. If starting in pots to transfer to the garden be sure to break off the bottom of the pot so the carrot can grow straight otherwise when the root hits the bottom on the peat pot it may become deformed.

Beets


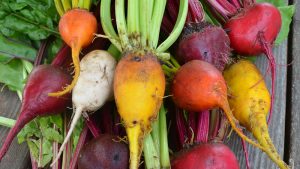
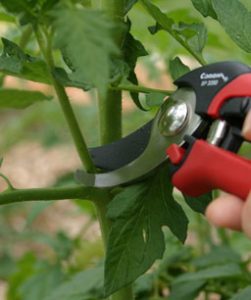
Beets are one of the easiest vegetables to grow. They’re almost never troubled by pests or disease. They don’t need staking, pruning or fussing. Just sow the seeds and you’ll have beets in about 6-8 weeks.

Plant seeds directly into the garden with loose friable soil. Each beet seed is actually a cluster of several seeds so you may need to thin the plants so as not to crowd each other out in the bed. To thin them just cut the top off of the weakest seedling and move on.Keep the soil moist until the beets germinate and plant in full sun. Beets will actually grow veery well over winter, they don’t mind the cold.

Harvest beets when they are small for the sweetest flavor, baby beets should be about 2” in diameter. You can let them continue to grow if you prefer bigger ones. There are many different kinds and colors of beets so try something unusual this year. Don’t forget the tops are edible as well! Salads and stir fried are just a couple of ways to prepare them. Treat them like you would cook or prepare spinach.
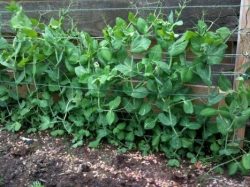
Peas

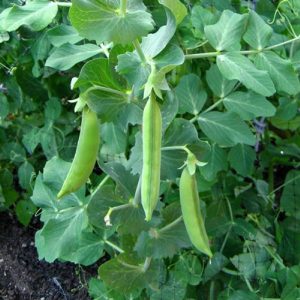
Snap peas are eaten whole, and both the crunchy pod and the peas inside taste sweet. Snap peas yield more food per square foot than the other types.

Snow peas produce tender, flat pods that are eaten whole. Snow peas also produce the most tender vine tips for adding to salads or stir-fries.

Shell peas are often called English peas, because many varieties were developed in Great Britain in the 18th century. Sweet green peas are shelled from tough, inedible pods.

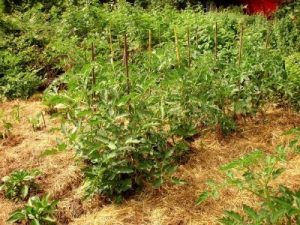
Pre-soak seeds overnight in warm water to soften the seed coat. Peas like moist but not wet soil. I like to start them in Sept. and then plant out in the beds when it’s a little cooler, about the end of Oct. I succession plant them by starting new seeds mid Nov. and then again early spring, this means I’ll have peas all the way up to early summer next year.

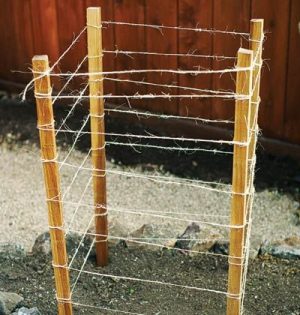
Provide a trellis for your peas, check your seed package to determine the height that they will grow. Some are actually ‘bush’ type peas. Peas can be grown in containers, but your yield may be little smaller.

Spinach


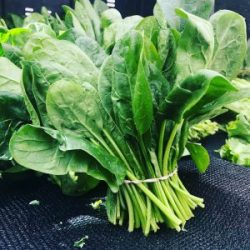
 Spinach is easy to grow during the cooler months of the year; it doesn’t like hot weather so you can enjoy it from fall to early summer in most parts of Southern California.

Spinach prefers a well-drained loose soil and plenty of nitrogen.

Start spinach indoors or direct seed in the garden as soon as the weather cools down. Start seeds early Oct and in about 3 weeks the transplants will be ready for the garden. If you direct seed wait till mid Oct. to plant unless you’re on the coast, then plant around the first of Oct.

Spinach will grow quickly and can be harvested at almost any stage. Succession plant it every 3 weeks for a continual harvest through early summer. You can harvest it when they leaves are the size you like. You can harvest it in the ‘cut and come again’ method, meaning pick the older, outer leaves first and let the inside grow a little more. You can try cutting the entire top off and it may re sprout with new baby leaves. Spinach is veery easy to grow and full of vitamins.

Do you need help with your garden? Virtual consultations are available, get in touch!

Ask Debbi


Leave a comment
Share
  • Pin it
  • Share
  • Tweet
  • Share
  • Email

Fall/Winter Vegetable Gardening

9 / 26 / 19

Vegetables to plant in our

So. California gardens now


Beets

Be sure to thin plants to about 3″ apart and harvest when they are small for a sweet flavor. Leaves and stems are edible, steam lightly or add to a salad.
To cook, place in a piece of foil, drizzle with olive oil and salt and pepper. Roast in a 450° oven for about 10-15 min. or until tender. Rub skin off with a towel

 Broccoli/Cauliflower

Buy transplants in the fall and bury the stem up above second row of leaves. Try roasting these vegetables in a 450° oven. Place cut up pieces on a parchment lined baking sheet, toss with a little olive oil, salt and pepper and any other seasoning you may like (red pepper flakes, garlic powder, lemon juice. Roast for 10 -15 minutes or until tender.

Cabbage

Cabbage is in the same family as broccoli and cauliflower. Homemade sauerkraut is the best! Cut out the fore of the cabbage and thinly slice the leaves into shreds. Place in a large bowl, add 1 1/2 Tb. kosher or canning salt and knead or massage the salt into the cabbage until it releases it’s liquid. Pack into a quart jar with a wide mouth and pour all liquid over the cabbage. Make a brine of 1 cup water and 1 Tb. kosher salt, stir to dissolve salt and then pour it all into a quart freezer bag, place this on top on the cabbage and place a piece of cheesecloth over the mouth of the jar, tie down with string or a rubber band and place in a cool, dark place on your counter. The second day, remove bag and press down on the cabbage to see if it will release more moisture. It should ideally cover the cabbage, if it doesn’t add more brine by either adding the ingredients in the freezer bag or make a new brine by stirring together 1 cup water and 1 tea. kosher salt. cover the cabbage and let stand for 3 -10 days. Begin tasting sauerkraut on the 3rd day, when it reaches the flavor you want, place a cap on the jar and store in your refrigerator.

Carrots

Make sure you have nice loose soil so the carrots can grow long and deep. Thin them when they sprout to give them room to grow, add the thinnings to your salad, soup or stew. Slow roast carrots as you would the broccoli or cauliflower. Drizzle with honey after roasting.

Leafy Greens

Lettuces, spinach, chard, mustard and kale all grow very well over the winter but plant at 2 -3 week intervals for a staggered supply of greens instead of harvesting all at once. Many greens can be lightly sautéed or eaten raw.

Onions & Garlic

Plant onions from ‘starts’ rather than from seeds. Pick short day varieties for best harvest. Scallions that are succession planted can be harvested over the winter/spring season.
Plant garlic from bulbs, plant pointed end up and cut off any green that is sprouting from the top.

Peas

Fall & Spring harvested peas are sweet and easy to grow. Plant a variety from English peas or shelling peas to sugar snap peas. Give them a trellis or cage to grown on and harvest daily for a continued harvest.
Peas and pea pods are lovely lightly steamed or even raw.

You can still plant sweet peas this month for spring flowering

Leave a comment
Share
  • Pin it
  • Share
  • Tweet
  • Share
  • Email

Lettuce Varieties

11 / 29 / 18


Are you hankering for some romaine lettuce? Well, there are tons of alternatives here in So. Cal for you. From the CDC website here’s what they are saying about the current outbreak of e coli on romaine lettuce.

‘Based on new information, CDC is narrowing its warning to consumers. CDC is advising that U.S. consumers not eat and retailers and restaurants not serve or sell any romaine lettuce harvested from the Central Coastal growing regions of northern and central California. If you do not know where the romaine is from, do not eat it.’
Here’s the link for more information, CDC.

Personally, I like a mix of lettuce mostly, a little crunch, a little color and a tangy dressing. My favorite is a good old Italian dressing made with a very good red wine vinegar. I love a little cheese as well, blue, parmesan or goat goes well with a tangy Italian dressing.

Just mix a little Dijon mustard, like Maille, with your red wine vinegar, add a little minced shallot, some fresh ground Italian spices and whisk in a little olive oil, season with salt and pepper and you’re done.
Local lettuce varieties are usually more plentiful during the winter as most lettuce prefers to grow in the cooler weather. Here are some varieties that will offer no only color but flavor to your salad bowl.

Choose lettuce that is bright with no brown edges or spots. Try and get them not too wet, if they are wet, they have a tendency to go bad faster. Pick whole heads of lettuce rather than bagged lettuce. The more lettuce is handled from field to bag the greater chance it can pick up any bacteria. Bagged lettuce can also be washed with chlorinated water and tends to be older than a non-bagged lettuce. Are you tempted to buy the bag that says triple washed and leave it at that? That lettuce may be contaminated with more than just chlorinated water and if it’s wet at all it will likely rot within a couple of days in that bag. Buy un-bagged lettuce, wash and dry well before storing. You might notice that if you purchase your lettuce at a farmers market that it lasts longer than a store bought lettuce, it’s because your farmers market lettuce was probably picked within a couple of days. I’ve had lettuce last up to 2 weeks from my farmers markets. So here are just some of the lettuce types you should be able to pick up anywhere.

Arugula (Rocket)-spicy and peppery, the larger the leaves the more bite it will have

Batavia is a loose-leaf lettuce similar to red or green leaf lettuce with a mild flavor

Belgian Endive-these can be a tad bitter, but they will add crunch to any salad mix

Butter-a very mild lettuce with big cupped leaves, great for serving topped with a crab salad

Frisee (Curly Endive)-Sometimes called chicory, the leaves are thin and curly with a little bit of a bite, aka peppery.

Iceberg-A dense head of lettuce with lots of crunch but little flavor

Leaf Lettuce, Red or Green-Another loose leaf lettuce with mild flavor but both add a lot of color to a salad bowl, great on sandwiches as well.

Little Gem-This lettuce looks like a mini version of romaine but it’s not as crunchy, mild flavor

Oakleaf-Another beautiful bi-colored loose-leaf lettuce that has a mild taste

Radicchio-There are numerous colors of radicchio, most have a little bitterness but a great addition to any salad.

Spring Mix-Usually a variety of small lettuces, some are mild, and some mixes can be spicy.

Watercress – Although probably a little difficult to find it makes a nice addition to a mixed salad or added to a rustic piece of bread slathered with some soft cheese. It has a peppery bit, much like Arugula. Use smaller leaves for less intense flavor.

Leave a comment
Share
  • Pin it
  • Share
  • Tweet
  • Share
  • Email

Alpine Strawberries

1 / 24 / 18

You’ll never have enough Alpine Strawberries, also called fraises des bois, to make a pie but they are so delicious with a scoop of vanilla ice cream or with a creamy panna cotta. I love them with my cereal in the morning fresh from the garden. Best grown in containers, in my opinion, they are small plants that will do well in partial shade or full sun. Mostly without runners I grow from transplants instead of seeds. I just never had any luck starting the tiny seeds. Alpine strawberries are related to wood (wild) strawberries and can be red or white with delicate white flowers. I think the red taste like perfume and the white are reminiscent of pineapple.

They like well-drained soil, rich in organic matter so that they drain well.  I amend my soil every fall and feed regularly with an organic fertilizer. Be careful not to cover the crown of the plant and keep the leaves off the soil. You can plant these much closer together than a bigger strawberry as the plants are small and grow slowly. Here in So. California my alpine strawberries start fruiting in Jan and finish up late fall. They do stop producing in summer if it gets too hot and sometimes I’ll move the pots to partial shade where they get morning sun. Other than protecting the delicate fruit from the birds, alpine strawberries are easy to grow and are pretty little plants in pots near my front door.

French Yogurt Cake

Save
Print

I love this bright lemony cake so much I adapted it slightly from Dorie Greenspan by adding these super sweet little strawberries, Alpine strawberries.

  • 1 1/2   cup all-purpose flour
  • 2         teaspoons baking powder
  •            Pinch of salt
  • 1         cup sugar
  • 1         lemon, grated and zest
  • 1/2      cup plain yogurt
  • 3         eggs
  • 1/4      teaspoon pure vanilla extract
  • 1/2      cup citrus olive oil
  • 1         cup Alpine strawberries, whole or halved

Center a rack in the oven and preheat the oven to 350 degrees F. Generously butter an 8 1/2-x-41/2-inch loaf pan and place the pan on a baking sheet.

Whisk together the flour, baking powder and salt.

Put the sugar and zest in a medium bowl and, with your fingertips, rub the zest into the sugar until the sugar is moist and aromatic.

Add the yogurt, eggs and vanilla and whisking vigorously until the mixture is very well blended.

Still whisking, add the dry ingredients, then switch to a large rubber spatula and fold in the oil and then the strawberries. You'll have a thick, smooth batter with a slight sheen. Scrape the batter into the pan and smooth the top.

Bake for 50 to 55 minutes, or until the cake begins to come away from the sides of the pan; it should be golden brown and a thin knife inserted into the center will come out clean. Transfer the pan to a rack and cool for 5 minutes, then run a blunt knife between the cake and the sides of the pan. Unmold, and cool to room temperature right side up on the rack.

Glaze (optional)

½ cup lemon marmalade mixed with 1 teaspoon water

To Make the Glaze:

Put the marmalade in a small saucepan or in a microwave-safe bowl, stir in the teaspoon of the water and heat until the jelly is hot and liquefied. Using a pastry brush, gently brush the cake with the glaze.

Leave a comment
Share
  • Pin it
  • Share
  • Tweet
  • Share
  • Email

Tips on Growing Tomatoes

3 / 16 / 17

How To Grow Great Tomato Plants


Buy transplants

Purchase healthy, stocky plants that have no flowers, fruits or buds

Choose a sunny location, rotate planting beds every year

Plant in an area where you may have grown peas or beans the previous year

Add compost to the soil and make sure the soil isn’t compacted.


Succession plant

Choose an early variety that can be planted in early spring. I like to plant my main crop in April and then another couple of plants in July for fall harvest. Check Sunset Gardening Guide for the best time in your area to plant.

Depending on how you’re going to stake or cage tomatoes, have all the equipment ready for planting day, stake the plants at the same time you transplant.


Planting

When planting remove lower leaves and plant the tomato deep, so that only about 3” are above ground. Tomato plants have the ability to grow roots from the buried stem. Water well after planting. Water well and deep but infrequently, keep your watering consistent, tomatoes need about 1” water a week.

Fertilize

Don’t over fertilize your tomato plants. Use a high phosphorus content fertilizer such as Dr. Earth Organic Tomato/Vegetable Fertilizer, 5-7-3. A high nitrogen content will give you lots of green leaves but little fruit.

Pinch branches out

I always pinch out side shoots in the beginning to help the plant grow tall rather than gangly.

Mulch and Companion Planting

Tomatoes love carrots; basil and marigolds so plant them in the same bed and mulch the rest of the soil to keep the moisture in.


Leave a comment
Share
  • Pin it
  • Share
  • Tweet
  • Share
  • Email

How To Grow Amaryllis & Paperwhite Bulbs

10 / 20 / 16

amaryllis-potted-2

I love growing Narcissus (Paperwhites) in the spring and in the fall/early winter. If you stagger planting these bulbs you can have continuous blooms from now all through the holidays. Narcissus and Amaryllis both grow well in soil or in a vase or shallow bowl with no soil at all. I love taking amaryllis bulbs to anyone that I visit during the holidays; you can even find bulb kits at the nursery or almost any store this time of year.

Unlike most bulbs these two don’t need to be chilled before planting, they love our warm climate (even if sometimes we don’t!). If you want continuous blooms buy a dozen or so bulbs and store some in a cool dark place and ‘plant’ every few weeks through late winter. Amaryllis will bloom 6 – 8 weeks after planting and Paperwhites 3-5 weeks after planting.

To plant in soil make sure the container is about 5”- 6” deep, plant the Paperwhite bulbs, with the root end down so that the tops peek above the soil surface. You can plant 5 bulbs in this pot and space them a little apart from each other. Water until the soil is damp but not soggy or the bulbs will rot, water occasionally until they bloom then water regularly but do not overwater. Some Paperwhites are very tall and need support to keep from falling over. Plant one Amaryllis bulb in the same size pot with the tip about one-third above the soil. Amaryllis can be encouraged to bloom again next year if planted in soil, cut off the old bloom to about 1” above the bulb, water and feed regularly and let the leaves grow throughout the year. In late summer stop watering and let the leaves dies back naturally as they start to store energy for the next season. You can dig up the bulb or leave in the pot and place into a cool, dark place for about 8 weeks. You can repot in fresh soil or add a little finished compost to it, bring it back into a light area, water infrequently until you see growth and then repeat the process. Paperwhites won’t usually bloom again so buy new bulbs each year.

To plant in gravel or stones place a layer of stones or gravel over the bottom of a vase to a depth of 2-4” for the Amaryllis or paperwhites and place the bulb or bulbs on top of the stones, fill the vase with more stones up to the top third of the bulb and add water up to 1” below the base of the bulb, do not let the bulb sit in water or it will rot. Add water as needed but keep the level below the base of the bulb. Be sure to use a vase or jar that is tall enough so that it won’t tip over as the flower shoots grow.

Buy some ‘kits’ as hostess gifts for the holidays and store in a cool, dark place until you need them. (Don’t forget where you stash them though!)

paperwhites-potted

Leave a comment
Share
  • Pin it
  • Share
  • Tweet
  • Share
  • Email

What to do in your Spring Garden

3 / 31 / 15

April in the Garden

Coming Soon....

Chef Debbi will be presenting a seminar, ‘Al Fresco Mothers Day Brunch’, at the South Coast Plaza Garden Show on Sat. April 25th, 12:30 in the Mitchell Gold & Bob Williams home store. Chef will be talking about spring vegetables, edible flowers and demonstrating a ‘Microgreen and Baby Lettuce Salad with Spring Vegetables, Edible Flowers and a Pomegranate Vinaigrette’ and serving that along with a Seasonal Asparagus and Goat Cheese Tart

The seminar is free but seating is limited.

What To Do in The Spring Garden in So. California

Last Chances:

You can get another crop of spring vegetables, peas (in cooler climates), asparagus, spinach, lettuce and last chance to plant artichokes from seedlings.

Spring Potatoes
Plant from certified organic ‘seeds’.

Spring and Early Summer

Tomatoes
Plant early season, cherry, heirloom & indeterminate varieties
Choose plants that are stocky with a thick stem, about the size of a pencil. Don’t choose plants with flowers or fruit on it, your tomato plant needs to develop strong, deep roots before starting to flower. Remove lower leaves and plant the seedling up to the first two set of leaves. All those furry little things on the side of the stem will turn into roots for you.
Companion plants to tomatoes are carrots, basil, lettuce and parsley.

Beans
All kinds of beans! Bush, pole and dried beans for winter soups and stews.
Companion plants to beans are corn, potatoes, radish and carrots.
Corn
Plant pole beans at the base of the corn and squash around the beans.

Beets, Turnips, Carrots and Radish
All grow underground in loose soil and can be grown in less sunny areas of the garden.

Peppers
All kinds of peppers can go in the ground, planting companions are spinach, basil and tomatoes.

Zucchini
Early squash can be planted but hold off on pumpkins until June if you want them for the fall holidays.

Herbs
Cilantro, Basil, Thyme, Dill, Fennel, Chives and most herbs will do well now.

Watch out for runners and re-seeders such as mint, oregano, borage, lemon verbena and pineapple sage for a few.

Now is a good time to amend your soil for the long summer growing season.

Bon Appetit!

Seminar is sponsored by 1logo 2004
Leave a comment
Share
  • Pin it
  • Share
  • Tweet
  • Share
  • Email

Why You Should Grow Your Own Organic Potatoes

2 / 17 / 15

The Potato: One of EWG’s Dirty Dozen

russet potatoes

By: Connie Rosemont (Only Organic)

The potato is a great food – calorie-dense and rich in nutrients like vitamin B6, vitamin C, potassium and manganese. It is America’s largest vegetable crop: the average American consumes 29 pounds of French fries a year and 142 pounds of potatoes overall.

Alas, the conventional potato tests positive for 35 different pesticides — more pesticides by weight than any other vegetable, according to EWG’s 2014 Dirty Dozen List. Some of these pesticides remain even after peeling and washing. Pesticides found on potatoes by the U.S. Department of Agriculture Pesticide Data Program include:

— Six known or probable carcinogens

— 12 suspected hormone disruptors

— Seven neurotoxins

— Six developmental or reproductive toxins

— Nine honeybee toxins

More potatoes aren’t organic because of production challenges, says Nate Lewis, Crop and Livestock specialist with the Organic Trade Association.

Farmers who raise conventional potatoes take a “kill-down” step just before harvest, spraying their potato fields with an herbicide that kills all the green leafy vegetation. With the leaves gone, the potato goes into a finishing-off process that thickens the skin, rendering it less susceptible to injury and blemishes.

After farmers harvest conventional potatoes, they warehouse them for up to nine months and ship them, as retailers and processing centers need them. Conventional producers apply post-harvest fungicides and sprouting inhibitors during storage to retard the spread of small blemishes and bad spots from one potato. Not surprisingly, these pesticides applied during storage show up most frequently on residue tests.

Organic standards enforced by the USDA bar organic farmers from using most field and storage pesticides. Organic farmers must work harder to store their potatoes for months without fungicides and sprout inhibitors. As a result, they face significantly larger hurdles than conventional producers in large-scale potato farming.

The hurdles of raising storage crops organically on a large scale might consign organic potatoes always to a small niche market. However, buying organic potatoes means that those farmers who decide to try organic potatoes will find a market for their efforts.


Leave a comment
Share
  • Pin it
  • Share
  • Tweet
  • Share
  • Email

Growing Potatoes in Your Edible Garden

2 / 17 / 152 / 17 / 15

How To Grow Potatoes:
by Dan Lake, Peaceful Valley employee

potato-blossom-470x419

Since I was 12 years old, my family has grown about 4 or 5 different varieties of potatoes in our garden at home every year.  I would love to brag about my tater planting abilities, and with all of that experience one would think that I was a spud-growing expert, but after reflecting on what I knew, I came to a different conclusion: I devoted most of my time to harvesting and eating the delicious potatoes and have a lot to learn about the process of planting them!

Now that I have my own garden, I’ve done some research, talked to a friend who happens to be a farmer, and compiled some good tips below.

Crop Rotation: When planting potatoes from season to season, they should be kept on a 3-year rotating cycle in terms of location in your garden. This means,  3-4 suitable sites are needed if you want to grow potatoes every year, rotating the site where you plant every season.

Soil & Sun: When it comes to soil, potatoes are not picky. They are adaptable and will usually produce a decent crop even when the soil conditions are less than perfect. What they do require, however, is as much sun as possible because of how aggressive their root systems are, so keep that in mind when picking your spot(s) to plant.

Preparing Seed Potatoes: When you have your seed potatoes (potatoes certified for growing), set them somewhere where they will be exposed to light and warmth (between 60 and 70F). This will help them to start sprouting. A day or two before planting, use a clean knife to slice the larger potatoes into smaller pieces that contain at least 1 or 2 “eyes” or buds. Each seed should be approximately 1 1/2-2 inches square, and the smaller potatoes may be planted whole. In the next day or so, your seed potato pieces will form thick calluses over the cuts, to help prevent it from rotting once planted.

Planting Seed Potatoes: After you have trenched a 4’” deep furrow, plant the seed potato pieces or small potatoes 4” deep in the furrow about 12” apart and cover lightly with soil. The soil should be evenly moist, but not wet or soggy. If the soil is water logged when you dig, your seed potatoes will probably rot before they even get started. Depending on how cold it gets in your area, it might be a good idea to put a layer of mulch or straw on top of the furrow for a little extra frost protection. Two to four months later, I hope you will be enjoying some of the most delicious potatoes ever!

You can also reference our Potato Planting & Growing Guide online.

Related Posts Plugin for WordPress, Blogger...
Leave a comment
Share
  • Pin it
  • Share
  • Tweet
  • Share
  • Email

Posts navigation

1 2 Next Page
Deb

Meet Chef Debbi

READ BIO

Join-Us Sign up for our newsletter to receive exclusive tips 'n tricks, and special offers on classes, tours, and more!

Recent Posts

  • New E-Book!
  • From the Pantry
  • Spaghettini at Home
  • Growing Corn
  • Spring IS Coming!

Categories

BookCUT

What's in Your Pantry?

How to stock your pantry to create delicious dishes.

Learn Chef Debbi's pantry essentials and how to substitute ingredients for pantry staples in her basic recipes for quick and easy meals.
BUY BOOK>

FacebookTwitterInstagramGooglepinterest


© 2014, DEB'S KITCHEN
Angie Makes Feminine WordPress Themes