Deb's Kitchen - Farm, Food, Wine & Lifestyle Adventures
  • Facebook
  • Google
  • Twitter
  • Instagram
  • Pinterest
  • Email
Menu
Skip to content
  • Home
  • Blog
  • Events
    • Classes
    • Tours & Adventures
  • Edible Gardening
  • Preserving
  • Recipes
    • Appetizers
    • Soups and Salads
    • Main Dishes
    • Side Dishes
    • Desserts
  • About
    • Whats In Your Pantry
    • Ask Debbi
    • Deb’s Kitchen Botanicals
    • Press
  • Contact

Tag Archives: bbq

Growing Corn

5 / 26 / 23

It’s time to start late spring and summer flowers & veggie’s


Photo: Farmers Almanac


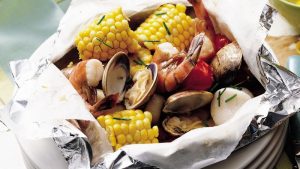
Corn can be fickle, it likes warm weather and the bugs and four-legged critters may eat all of yours before you can get to it. Native Americans planted corn with beans and once the beans sprout they planted squash at the base of the corn. The beans will use the corn stalk as a trellis and the squash leaves will protect the base of the corn which grows very shallow. This is called The Three Sisters or Companion Planting.
Plant corn directly in the garden where it will receive at least 6 hours of sun, water well and help the pollen to reach the tassels. Each tassel that gets pollinated turns into a kernel. To make sure the plant is getting pollinated, shake the tassels so the pollen falls onto them, nature will take it from there. 
The ears are ready to harvest when the silks turn from light yellow to dark brown.

To cook, grill, steam or pop in the microwave. Leave the husk on the corn if you microwave and cook on high for 3 minutes (for two ears), add an extra minute with more ears. Let them slightly cool and peel the husk and silk off the corn.

NOW Booking for Vegetable & Flower Garden consult & Design

[email protected]
Leave a comment
Share
  • Pin it
  • Share
  • Tweet
  • Share
  • Email

Farm, Food & Wine Tour 2022

4 / 29 / 225 / 15 / 22


Farm, Food & Wine Tours are Back!!

Join us this fall for our first tour in a few years

Fri, Oct 14th – Sun, Oct 16th

Two Nights at Cambria Pines Lodge

with Hot Buffet Breakfast

Fri Evening

Welcome Dinner

Local Vinegar Tasting & Demo

Sat Tour

Wine Wrangler Tour

Mighty Cap Mushroom Farm

Visit a high end mushroom farm that grows artisanal gourmet mushrooms organically
(above photo is one of their ‘pink’ varieties)

Rangeland Winery

Wine tasting & BBQ lunch
(Local Grass-Fed Burgers)

Jack Creek Cellars 

Wine Tasting

Jack Creek Pumpkin Farm

Sun Tour

Groves on 41 Olive Oil tasting & Demo


Picnic Lunch by Debs Kitchen

Don’t miss the Cambria Scarecrow Contest
Scarecrows displayed all over town!

Elephant Seal Rookery

Walks on the Beach &
Fabulous Sunsets

Make your reservation now, limited occupancy
Not included, travel to and from Cambria
Saturday Evening Dinner

$849.75 per person
$400.00 deposit required
Refund cancellations until Aug. 15th
Click below to make a deposit or venmo me @ debbidubbs

Tour Payments


Leave a comment
Share
  • Pin it
  • Share
  • Tweet
  • Share
  • Email

Summer Pantry

5 / 20 / 20

Summer Pantry

 25 Must Haves for Your Summer Pantry

  1. Anchovies or anchovy paste
  2. BBQ sauce
  3. Canned lump crab meat
  4. Canned Tomatoes, Plum, chopped and Sun Dried
  5. Capers
  6. Chickpeas
  7. Corn and pickle relish
  8. Crackers
  9. Dried or canned beans
  10. A variety of Italian Cured Meats, Prosciutto, Salami etc. (for Sandwiches, Salads, Pizza)
  11. Italian Tuna in olive oil
  12. Marinated Artichoke hearts
  13. Nuts, sunflower seeds (keep in refrigerator-they’ll last longer
  14. Extra Virgin Olive Oil
  15. Oil, Safflower, Sunflower or Peanut
  16. A variety of olives, pitted & not
  17. Pasta and Pizza sauce
  18. Pasta, spaghetti, shells, noodles, orzo
  19. Pickles and Pickled Vegetables
  20. Real Parmigiano Reggiano (wedge)
  21. Roasted Peppers in a jar
  22. Rice, Jasmine, Arborio, Bomba or Iberia (both Spanish rice for Paella)
  23. Salsa
  24. Sardines, in olive oil, mustard or tomato sauce
  25. Variety of vinegars, Rice, Apple Cider (for pickling), balsamic, red wine

It’s hard to narrow down a list to 25 items you must have (or at least these are must’s for me). You can find a full list of pantry must haves including herbs, spices and more in my book ‘What’s In Your Pantry’ available on my site, Debs Kitchen.

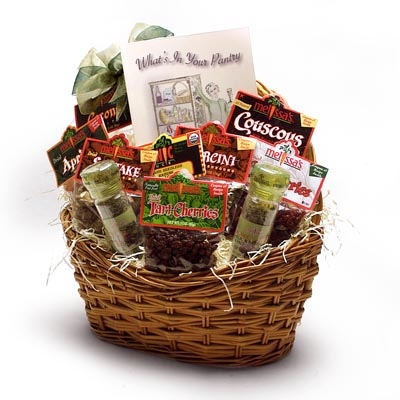
Here’s a gift basket that I designed with Melissa’s Produce full of dried pantry items, fruit, seasonings, mushrooms and more. It also comes with a signed copy of my book, What’s In Your Pantry! Get it here, click on Melissas’s.


Summer Menu

Crab Cakes
(Serve with Roasted Red Pepper Dip
or Tomato Bacon Jam)

Summer Greens with Goat Cheese & Pickled Beets

Orzo Salad with Shrimp

BBQ Chicken Thighs

Mini Crab Cakes

Save
Print

Makes 24 small crab cakes

  • 1 pound lump crab meat 

  • 4 green onions, thinly sliced 

  • 2/3 cup whole wheat bread crumbs 

  • 1 1/2 teaspoons Old Bay seafood seasoning 

  • 1/4 teaspoon ground black pepper 

  • 1 tablespoon Dijon mustard 

  • 1 egg 

  • 2 tablespoons mayonnaise, divided 

  • 1 ½ teaspoons lemon zest
  • 1/4 cup chopped jarred roasted red bell pepper 

  • 2 teaspoons hot sauce 

  • 1 1/2 teaspoons grated lemon zest 

  • 1 tablespoon oil, more if needed

Place crab meat in a large bowl and use your fingers to gently feel for and remove any pieces of shell or cartilage. Add green onions, bread crumbs, seafood seasoning and pepper and toss to combine.

In a small bowl, whisk together mustard, eggs, mayonnaise and lemon zest, pour over the crab mixture. Toss until combined, cover and refrigerate 30 minutes. 


Form the crab mixture into 24 small cakes, each about 1 1/2 inches in diameter. Heat oil in a large nonstick skillet over medium heat. Working in batches, fry cakes until nicely browned and cooked through, about 3 minutes per side. Drain briefly on a paper-towel lined plate and serve.

These freeze well also, freeze in a single layer on a sheet pan and when frozen toss into a freezer bag.


Tomato and Bacon Jam

Save
Print
  • ½ pound bacon
  • 2 pounds tomatoes, chopped
  • 1 yellow sweet onion, diced
  • 1 cup sugar
  • 2 ½ tablespoons apple cider vinegar
  • 1 ½ teaspoon kosher salt
  • ¼ teaspoon pepper
  • 1 dash hot pepper sauce

Render the bacon until browned, place on paper towel lined paper plate.

In a medium saucepan bring to a boil the tomatoes, onion, sugar, vinegar, salt, pepper and splash of hot sauce. Stir occasionally until the sugar dissolved. Using a stick blender, crush the tomato ingredients until chunky. Chop the bacon and add to the tomato mixture, cook over medium heat until thick, about an hour. Taste and adjust seasoning.

Cool before storing in a 1 pint jar. Refrigerate up to a week or freeze up to 2 months.


Roasted Red Bell Pepper Sauce

Save
Print

An easy roasted red pepper dip for any occasion. Quick and easy to prepare; serve with pita bread, cocktail bread or any cracker. Also a great dip for crab cakes

Serving Size: 6

Pomegranate Molasses can be found at Middle Eastern markets. You can omit it if you like, the flavor will be good, just not as rounded.

  • 1 cup walnuts -- toasted
  • 1 slice Italian bread -- torn into pieces
  • 1 cup red peppers -- roasted
  • 2 tablespoons extra virgin olive oil
  • 2 tablespoons pomegranate molasses
  • 1 tablespoon tomato paste
  • 1 teaspoon kosher salt
  • 1 teaspoon ground cumin
  • 1/2 teaspoon Aleppo pepper -- ground or Hungarian paprika
  • 1/2 teaspoon sugar -- optional
  • pita bread -- sliced into wedges

Place all ingredients into a food processor or blender and puree into a

smooth paste, stopping occasionally to scrape down the sides. Refrigerate

if not serving immediately. Let come to room temperature before serving.

Serve with pita wedges.


Pickled Beet, Walnut & Goat Cheese Salad

Save
Print

Servings: 4

  • 4 cups mixed summer greens
  • ½ cup goat cheese, crumbled
  • 1 cup toasted walnuts, broken in pieces
  • 1 recipe Apple Vinaigrette
  • Pickled Beet slices

Toss summer greens with a little of the dressing, just enough to coat. Place onto individual plates and lay beets onto greens, sprinkle the beets with a little dressing and top with crumbled goat cheese and toasted nuts.


Pickled Beets

Save
Print

Makes 1 qt. jar

  • 1 pounds bunched small beets, tops removed*
  • 1 teaspoon whole mustard seeds, divided
  • 1 medium orange slice
  • 1 cup apple vinegar
  • 1 cup water
  • 1 tablespoon kosher salt
  • 1 qt jar with lid, washed and dried

Preheat oven to 400°. Rinse and dry the beets, place in a piece of foil and drizzle with oil. Wrap up and place on a baking sheet. Cook for 30 min. to an hour depending on the size of the beets, or until you can easily pierce them with a paring knife. * Steamed and peeled beets are available usually at Trader Joe’s or always at Melissas.com

Put mustard seeds into the bottom of the jar and add an orange.

Let the beets cool after roasting until you can handle them in your hand. Rub the skin off the beets with a paper towel, remove root and cut the top off.

You can cut the beets however you like, into wedges, slices or half slices, then place into the jar.

Place the vinegar, water, and salt in a large measuring cup or bowl and stir to dissolve the salt. Pour over the beets, leaving a 1/2” space at the top. Slide a table knife down the side of the beets to release any trapped air. Refrigerate for 24 to 48 hours

Storage: Since these beets are not canned, they must be stored in the refrigerator. Refrigerate pickled beets for up to 2 months, but if any off flavors or aromas develop or if fermentation begins, it is best to discard the remaining beets.


Apple Cider Vinaigrette

Save
Print

Serves 6

  • ¼ cup apple cider vinegar
  • 1 tablespoon shallot, finely minced
  • 1 teaspoon Dijon mustard
  • ½ cup olive oil, approximately
  • 1 pinch sugar
  • salt and pepper, to taste

In a medium bowl, whisk together vinegar, shallot and Dijon mustard. Slowly whisk in olive oil and season as needed with sugar, salt and pepper.


Orzo Pasta Salad

Save
Print

Serves 2

  • 1/4 cup vinegar, red wine, white wine or other flavor
  • 1 teaspoon Dijon mustard
  • 1/2 cup olive oil, approximately
  • Salt and pepper
  • 1 teaspoon garlic powder
  • 1/2 cup diced cucumber
  • 1 pint cherry tomatoes, halved or quartered
  • 1/4 cup sliced black olives
  • 1/2 cup crumbled feta, optional
  • 1 1/2cup cooked orzo pasta
  • 1 pound medium cooked shrimp, chilled

For dressing, mix together vinegar, Dijon, salt, pepper, and garlic powder and whisk until it comes together. While continually whisking slowly add olive oil to taste. Set aside.

Mix together remaining ingredients and toss with dressing. Serve cold.


BBQ Chicken Thighs

Save
Print
  • 4-10 small or medium chicken thighs, bone-in, skin-on
  • 2 Tb. oil or as needed
  • 1/2 – 1 cup barbecue sauce

Preheat your gas grill to 400° with the lid closed. When you’re ready to grill, turn grill down to 350°.

Rub the chicken lightly with oil and place skin side down on the grates. Close the lid and cook for about 5 minutes. If the thighs are on the larger side, grill for 7-8 minutes. Do not crowd the chicken on the grate. If you try to turn the chicken and the skin is sticking to the grate, let the chicken cook until it releases. Turn and cook the other side for the same amount of time.

Once preheated, lower the temperature to 350°F. Place

chicken on the grates and close the lid. Grill on one side

for about 7 minutes or until the chicken naturally

releases from the grill.

Move all the pieces to one side of the grill and turn off the burner under the chicken. Brush the skin lightly with BBQ sauce and let cook a further 7-10 minutes with the lid closed. Check with a meat thermometer, you want to cook the chicken until it reaches 165°. Brush chicken with BBQ sauce several times and you can turn the chicken to add BBQ sauce to the other side.

Leave a comment
Share
  • Pin it
  • Share
  • Tweet
  • Share
  • Email

A Simple Meal

7 / 9 / 19

Grilled Prime Ribeye Steak

Last week we had friends over and grilled a Prime Ribeye steak that I had cut off a bone in prime rib roast, the steak was about 3 lbs. and 4″ thick. I had just attended a book signing/demo at Melissa’s Produce with Jamie Purviance and his new book, Weber’s Ultimate Grilling and was eager to try some of his fabulous recipes.

When I brought this book home my husband, Frank,  promptly stole it and put it on his side of the table. After several readings he was excited to try some new ideas that he picked up from the book. He decided to set up our Weber with a ‘hot’ side and a ‘cool’ side and he also wanted to get a little smoke on the steak so to get the ‘smoke’ he placed a chunk of hardwood into a pan, filled it with water and let it soak for an hour or so. Then he placed it on the hot side of the bbq, closed the lid and let it heat up to a smoke point.

I made sure the meat was nice and dry, seasoned it with Himalayan Pink Sea Salt and freshly ground pepper. We grilled it on the hot side of the bbq for about 3 minutes, turning it a quarter turn before flipping it over to the other side and repeating the process. Frank then moved the steak to the cool side and covered the Weber with the lid; we let it smoke until the steak was about 125°, removed it and let it rest for about 10 minutes before slicing it. This ensures the meat will be rare to medium rare when we do cut it; the steak will continue to cook after it’s removed from the heat and it needs the off heat time to let the juices settle back into the meat.

We added some grilled corn and a garden fresh salad with just picked tomatoes, cucumbers & mixed greens. The prime rib was tender, juicy with just a little hint of smoke, a success all around. We’ll definitely be using this method in the future for all cuts of meat and poultry. Thanks for the informative and thoughtful book Jamie!

Leave a comment
Share
  • Pin it
  • Share
  • Tweet
  • Share
  • Email

Memorial Day 2019

5 / 23 / 19

Summer is almost here! Not that you would know that by the weather we’re having. The rain is nice and it makes the garden grow but my other half is craving those warm summer days. Even though here in Southern California we grill all year long, Memorial Day is the official start of grilling season. Whether you grill on gas, charcoal or wood these recipes are easy do ahead recipes for cooking outdoors and picnics. So clean up that grill and set the table because dinner is served! Check out this simple cheese platter, get A Little Book of Cheese to learn all about cheese and how to make a platter!

Summer Pasta Salad

Save
Print

Make this light summer pasta salad recipe a day ahead of time so that it can soak up all the bright, tangy dressing.

  • 1/4 cup red wine vinegar
  • 1 teaspoon Dijon mustard
  • 1/2 cup olive oil, approximately
  • Salt and pepper
  • 1 teaspoon garlic powder
  • 2 teaspoon fresh basil, torn
  • 1/2 cup diced cucumber
  • 1 pint cherry tomatoes, halved or quartered
  • 1/2 cup diced red bell pepper
  • 1/3 cup thinly sliced green onions
  • 1/4 cup sliced black olives
  • 1/2 cup crumbled or diced cheese, mozzarella, chedderella, goat cheese or any you prefer
  • 1 ½ cup cooked pasta, cooked and chilled*

For dressing, mix together vinegar, Dijon, salt, pepper, and garlic powder and whisk until it comes together. While continually whisking slowly add olive oil to taste. Set aside.

Mix together remaining ingredients and toss with dressing. Serve cold.

*Boil the pasta according to package directions, drain and rinse with cold water. When pasta has cooled down a bit, shake off excess water (dry with a towel, if necessary) and toss lightly with olive oil to keep from it sticking together. Refrigerate until ready to toss with dressing. Be sure to cool your pasta before adding the dressing otherwise the pasta will soak it all up.


BBQ Baby Back Ribs

Save
Print

This is quick and easy do ahead baby back ribs. By using your Instant Pot or pressure cooker your ribs will come out nice and tender. Finish off on the grill with your favorite BBQ sauce.

  • 1 slab Baby Back Pork Ribs
  • Sea salt and pepper
  • 1 small yellow onion, roughly chopped
  • 1 celery stalk, large diced, roughly chopped
  • 1 carrot, roughly chopped
  • 1 cup beer (or water)
  • 1 cup BBQ sauce or more

Cut the racks of ribs in to sections that will fit in the pressure cooker and rub with salt and pepper.

Place onion, celery, carrot and beer in the pressure cooking pot. If you’re going to make sauce from the juices in the pressure cooker you can place the ribs directly in the liquid or put the ribs on the rack if you’re going to finish the ribs on the grill or under the broiler with another sauce.

Close and lock the lid of the pressure cooker. Select High Pressure and set the timer for 12 minutes. Press start.

When beep sounds, turn off pressure cooker and use a natural pressure release for 10 minutes and then do a quick pressure release to release any remaining pressure. When valve drops carefully remove lid.

Remove the ribs and cool to room temperature. Once cool, refrigerate until ready to serve.

To finish the ribs:

Preheat the BBQ grill to a medium high heat. Coat one side of the ribs with BBQ sauce and grill 3 minutes. Coat the other side with BBQ sauce flip and grill an additional 3 minutes. Slather on additional BBQ sauce and grill each side for an additional 3 minutes.

You could do the same as above by broiling them until just how you like them.

Serve immediately.

Stuffed Baked Potatoes

Save
Print

The perfect BBQ side dish as they can be made in advance, wrapped in foil and heated on the grill before serving.

  • 2 medium to large russet potatoes, rinsed, dried
  • 1/4 cup sour cream
  • 1/4 cup cheddar cheese, grated
  • 1/4 cup butter, (1/2 stick) room temperature
  • 2 green onions or chives, chopped
  • Sea salt and pepper, to taste
  • 4 tablespoons cooked bacon, crumbled, optional

Preheat oven to 450°. Pierce potatoes with fork. Lightly oil potatoes and

place on oven rack. Bake until cooked through, about 1 hour. If potatoes

starts to crisp and brown up, turn the oven down to 400. Transfer to baking

sheet; cool 5 minutes. Cut potato in half lengthwise. Carefully scoop meat

from the shell and mix with remaining ingredients, mashing lightly as you go. Season and taste before scooping mixture into potato shell.

Can be prepared 1 day ahead, covered and refrigerated. Bring to room temperature before the final cooking stage.

Preheat oven to 400°. Bake potatoes on baking sheet until heated through

and beginning to brown, about 25 minutes. For the grill, wrap each ½ in heavy duty foil, heat on the indirect side of the grill for about 20 minutes or until hot. Garnish with finely minced green onions, chives or crumbled bacon.

Leave a comment
Share
  • Pin it
  • Share
  • Tweet
  • Share
  • Email

Flashback BBQ

4 / 24 / 196 / 16 / 19

This cooking class demo is being held at a private home, everyone’s invited! Address will be given upon paid reservation. North Long Beach area

Saturday, June 22
4:00 – 7:00

$60.00
BYOB

Menu

Chef Debbi’s Pickled Vegetables

Grilled Artichokes with Walt’s Wharf Dip

Sweet ‘n Sour Surf and Turf Kabobs

Cold Green Bean, Tomato and Watermelon Radish Salad

Pineapple Upside Down Cake

Register here for Credit Card


If you prefer to pay by check,

Contact Debbi @ 562-243-3926 or [email protected]  

Leave a comment
Share
  • Pin it
  • Share
  • Tweet
  • Share
  • Email

August Cooking Demo

7 / 16 / 17

Join us for our next cooking demo

Thurs. August 10th & 17th

6:30 – 8:30, approximately

Reservations required (see below)

End of Summer Party

Artichoke Bruschetta

Heirloom Tomato & Asparagus Salad

 Clambake BBQ Foil Packets

With Shrimp, Clams, Sausage, Fresh Corn, Baby Yukon Gold Potatoes in Lemon Herbed Garlic Sauce

Watermelon Sorbet


$45.00

For reservations call

Temecula Olive Oil

(562) 296-5421

Sponsored by

Leave a comment
Share
  • Pin it
  • Share
  • Tweet
  • Share
  • Email

Hawaiian Luau Feast

6 / 4 / 156 / 4 / 15

luau 002

Summer is almost here and if you can’t visit the Islands we can certainly take some of the traditional Hawaiian foods and tweak them to our recipes and summer picnics. Our next cooking class uses many of these ingredients and we show you ways to incorporate them into your backyard parties.

luau 001

While we can’t host a traditional luau in the tasting room we can enjoy a luau type picnic with foods of the Islands. In ancient Hawaii men and women ate their meals separately but in 1819 King Kamehameha removed all religious laws and taboos and men and women began eating together, creating the first luau feast.

luau_party_0

The name luau refers to a dish made with chicken wrapped in taro leaves (luau), and baked in coconut milk; it’s served with slightly salty, smoky Kalua pig (pork). Kalua means ‘the hole’ and refers to the pit (an imu oven) the pig is cooked in. Simply put, the pig is steamed over a long period of time and is similar to a smoky pulled pork dish.

Hawaiian-Luau Fun

We’ll be doing our Kalua pork in a pressure cooker but the flavors will be able to develop while we talk and prepare other side dishes that use traditional Hawaiian ingredients. We might even be able to talk Tammy into a little hula (we know she can)!

Join us in the Temecula Olive Oil Tasting Room, Seal Beach for our fun little Hawaiian party. Learn a little about Hawaiian tradition and a conversation about cooking with pressure cookers!

Click here to see full menu

Our class goes off next week! Thursday, June 11th 6:30 p.m.Make your reservation today!

Luau Sign

For Reservations Call (562) 296-5421


Related Posts Plugin for WordPress, Blogger...
Leave a comment
Share
  • Pin it
  • Share
  • Tweet
  • Share
  • Email
Deb

Meet Chef Debbi

READ BIO

Join-Us Sign up for our newsletter to receive exclusive tips 'n tricks, and special offers on classes, tours, and more!

Recent Posts

  • New E-Book!
  • From the Pantry
  • Spaghettini at Home
  • Growing Corn
  • Spring IS Coming!

Categories

BookCUT

What's in Your Pantry?

How to stock your pantry to create delicious dishes.

Learn Chef Debbi's pantry essentials and how to substitute ingredients for pantry staples in her basic recipes for quick and easy meals.
BUY BOOK>

FacebookTwitterInstagramGooglepinterest


© 2014, DEB'S KITCHEN
Angie Makes Feminine WordPress Themes