Deb's Kitchen - Farm, Food, Wine & Lifestyle Adventures
  • Facebook
  • Google
  • Twitter
  • Instagram
  • Pinterest
  • Email
Menu
Skip to content
  • Home
  • Blog
  • Events
    • Classes
    • Tours & Adventures
  • Edible Gardening
  • Preserving
  • Recipes
    • Appetizers
    • Soups and Salads
    • Main Dishes
    • Side Dishes
    • Desserts
  • About
    • Whats In Your Pantry
    • Ask Debbi
    • Deb’s Kitchen Botanicals
    • Press
  • Contact

Tag Archives: recipes

Osso Buco

1 / 7 / 22


I was in Lazy Acres meat department picking up an order when I notice the beautiful veal shanks in the case. This time of year, I love any kind of braised meat, beef, or chicken and one of my favorites is Osso Bucco. I’m not sure why you don’t see it on restaurant menu’s very often, perhaps the cost of veal would choke you, but you can also make it with beef shanks which aren’t quite as expensive.
Although this dish takes a fair amount of time to cook, hands-on cooking time is very little. Instead of cooking the dish in an oven for up to 3 hours, a slow cooker or maybe even an instant-pot would do.
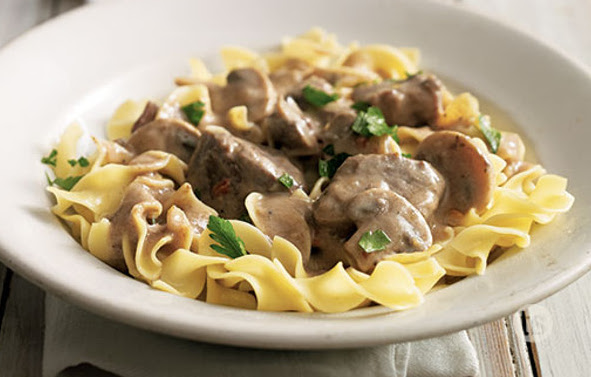
A braise is a dish that used two kinds of cooking techniques, one is searing, and the other is moist heat cooking (in liquid). Wine, broth, and tomatoes are used to ‘stew’ this rather tough cut of meat into fall apart deliciousness. Typically served with Risotto Milanese but you could substitute mashed potatoes or pasta.

6          1-1/4-inch-thick veal (or beef) shanks

Sea salt and freshly ground black pepper

1/2      cup all-purpose flour for dredging

1/4      cup extra-virgin olive oil, reserve 1 tablespoon

1          tablespoon unsalted butter

1          large yellow onion, diced

2          stalks  celery, finely diced

1          medium carrot, diced

1          teaspoon dried oregano

3/4      cup dry white wine

2           tablespoon tomato paste 1

1          28-oz. can Italian plum tomatoes, drained and chopped, juices reserved

1          cup low-salt chicken broth, more if needed

1          large sprig thyme

1          bay leaf

1          Tbs. arrowroot mixed with 2 tsp. broth or water


Preheat the oven to 350°.

Wrap string around the shanks to hold them together.  Put the flour onto a paper plate, Season the shanks with salt and pepper. Dredge the shanks lightly in flour, shake off the excess.

Use a large Le Creuset or the like, one that you can fit all the shanks in laying flat.

Heat pan and add oil, when hot add ½ the shanks and brown well on both sides. Remove and repeat with remaining shanks, set aside.

Pour or scoop excess oil out of the pan leaving the browned bits on the bottom of the pan. Return the pan to medium heat and add the butter and reserved 1 Tbs. of oil.

When the butter is melted, add the onion, celery, carrot, oregano, and 1 tsp. salt. Cook the vegetables, stirring occasionally, until soft and lightly browned and translucent. Add the wine, and increase the heat to medium-high, and cook, scraping up any brown bits with a wooden spoon, until the wine is reduced to about 1/4 cup, about 3 minutes Stir in the tomato paste. Add the tomatoes with their juices, the broth, thyme, bay leaf, 1/2 tsp. salt, and a few grinds of pepper. Add the shanks back to the pan, cover and cook in the oven until tender, 1-1/2 to 2 hours, checking the liquid occasionally.

If it has cooked down, add enough broth to keep the level about halfway up the shanks. To check for doneness, pierce a shank with a fork. The meat should pull apart easily.

Strain the pan juices through a medium-mesh sieve into a saucepan, pressing hard on the solids with a spatula to extract as much sauce as you can. Bring the sauce to a simmer. Whisk in the arrowroot mixture and cook briefly to thicken.

To cook in a slow cooker, after browning the meat and deglazing the pot, add the shanks to a slow cooker and pour all the juices over them. Cover and cook on low heat for 6 to 8 hours.

Recipe edited from Fine Cooking


Leave a comment
Share
  • Pin it
  • Share
  • Tweet
  • Share
  • Email

New Classes 2022

1 / 3 / 22

Happy New Year to all!

Unfortunately, we are still dealing with a pandemic and since infections & hospitalizations are on the rise Cal State Fullerton’s Arboretum has decided not to host indoor classes at this time. We are trying to arrange ‘al fresco’ cooking classes but for comfort (weather-wise) they won’t be offered until a little later in the spring. But we WILL be back, patience for good food!

In the meantime, I’ve been falling back on my other love, Edible Gardening. Most of you know I’ve been gardening for over 20 years. Last year I was asked by a local (Oceanside) college to teach online Zoom classes in vegetable gardening. They are going so well we decided to add more Edible Gardening classes this winter/spring. I will add those to my website when registration is live. I’ve also added extra classes to my own company, Debs Kitchen, classes are 2-2 ½ hours in length with the last half hour dedicated to sharing a recipe. I hope you’ll join me.

Farm Tours Update

YES! Spring tours will be back! Mary & I are in the process of setting up some new, local, So. Cal farm tours & educational seminars & tastings. Send us an email on what you’d like to see, do, taste!

Debs Kitchen Winter Classes

On Line Classes begin Jan 29

Registration is live!  For the moment, all classes will be Zoom classes

Register Here for all Classes

Questions? Send me an email, Debbi

Leave a comment
Share
  • Pin it
  • Share
  • Tweet
  • Share
  • Email

Debs Kitchen Class Registration

1 / 3 / 22

Sign Up for Current Class Schedule

Growing produce from Seeds, Seed Starting Basics

Jan. 29th 11:00-1:00, $30.00


Guest Count


Growing Cut Flowers in Your Vegetable  Garden & How to Use Edible Flowers in Cooking

Feb. 5th 11:00 – 1:30, $40.00


Guest Count


Growing a Spring Salad Garden & Salad Harvest Demo

Feb. 26th 11:00 – 1:30, $40.00


Guest Count


Organic Vegetable Gardening & Cooking Demo

March 26 11:00 – 1:30, $40.00


Guest Count


Leave a comment
Share
  • Pin it
  • Share
  • Tweet
  • Share
  • Email

Clean and Husk (strings and all) Corn on the Cob

9 / 4 / 21


Here’s a simple trick to cleaning up corn on the cob while not quite cooking it all the way. I love corn on the grill but husking it before hand can be a pain trying to get all the strings off.

Cut off the bottom of the cob just above first row of kernels. Place on microwave-safe plate, cover with a damp paper towel and microwave on full power for 30 to 60 seconds. (If you want to fully cook the corn, microwave for 4 min. per cob)

Remove from microwave and using a hot pad or cloth pinch and squeeze the top of the husk to push out the whole corn. It should slip out fairly easy.

Proceed to cooking it in the manner you like.


Leave a comment
Share
  • Pin it
  • Share
  • Tweet
  • Share
  • Email

Marinated Cucumber and Tomato Salad

9 / 2 / 21


Marinated Cucumber and Tomato Salad

Save
Print
  • 3 medium cucumbers, peeled and sliced ¼ inch thick
  • 1-2 large tomatoes, cut into wedges
  • 1 medium red onion, sliced and separated into rings, optional
  • ½ cup red wine or pomegranate vinegar
  • ¼ cup sugar
  • 1 cup water
  • ¼ cup oil
  • Sea salt and fresh ground pepper

Combine ingredients in a large bowl and mix well. Refrigerate at least 2 hours before serving so the flavors have a chance to blend.

Leave a comment
Share
  • Pin it
  • Share
  • Tweet
  • Share
  • Email

It’s Asparagus & Artichoke Season

4 / 24 / 21


A few things to know about asparagus now that it’s in season. Buy organic, fresh, California grown asparagus for the most nutritious and best tasting.

Asparagus is dioecious, meaning that it has separate male and female plants. The female plants make berries, containing seeds. The male plants just make flowers, containing pollen. But both of them produce spears.

Scott Walker, president of the world’s biggest asparagus seed company (Walker Brothers, of Pittsgrove, N.J.), says that he’s heard that on really hot days, asparagus can grow an inch per hour. But he’s never actually measured them. During harvest season, farmers struggle to stay ahead of the growing spears. Each field has to be harvested every day, and sometimes even twice a day.

After about six or eight weeks, farmers stop harvesting and let them grow wild. The plant needs to grow into a fern to capture energy from the sun and store it in the root for the next growing season.

After harvest, asparagus loses quality very rapidly––the sugar content declines and the amount of fibrous material increases. Use spears with compact heads; those with loose heads are fibrous and do not keep well.

There are 3 types of asparagus, green, white (which is blanched by covering the stalks with straw or mulch to keep it from turning green) and there is a purple variety.

Green asparagus is a bit grassy in flavor, while white asparagus is mild and slightly bitter. Purple asparagus is a bit nuttier and sweeter because it has about 20 percent more sugar in its stalks. Purple asparagus is a bit nuttier and sweeter because it has about 20 percent more sugar in its stalks. While the stalks are purple on the outside, the interior is the same green spear. The outside may appear a little purple-greenish when cooked. Blanch this and use it in salads.

How to buy asparagus; look for bright, green, evenly colored spears with tight buds. You can store asparagus standing up in a glass with a little water in the refrigerator, I like to use them within a few days. If the stalks are a little thick you might want to peel them down up a bit so they’re not so fibrous.

Cook asparagus by blanching, steaming, roasting or grilling. Here are a few of my favorite ways to serve asparagus.

Asparagus Casear Salad recipe

Asparagus Gratin recipe

Spring Artichokes

Read all about artichokes, how to choose and store them.

Artichoke Info & Recipes, click here


Leave a comment
Share
  • Pin it
  • Share
  • Tweet
  • Share
  • Email

Caesar Salad with Spring Asparagus

4 / 23 / 21


Caesar Salad with Spring Asparagus

Save
Print
  • 2 bunches pencil-thin asparagus, trimmed and chopped into 1/2-inch pieces
  • 1 tablespoon mayonnaise
  • 1 ½ tablespoons red wine vinegar
  • 2 tablespoons freshly squeezed lemon juice
  • 1 garlic clove, minced
  • 1 teaspoon Dijon mustard
  • 1 teaspoon Worcestershire sauce
  • 1 teaspoon anchovy paste (or 1 anchovy filet)
  • 6 tablespoons extra virgin olive oil
  • Sea salt and freshly ground black pepper
  • 1/2 cup freshly grated Parmigiano-Reggiano
  • 1 head romaine hearts, chopped

Prepare a large bowl with ice and cold water, set aside to blanch the asparagus.

Bring a saucepan big enough to hold the asparagus to a boil, add a heaping tablespoon of salt and plunge the asparagus into the water, boil for 2 minutes. Drain the asparagus and put into the water bath until cooled, drain and set aside on a baking sheet covered with paper towels.

Combine mayonnaise, vinegar, lemon juice, garlic, Dijon mustard, Worcestershire sauce, and anchovy paste in a medium bowl and whisk until combined. While whisking constantly, add the olive oil in a thin, steady stream until incorporated. Season to taste with salt and pepper.

Toss the romaine with a little of the dressing. Transfer to a serving platter and top with asparagus and the grated Parmigiano-Reggiano. Serve extra dressing on the side.

Leave a comment
Share
  • Pin it
  • Share
  • Tweet
  • Share
  • Email

Naturally Dyed Easter Eggs

4 / 2 / 21

Instant Pot or Stove Top, your choice. Be creative and enjoy this really fun project!

To Make the Dye

 Directions are for each individual dye.  if making more than one color, rinse the pot thoroughly between each batch to prevent mixing colors

 Purple = 1½ cup shredded red beets

Rust = 7 yellow onion skins

Yellow = 3 tablespoons ground turmeric or cumin

Orange = 3 tablespoons chili powder

Sky Blue = 1½ cups shredded red cabbage

Dark Blue = 2 cups blueberry juice

Green = 2 cups spinach

1 cup red onion skins = lavender or red eggs

1 bag Red Zinger tea = lavender eggs


Stovetop

Bring 2 cups water to a rolling boil.

Add coloring agent.

Reduce heat and simmer for 30 minutes or longer for the deepest color.

Strain liquid into a large mason jar, and allow to cool to room temperature, 2-3 hours.

Stir in 2 tablespoons white vinegar and add 3 or more hard-boiled eggs.

Seal the jar and refrigerate overnight or until the egg is the desired color.

Rub dried eggs with a dab of vegetable oil to give them a shinier finish (optional).

Instant Pot

 Pour 2 cups of water into the Instant pot and add desired dyeing agent.

Secure the lid and turn pressure release knob to a sealed position.  Cook at high pressure for 10 minutes on manual.

When cooking is complete, use a quick release.

Carefully pour through a strainer into a larger bowl, discard dyeing agent.

Pour colored water into a quart size wide mouth mason jar and add 2 tablespoons of vinegar.  Top with a lid and place in fridge.

Let it chill 4 hours or overnight before placing hard boiled eggs in the jar to dye.

Repeat with the other dyeing agents to create more colors.

Dye will keep in the fridge for at least 1 week.

Note: Each jar will hold 4-5 eggs at a time.  The eggs will have white spots where they touch each other, or the jar so lightly rotate the jar a few times while they are in the jar for more even coloring.

 Dye the eggs

Gently place the eggs into the dye and allow them to sit in the dye for at least an hour or overnight in the refrigerator, depending on how dark you want them. I put them in quart jars, they can hold about 4 eggs each.

When they have achieved the color you want, use a slotted spoon to gently lift them from the jar.

While they are wet, the color will come off if you rub on it too hard.  Place on a cooling rack in the fridge to dry completely.  This will set the dye, so it won’t rub off.

Once dry, store in an egg carton or other sealed container.

Repeat with more eggs if desired.


* How to hard boil eggs

Instant Pot

                        Place 1 cup of COLD water in the inner pot of Instant Pot for a 6 quart                                instant pot and 1.5 cups COLD water for an 8-quart Instant pot.

                        Place rack into pot and carefully set as many eggs as desired on the rack.

                        Let the pressure release naturally for 5 minutes. Then do a quick release                                  and remove eggs from Instant Pot and place in ice water bath.

                        Let eggs sit in water bath for 5 minutes.

                        Store in the fridge for up to 7 days unpeeled or peel and use within 3 days.

            Stove Top

Place eggs into a saucepan and cover with cool water. Bring to a boil then                          turn heat off and cover the pan. Set timer for 15 minutes, drain and place                                 eggs in ice bath to cool, then store in refrigerator.

Leave a comment
Share
  • Pin it
  • Share
  • Tweet
  • Share
  • Email

Braised Lamb, Veal or Beef Shanks

4 / 2 / 21

Warm, hearty shanks usually like a long cook in the oven, these are done in an Instant Pot or pressure cooker and take only a few hours. Sauté the shanks and the vegetables and then set the timer, take a nap or have a glass of wine and relax, let the cooker work its magic. A great dish for any special occasion or holiday.


Braised Lamb, Veal or Beef Shanks

Save
Print
  • 5 sprigs of fresh thyme
  • 2 dried bay leaves
  • 4 lamb, veal or beef shanks (make sure they will fit into your pot or have the butcher cut them for
  • you
  • Sea salt and fresh ground pepper
  • 2 - 3 tablespoons sunflower or olive oil
  • 1 medium onion, about the size of your palm cup onion, finely diced
  • 1 garlic clove, minced
  • 3 large stalks celery, finely diced
  • 2 medium carrots finely diced
  • 2 ½ cup dry red wine
  • 2 cups chicken stock
  • 1 large can crushed or peeled and chopped tomatoes
  • 2 tablespoons tomato paste

Place the thyme and bay leaves into a piece of cheesecloth, close by tying the ends of the cheesecloth together. This is your bouquet garni. Set aside.

Set your Instant Pot to sauté and add a little sunflower or olive oil.

Dry the shanks with a cloth or paper towels, season with salt and pepper.

Brown the shanks on all sides, then set aside. Add the onion, garlic, celery and carrots and sauté until the onions start to turn translucent. Add wine, stock tomatoes, tomato paste and bouquet garni. Stir well, snug the shanks into the liquid until they are completely or nearly covered with liquid.

Close and set the vent to seal. Set the Instant Pot to Manual pressure cook high for 50 minutes. Let the pot naturally release pressure, 20 min. or so.

Remove the shanks and set them aside on a plate and keep warm by covering with foil.

Strain the liquid squeezing out as much liquid as possible. Measure liquid and for each cup of liquid, make gravy in the Instant Pot using the following method.

Per 1 cup of liquid:

1 ½ tablespoons of butter or olive oil

1 ½ tablespoons all-purpose flour

Melt butter or oil in the pot on sauté, whisk in flour and let cook, while continuing to whisk until the flour turns slightly browned.

Remove as much fat from the cooking liquid as possible; slowly add the liquid into the flour mixture while whisking. As the liquid begins to thicken add more liquid and whisk until the gravy is thick, taste and season with salt and pepper. If gravy is too thick, add a little stock or water until it’s the consistency you like, it should be on the thinner side for this dish.

Serve atop a good helping of mashed potatoes or polenta.

If you’d like to serve the cooking vegetables, remove bouquet garni and stir the vegetables into the gravy.

Leave a comment
Share
  • Pin it
  • Share
  • Tweet
  • Share
  • Email

Happy Valentines Day

2 / 12 / 21

Here’s a lovely menu for your Valentine~

I saw cool spring asparagus in the market recently and California strawberries are ripe and red and ready to go. This may seem like a daunting menu to make but there are some tricks that can make it a little easier on you as you prepare the menu. Read the recipe all the way through before beginning so that you can lay out your ingredients. The Chocolate-Strawberry Cheesecake Trifle can be made the day ahead. You could lightly steam the asparagus ahead, refrigerate or let it sit at room temperature. While you are searing the steaks, bring a saucepan with a steamer basket to a boil for the crab. Steam the crab and sauté the asparagus while you are making the bearnaise sauce. Everything is hot at the same time and ready to be assembled. Enjoy!


Filet Oscar

Save
Print
  • 2 (2-inch-thick) filets mignons
  • 2 tablespoons olive oil
  • ½ lb. thin fresh asparagus
  • 6 ounces fresh crab meat, room temperature

Preheat the oven to 400°.

Bring steaks to room temperature for about 30 minutes.

Heat a large skillet.

Dry the filets with a paper towel.

Brush the filets lightly all over with the oil. Season both side wells with sea salt and pepper.

When the pan is hot, add the steaks and sear evenly on all sides for about 2 minutes per side or until well browned. If the steaks won’t release from the pan, wait another minute or so and it will release when browned.

Arrange the steaks on a parchment lined baking sheet and place into the oven and cook until 120°, about 10 minutes. Remove from oven and let rest for 5 minutes.

Asparagus and Crab

While the steaks are cooking you can lightly steam the asparagus or cook it in the still hot pan that you cooked the steaks in.

Cut the stems from the asparagus so the spears are all the same length. Lightly toss with a little olive oil and season with salt and pepper. Cook until you can pierce with a knife, about 5 minutes. Let rest until you’re ready to assemble the dish.

Warm the crab in a steamer basket over simmering water for about 5 minutes.

Make the bearnaise sauce at the very last minute.

Assembly:

Place the steaks on two plates, top with asparagus spears, then add the crab and drizzle with sauce.

Bearnaise Sauce

Save
Print

Using an immersion blender and a tall narrow jar to make the sauce rather than in a double boiler makes getting this sauce on your food much easier (and quicker).

  • 3 large egg yolks
  • ¼ teaspoon cayenne pepper
  • ¼ teaspoon sea salt
  • 1 ½ tablespoon lemon juice, plus more to taste
  • 1 ½ tablespoon water
  • 1 ½ sticks unsalted butter
  • 1 tablespoon minced tarragon leaves, preferably fresh

Place egg yolks in a tall narrow container that the blender stick fits in all the way to the base.

Add water, lemon juice, cayenne pepper and salt. Mix to combine.

Melt butter in a small saucepan. Spoon off much of the white as it melts.

With the blender stick on, slowly pour the butter in a thin stream into the eggs over around 45 seconds. Leave any of the white part of the butter that you couldn’t scrape off. (It won’t hurt if some manages to slip in.

Blend for a further 10 seconds, moving the stick up and down.

If too thick, mix in warm tap water 1 teaspoon at a time.

Taste for lemon level, adding a little more if desired, add the tarragon leaves and serve immediately. If you need to reheat do it in a small saucepan and heat slowly, if the sauce starts to separate (break) add a drop of water one at a tie until it comes back together.

Chocolate-Strawberry Cheesecake Trifle

Save
Print
  • 16 ounces cream cheese, softened
  • 2 cups powdered sugar
  • 8 ounces sour cream
  • ½ teaspoon vanilla extract
  • ¼ teaspoon almond extract
  • 1 cup whipped cream + more for garnish
  • 1 angel food cake
  • 2 quarts, fresh strawberries
  • 6 ounces shaved chocolate

In a large bowl, beat cream cheese and powdered sugar until fluffy. Add sour cream, vanilla and almond extract. Fold in whipped cream. Tear the angel food cake into tiny pieces and add to mixture. Set aside. Combine sliced strawberries and sugar until sugar is dissolved. In trifle dish or glass bowl, layer the two mixtures. Finish with fresh strawberries on top. Chill before serving.

Immediately prior to serving, garnish with a dollop of whipped cream and sprinkle with chocolate shavings. Refrigerate for several hours.

Leave a comment
Share
  • Pin it
  • Share
  • Tweet
  • Share
  • Email

Another Superbowl Sunday Party

2 / 3 / 21


Pigs in a Blanket with Everything Bagel Topping

Save
Print
  • 1 package puff pastry
  • 1 package of little smokies or cocktail sausages
  • 1 large egg, beaten with a little water
  • 2 tablespoons everything bagel seasoning

Preheat oven to 400°. Line a baking sheet with parchment paper, or a silpat.

Defrost puff pastry as directed on box. Sprinkle a cutting board with a dusting of flour, place one puff pastry sheet at a time on the cutting board and lightly roll out.

Cut puff pastry into equally sized rectangles for the number of sausages you have. Cut the pastry as wide as you like, leave a little bit of the sausage uncovered or cover the entire sausage.

Roll the sausage in the puff pastry. Place seam side down onto the baking sheet at least once inch apart.

Brush beaten egg/water mixture over the top of each pig in the blanket. Then sprinkle each pig in a blanket with a bit of the everything bagel seasoning blend.

Bake the pigs in a blanket in the preheated oven for about 25 minutes, or until pastry is puffed and golden brown.

Boursin Cheese Dip with Roasted Grapes Crostini

Save
Print
  • 1 ½ cups grapes, approximately (cut in ½)
  • Olive oil
  • Sea salt
  • 2 fresh thyme sprigs
  • Boursin cheese dip
  • 6 oz. Boursin cheese
  • 2 tablespoons heavy cream or milk
  • Good rustic bread, sliced into 1/2-inch thick pieces
  • Olive oil

Preheat oven to 450ºF. Spread grapes onto a sheet pan. Drizzle with olive oil. Sprinkle with salt. Lay thyme leaves over top. Toss all together gently with your hands. Place pan in the oven for 7 to 9 minutes or until grapes just begin to burst.

Mix the Boursin cheese with enough cream to make it slightly soft and runny, set aside.

Meanwhile, heat a grill or grill pan to medium-high. Brush the bread with olive oil. Grill until nice and toasty.

Assemble the open-faced sandwiches: Spread Boursin mix over bread. Top with roasted grapes. Discard thyme sprigs.

Artichoke Bruschetta

Save
Print
  • ½ large jar marinated artichoke hearts -- drained, patted dry, chopped
  • ¼ cup Romano cheese grated
  • ½ shallot -- minced
  • 2 ½ tablespoons mayonnaise
  • ½ clove garlic
  • ½ loaf ciabatta

Place first 3 ingredients in bowl. Mix in enough mayonnaise to form thick

spread.

Preheat broiler. Slice bread in half lengthwise and rub garlic onto bread,

cut into slices. Toast lightly, spread artichoke mixture on bread and

broil until mixture is heated through and begins to brown, about 2

minutes.

Instant Pot Baby Back Ribs

Save
Print
  • 1 rack baby back ribs*
  • 1 onion, rough chopped
  • 1 carrot, rough chopped
  • 1 celery, rough chopped
  • 1 cup broth or water
  • barbecue sauce

Dry the ribs with a paper towel, then remove the thin membrane from the back of the ribs.

Cut ribs cut into 3 bone pieces. Add rough chopped vegetables to the pot and place rack in the bottom of the Instant Pot. Add broth or water and set ribs upright on the rack.

Close lid and select manual pressure and set the timer for 23 minutes. Let the Instant Pot vent for 5 minutes and release the rest of the pressure. Take care of the steam, don’t burn yourself.

Brush with barbecue sauce and broil or grill until slightly charred.

I like to have the butcher cut the ribs down the center to create ‘riblets’.

Crab Stuffed Mushrooms

Save
Print
  • 16 large white mushrooms, brushed with stems and gills removed*
  • Olive oil
  • 8 oz. cooked crab or lobster meat
  • 1/2 cup Panko breadcrumbs, divided
  • 1/3 cup freshly grated parmesan cheese
  • 1/3 cup mayonnaise
  • 4 oz. whipped cream cheese, softened
  • 2 green onions, chopped
  • ¼ cup minced celery
  • 1 tablespoon finely chopped Italian parsley
  • ¼ teaspoon dried oregano
  • Sea salt and fresh ground pepper
  • ½ teaspoon garlic powder
  • ½ tablespoon lemon olive oil

Preheat the oven to 400°. Place a piece of parchment paper on a baking sheet and set aside.

Brush the outside of the mushrooms with a little olive oil and arrange on baking sheet.

In a large bowl combine crab meat, 1/3 cup Panko crumbs, parmesan, mayonnaise, cream cheese, green onions, celery, herbs, salt and pepper.

Stuff each mushroom cap generously with the crab mixture.

Combine oil and remaining Panko crumbs until evenly coated. Sprinkle the panko mixture over the tops of the mushrooms.

Bake until the mushrooms begin to brown, approximately 15 minutes then broil for 2 minutes until golden all over with crispy tops.

Serve immediately.

Choose mushrooms about the size of a half dollar.

Crispy Chicken Wings

Save
Print
  • 4 pounds free-range chicken wings cut into pieces
  • 2-4 Tablespoon sunflower or other oil*
  • Blue Cheese Dip
  • 1 cup crumbled blue cheese softened
  • 1/4 cup sour cream
  • 1/3 cup mayonnaise
  • 1 Tablespoon lemon juice
  • Sea salt and ground black pepper

Preheat oven to 450°.

Line a baking sheet with parchment paper or tin foil and set a heat-proof wire rack on top.

Dry the chicken wings well and transfer them to a large bowl. Toss with a little oil and season with salt and pepper. Place on rack and bake for 30 minutes, turn the wings over and bake until crisp, 20 -30 minutes.

Bake for 30 minutes; flip and continue to cook until crisp and golden brown, (about 20-30 minutes longer), until golden browned and crispy.

Serve wings immediately.

*Note:

You could toss the wings with a little BBQ sauce instead of the oil if you want them with more flavor or spiciness.

Leave a comment
Share
  • Pin it
  • Share
  • Tweet
  • Share
  • Email

Citrus Season!

1 / 19 / 21


Nutritious and healthy we all know that citrus fruits are high in vitamin c which helps your immune system; they are loaded in plant compounds that have various health benefits, including anti-inflammatory and antioxidant effects. They contain B vitamins, potassium, phosphorous, magnesium and copper as well. A versatile fruit they can be made into jams, jellies, drinks and savory or sweet dishes or just eaten out of hand. Try this Roasted Chicken with Lemon and Herbs along with Melissa’s Dutch Yellow Potatoes for a tasty, comforting dinner.

Lemon Herb Roasted Chicken With Dutch Yellow Potatoes®

Save
Print
  • 1 Meyer lemon, zested and juiced
  • 2 tablespoons unsalted butter, softened
  • ½ teaspoon minced fresh thyme
  • Sea Salt and freshly ground pepper
  • 1 large onion, rough chopped
  • 2 small carrots, rough chopped
  • 1 stalk celery, rough chopped
  • 4 sprigs Italian flat leafed parsley
  • 1 bag Melissa’s Dutch Yellow Potatoes®, cut in half
  • ½ cup chicken stock

Preheat the oven to 425° and place the rack in the lower third of the oven.

Mince the lemon zest and mix with the butter and minced thyme.

Rinse and pat the chicken dry. Slide half of the butter mixture under the skin and the rest over the chicken, season with salt and pepper.

Scatter the onion, carrots, celery and parsley over the middle of a roasting pan*. Place the chicken on top of the vegetables and place the potatoes around the chicken.

Roast for approximately 50 minutes, using a probe type or instant read thermometer placed into the thigh and it should read 165° - 175°. Let the chicken rest in the pan for 15 minutes. Remove to a cutting board, remove vegetables from pan and place the pan over a medium high heat. Add the stock and scrape any bits from the bottom of the pan, reduce the liquid to about ½ and serve along with the chicken.

Use a roasting pan with no more than 2” sides

Related Posts Plugin for WordPress, Blogger...
Leave a comment
Share
  • Pin it
  • Share
  • Tweet
  • Share
  • Email

Posts navigation

1 2 3 … 11 12 Next Page
Deb

Meet Chef Debbi

READ BIO

Join-Us Sign up for our newsletter to receive exclusive tips 'n tricks, and special offers on classes, tours, and more!

Recent Posts

  • Farm, Food & Wine Tour 2022
  • Osso Buco
  • New Classes 2022
  • Debs Kitchen Class Registration
  • Clean and Husk (strings and all) Corn on the Cob

Categories

BookCUT

What's in Your Pantry?

How to stock your pantry to create delicious dishes.

Learn Chef Debbi's pantry essentials and how to substitute ingredients for pantry staples in her basic recipes for quick and easy meals.
BUY BOOK>

FacebookTwitterInstagramGooglepinterest


© 2014, DEB'S KITCHEN
Angie Makes Feminine WordPress Themes