Deb's Kitchen - Farm, Food, Wine & Lifestyle Adventures
  • Facebook
  • Google
  • Twitter
  • Instagram
  • Pinterest
  • Email
Menu
Skip to content
  • Home
  • Blog
  • Events
    • Classes
    • Tours & Adventures
  • Edible Gardening
  • Preserving
  • Recipes
    • Appetizers
    • Soups and Salads
    • Main Dishes
    • Side Dishes
    • Desserts
  • About
    • Whats In Your Pantry
    • Ask Debbi
    • Deb’s Kitchen Botanicals
    • Press
  • Contact

Tag Archives: summer

Blackberry Crumb Bars

5 / 26 / 155 / 26 / 15

blackberry crumb bar-smitten kitchen

Blackberry Crumb Bar

Save
Print
  • 6 tablespoons unsalted butter melted, and
  • 1/2 cup (1 stick), room temperature, plus more for pan
  • 1 3/4 cups all-purpose flour (spooned and leveled), plus more for pan
  • 1/2 cup packed light-brown sugar
  • 1/2 teaspoon salt
  • 1/2 teaspoon baking powder
  • 1 cup confectioners' sugar
  • 1/2 teaspoon Grand Marnier or pure vanilla extract
  • 2 large eggs
  • 10 ounces blackberries

Preheat oven to 350°. Butter an 8-inch square-baking pan. Line bottom with parchment paper, leaving an overhang on two sides; butter and flour paper, tapping out excess.

Make topping:

In a medium bowl, whisk together melted butter, brown sugar, and 1/4 teaspoon salt; add 1 cup flour, and mix with a fork until large moist crumbs form. Refrigerate topping until ready to use.

In a medium bowl, whisk together remaining 3/4 cup flour, baking powder, and remaining 1/4 teaspoon salt; set aside.

In a large bowl, using an electric mixer, beat room-temperature butter, confectioners' sugar, and vanilla until light and fluffy, add eggs, one at a time, beating well after each addition. Reduce speed to low; mix in flour mixture. Spread batter evenly in pan; sprinkle with blackberries, then chilled topping.

Bake until golden and a toothpick inserted in center comes out with moist crumbs attached, 40 to 45. Cool completely in pan. Using paper overhang, lift cake onto a work surface and cut into 16 squares.

Adapted lightly from Martha Stewart

Photo: Smitten Kitchen

Leave a comment
Share
  • Pin it
  • Share
  • Tweet
  • Share
  • Email

Companion Planting

3 / 21 / 153 / 28 / 15

What is Companion Planting


Two or more plant types as to be beneficial to each other. Companion planting will help with pest control, higher yields, healthier soil and to keep weeds away.

Some flowers (marigolds, nasturtiums) can act as trap crops to attract insects away from vegetable crops. Aromatic herbs (basil, rosemary, lavender, sage) repel many insects away from more susceptible plants (tomatoes)

Umbel flowers, dill, fennel, parsley attract beneficial insects to the garden. The large flower heads provide a place where they beneficials can land and rest while they feed. Be sure to plant extra around the garden and let them go to seed. You may get some volunteers the next year (from all the seed flying around) but you can just dig those up and transplant them, free plants!

companion-plants-2Here are some classic combinations.

3 sisters, corn, beans, squash.  Plant corn and beans first, squash a couple of weeks later; beans feed nitrogen into the soil for both corn and squash, the squash leaves will protect the shallow roots of the corn and beans will grow up the corn stalks.

Basil and tomatoes are a classic example of companion planting. Plant carrots around the base of the tomatoes, they’ll be ready for harvest before the tomato plants go wild. No brassicas (cauliflower, broccoli, brussels sprouts) with tomatoes. No peppers or eggplant near or within the last year in the same spot. They are in the same family and can transfer soil born diseases.

Plant some of the umbel plants near tomatoes for help with hornworm which helps attract parasitic wasps and their larvae will feed on the hornworms.

Beans and potatoes.

While these grow together well don’t plant the beans near the corn as we talked about before. Another row of beans never hurt to have around so plant away from the squash and plant with potatoes. Potato doesn’t like squash, cucumbers or sunflowers.

Lettuce and radish

Both with tolerate less sun than 6 hrs. and the radish will be ready to harvest before lettuce starts getting big, neither one likes the heat.

Sunflowers & Pumpkins

A natural combination that get along well

Leave a comment
Share
  • Pin it
  • Share
  • Tweet
  • Share
  • Email

The Plant Stand~Jan

1 / 6 / 151 / 6 / 16

the plant stand logo

Rescheduled due to rain! See us on the 23rd

January 23rd, Sat

10 a.m.

Companion Planting

Spring Garden Planning

&

Companion Planting

Join us for a little talk and a tasty treat!

The Plant Stand
2972-A Century Place
Costa Mesa, California 92626-4324

(714) 966-0797

DKB-12

Leave a comment
Share
  • Pin it
  • Share
  • Tweet
  • Share
  • Email

Boysenberry Tart

5 / 30 / 1412 / 3 / 14

berry copy

Pastry:
1 cup all purpose flour
1 Tablespoon Sugar
1 pinch salt
6 Tablespoon Unsalted butter, cold
1 Egg yolk, slightly whisked
1 Tablespoon Lemon juice
Filling:
3 Tablespoon Cornstarch
1 Tablespoon Grand Marnier, or more if needed
3/4 cup Sugar
1 cup boysenberries or more as needed

Pastry:
In large bowl, stir together flour, sugar and salt. With pastry blender or food processor, cut in butter until it resembles tiny peas. Mix together egg yolk, lemon juice and 1 tablespoon water; sprinkle over flour mixture. Stirring with fork, add a little more water if necessary to hold dough together. Using hands, gently shape pastry into ball. Press dough 1/8″ thick into flan pan. Refrigerate while making filling.

Filling:
Preheat oven to 425°.
In small saucepan, stir together Grand Marnier & cornstarch till smooth. Stir in sugar. Add boysenberries and cook, stirring, over medium-low heat for 10-15 minutes or till thickened.

Let cool; spoon into shell, filling no more than 2/3 full. Bake in 425° oven for 10 minutes. Reduce heat to 350° and bake 15 minutes longer or till pastry is golden brown. Let cool 15 minutes before removing to rack.


Leave a comment
Share
  • Pin it
  • Share
  • Tweet
  • Share
  • Email

Growing Asparagus

1 / 14 / 1412 / 14 / 14

Coming Soon....
Growing Asparagus

Asparagus is a very hardy, cool-season perennial vegetable, which can produce a spring harvest for 10-20 years! Therefore, it must be planted in a “dedicated bed”. It can be grown from seed, but most often is grown from 1-2 year old “crowns” (rhizomes), which is offered in January.

For 6 crowns, you will need a dedicated area measuring 6’ wide x 6’ long.
For 13 crowns, you will need a dedicated area measuring 6’ wide x 10’ long.

Crowns are dormant and must be planted within one week; you may keep them in the refrigerator, so they don’t break dormancy, until you can plant out.

Asparagus requires rich, fertile, well-drained soil, with a pH of 7.0 – 7.2.
Mix in lots of compost. If gophers are a problem for you, install wire barriers down in the bed before planting. Be sure the bed is as weed-free as possible. They prefer full sun.

Be sure the soil is at least 50 degrees. Dig a trench 12-15” deep (roughly twice the length of the roots), and allow 3-4’ between rows. Mound up soil inside the trench to create a cone 6” tall; cones should be 1’ apart. If you are trenching down into regular soil, prepare the bed by the “double dig” method, adding in compost to assure a well-draining soil.

Over each cone, drape the roots of one asparagus crown. Begin filling the trench with soil, up to just 1” above the crowns, to start. Firm the plants in well. As the plants grow and shoots emerge, begin covering the crowns with more soil until the trench becomes level with the soil surface. Water well each time.

asparagus bed planting


Asparagus takes a few years to fully mature. Do not harvest any shoots the first year; after they emerge, let them leaf out so the foliage can nourish the growing roots and rhizome for future production. Remember that good things come to those who wait!

You can begin to harvest lightly the shoots in the second year for about a month. The fleshy roots still need to develop and support perennial growth in future seasons. Plants that are harvested too much, too soon will become spindly and weak, and perhaps not recover. To harvest, simply cut or snap the spears 1-2” below the soil and at least 2” above the crown.

Subsequent harvests generally last for 8-12 weeks. Be sure to harvest daily during the season; either use or refrigerate immediately in a plastic bag. 6-8” is the optimum size. Don’t leave them to become tall and woody.

If you want blanched asparagus, which is a gourmet treat, mound soil around them (or otherwise exclude light from them so they do not form chlorophyll.)

At the end of the harvest, let the spears leaf out and become ferny. It can make a nice tall border. When the foliage yellows, cut it down to 2” stubs and add a 4-6” mulch of compost or leaves, which will help control weeds and feed the soil with organic matter and nutrients. If you live in an area with lots of frost, you can help protect your plants (which are hardy down to zone 4) by adding a thick layer of compost and straw to the bed.

Next Spring, be sure to weed the bed thoroughly, but pull the weeds instead of hoeing them to prevent damaging the plants, which are spreading out underground. The 6 or 13 plants you’ve planted will eventually fill out the entire bed, and you will enjoy this fantastic veggie for many, many years!

Written by Jo Ann Trigo of Two Dog Nursery. Jo Ann and Alex have many other growing guides on their site under Helpful Guides, visit them soon.

Leave a comment
Share
  • Pin it
  • Share
  • Tweet
  • Share
  • Email

What do you do with a bumper crop of tomatoes?

8 / 27 / 13

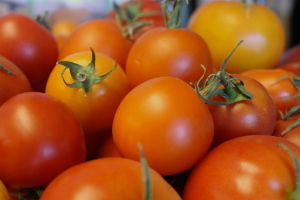
IMG_1189I usually freeze my tomatoes until I have time later to make sauce, ketchup or just can some chopped tomatoes for later use. (I freeze them by washing and drying them, placing them on a baking sheet and freezing until solid. No, I do not peel or seed them as the skin comes off easily when they are defrosted. Once frozen, I place into an airtight freezer bag and return to the freezer. This allows me to defrost one or ten, however many I need at the time.)

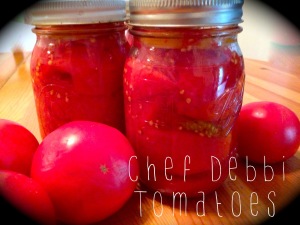
I like to do ‘small batch’ canning, which means I can do a few jars at a time. Of course when my tomatoes come in all at once, I haul out the big canner and fill it up. The basic procedure for canning small or large batches is the same only the equipment varies slightly. If I’m canning a small batch instead of the big canner, I can usually use a large stockpot, deep enough for the water to cover the jars by 2″. I use a cake rack for the bottom of the stockpot so the jars don’t sit on the bottom of the pot where they could possibly break. That’s it!

Tomatoes-I do not peel or seed my tomatoes, just pack them raw
Tomato juice (you could also use hot water)
Lemons
Sea salt
Fresh herbs, optional

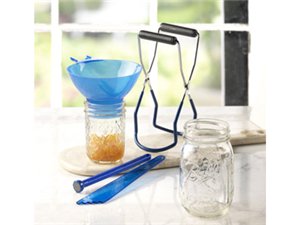
383374For Processing Tomatoes You will need:

  1. A stockpot or regular canner (tall enough so the jars are submerged by 2″ while processing)
  2. A rack for the bottom of the stockpot or canner
  3. Canning lifters (for jars & for lids), wide mouth funnel
  4. Canning jars, lids and screw bands
  5. Several clean tea towels
  6. Baking sheet

Place the rack in the bottom of your stockpot. Make sure to choose a deep enough pot so that the jars will be covered 2″ of water.

Fill the pot with water and begin to bring to a boil. Line a baking sheet with a clean tea towel.

Wash and dry the jars, lids and screw bands. Place lids into a small saucepan with hot water.

Prepare tomatoes by washing and lying out on a towel to air dry (they don’t have to be totally dry). If desired, cut tomatoes into quarters and set aside. I don’t peel or seed my tomatoes before packing as the skin comes right off when I take them out of the jar. If I don’t want to use the seeds, I simply strain them out.

Heat jars by placing them into the stockpot while you bring the water to a boil. Remove them to the cloth lined baking sheet when you are ready to fill with tomatoes. (The water in the stockpot should be boiling or very close to it).

Place one or two slices of lemon on the bottom of your jar.

Fill your jars with tomatoes, really squish them in there, and use a wooden spoon to smash them down. Add a sprinkle of sea salt and a tablespoon of lemon juice (from a real lemon). You can also add herbs such as basil, thyme or parsley. Using a plastic knife or chopstick, slide it down the side of the jar removing any air bubbles. Add tomato juice to cover the tomatoes and a slice of lemon at the top of the jar before sealing. Leave a 1/2″ headspace.

IMG_0807Wipe the top of the jar, removing any debris from the screw area and the top of the jar. Place the lid and the screw top on the jar, closing only finger tight, and place on the rack in the canner or stockpot. Make sure the jars are covered by 2″ water, bring to a boil and time for 40 minutes (for pints) or 45 (for qts). The water must be boiling the entire 40 minutes or you’ll need to restart the timer from the beginning. Remove to a cloth lined baking sheet and let cool for 24 hours before moving.

After 24 hours, if the center of the lid still moves up and down the jar has not sealed properly. You can reprocess this jar once or just put it in the refrigerator and use within a few days.

2 Comments
Share
  • Pin it
  • Share
  • Tweet
  • Share
  • Email

Peaches

6 / 4 / 1312 / 4 / 14

peach-cobbler-2

Oh all those beautiful rosy peaches from the farmers market! They smell like summer and I don’t know about you but I wait all year for them to show up!
I have a peach tree but that in no way yields enough peaches to satisfy my sweet tooth. Seasonal peaches are available in California from June to Sept. Peaches from other parts of the world are usually picked hard and mostly premature and will never develop that sweet summer flavor.

The following is part of the prologue to David Mas Masumoto’s book ‘Epitaph for a Peach’, he is talking about the Sun Crest peach but I think it reflects all good peaches. “Sun Crest is one of the last remaining truly juicy peaches. When you wash that treasure under a stream of cooling water, your fingertips instinctively search for the gushy side of the fruit. Your mouth waters in anticipation. You lean over the sink to make sure you don’t drip on yourself. Then you sink your teeth into the flesh and the juices trickle down your cheeks and dangle on your chin. This is a real bite, a primal act, a magical sensory celebration announcing that summer has arrived. “

Choose peaches that yield slightly to pressure, hard fruit isn’t ripe and though it will get softer, it won’t get tastier. Peaches need to develop flavor and sweetness while still hanging on the tree, color will vary with peach varieties but avoid and peaches that show any sign of green. Smell the peach for sweetness and you’ll be fine.

Peaches should be kept at room temperature until soft and then refrigerated but don’t wait too long to eat them or they’ll over ripen.

I find it pretty easy to peel a ripe peach with a sharp paring knife or you can blanch in boiling water for a few seconds, don’t over do or you’ll start to cook the fruit flesh.

Here’s my favorite cobbler recipe that I pieced together from two different recipes that I use. One from my favorite boysenberry pie and the cobbler batter from Marcy Masumoto’s ‘French Peach Cobbler’ recipe from The Perfect Peach: Recipes and Stories from The Masumoto Family Farm.

Debbi’s Peach Cobbler recipe

Related Posts Plugin for WordPress, Blogger...
Leave a comment
Share
  • Pin it
  • Share
  • Tweet
  • Share
  • Email

Posts navigation

Previous Page 1 2 3
Deb

Meet Chef Debbi

READ BIO

Join-Us Sign up for our newsletter to receive exclusive tips 'n tricks, and special offers on classes, tours, and more!

Recent Posts

  • New E-Book!
  • From the Pantry
  • Spaghettini at Home
  • Growing Corn
  • Spring IS Coming!

Categories

BookCUT

What's in Your Pantry?

How to stock your pantry to create delicious dishes.

Learn Chef Debbi's pantry essentials and how to substitute ingredients for pantry staples in her basic recipes for quick and easy meals.
BUY BOOK>

FacebookTwitterInstagramGooglepinterest


© 2014, DEB'S KITCHEN
Angie Makes Feminine WordPress Themes