Deb's Kitchen - Farm, Food, Wine & Lifestyle Adventures
  • Facebook
  • Google
  • Twitter
  • Instagram
  • Pinterest
  • Email
Menu
Skip to content
  • Home
  • Blog
  • Events
    • Classes
    • Tours & Adventures
  • Edible Gardening
  • Preserving
  • Recipes
    • Appetizers
    • Soups and Salads
    • Main Dishes
    • Side Dishes
    • Desserts
  • About
    • Whats In Your Pantry
    • Ask Debbi
    • Deb’s Kitchen Botanicals
    • Press
  • Contact

Category Archives: Blog

Skillet Lasagna

2 / 18 / 18


After making this for a demo in a skillet because I have no oven available, I will never make lasagna in the traditional manner. An easy weeknight recipe for dinner and leftovers it’s ready in about 30 minutes with little prep. Feel free to doctor it up with herbs, spices, sausage, chopped peppers or whatever floats your boat. Be mindful of the addition of extra ingredients, you may need to adjust the amount of sauce that you use. I wouldn’t add more than a half cup of other chopped vegetables without adding another half cup of sauce. The size of the pan also matters, if you use a larger than 9″ or 10″ pan you may need more ricotta to cover the top of the lasagna but you shouldn’t need to adjust other ingredients. As I say in cooking class, try the recipe as written before you make any changes, then adapt it to your taste. Have fun in the kitchen!

Skillet Lasagna

Save
Print

Great recipe to cook ‘From Your Pantry’ as you should have most of these ingredients as staples in your kitchen. Add a nice loaf of warmed Italian bread with olive oil on the side, a green salad and your set to go.

  • 1 pound lean ground beef, turkey or chicken
  • 1 teaspoon dried Italian seasoning, crushed
  • Sea salt and fresh ground pepper
  • ½ medium brown onion, chopped
  • 1 clove garlic, minced
  • 8 ounces sliced mushroom
  • ½ pound dry pasta, egg noodles, rotini, rotelle, farfalle or other shape
  • 1 favorite jar pasta sauce
  • ½ cup water
  • ½ cup dry red wine
  • ½ cup ricotta cheese
  • ¼ cup Parmesan cheese
  • 8 ounces shredded part-skim mozzarella cheese
  • Basil leaves for garnish, optional

In an approximately 9" sauté pan*, preferably non-stick, with lid, brown ground beef adding a little salt, pepper and Italian seasoning as it cooks. Drain and set aside.

Add a little olive oil, if needed, to lightly coat the bottom of the pan, add the onion and sauté until lightly translucent, add garlic and stir, cook briefly, then add mushrooms and continue to cook until mushrooms are lightly browned.

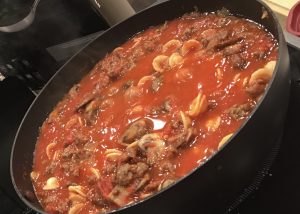
Add ground beef back to the pan and add the pasta, pasta sauce, water and wine, bring to a boil, reduce heat to a low boil, cover and cook about 10 minutes or until pasta is cooked. Taste and season with salt, pepper and Italian seasoning to taste.

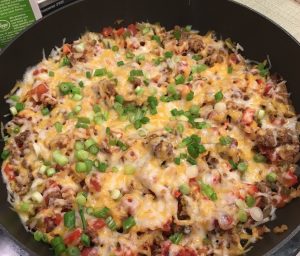
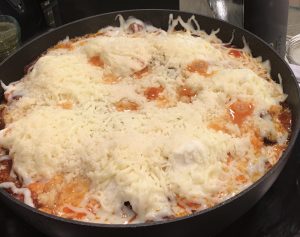
Spoon ricotta into mounds on top of the lasagna mixture, sprinkle grated cheese over the top, cover, reduce heat to low and cook until the cheese is melted.

Add parmesan cheese and basil leaves, if using.

*If you're confused about sauté pan vs. skillet, a sauté pan has straight sides and some depth to the pan whereas a skillet has flared sides and won't hold the volume that this recipe calls for.


Leave a comment
Share
  • Pin it
  • Share
  • Tweet
  • Share
  • Email

Alpine Strawberries

1 / 24 / 18

You’ll never have enough Alpine Strawberries, also called fraises des bois, to make a pie but they are so delicious with a scoop of vanilla ice cream or with a creamy panna cotta. I love them with my cereal in the morning fresh from the garden. Best grown in containers, in my opinion, they are small plants that will do well in partial shade or full sun. Mostly without runners I grow from transplants instead of seeds. I just never had any luck starting the tiny seeds. Alpine strawberries are related to wood (wild) strawberries and can be red or white with delicate white flowers. I think the red taste like perfume and the white are reminiscent of pineapple.

They like well-drained soil, rich in organic matter so that they drain well.  I amend my soil every fall and feed regularly with an organic fertilizer. Be careful not to cover the crown of the plant and keep the leaves off the soil. You can plant these much closer together than a bigger strawberry as the plants are small and grow slowly. Here in So. California my alpine strawberries start fruiting in Jan and finish up late fall. They do stop producing in summer if it gets too hot and sometimes I’ll move the pots to partial shade where they get morning sun. Other than protecting the delicate fruit from the birds, alpine strawberries are easy to grow and are pretty little plants in pots near my front door.

French Yogurt Cake

Save
Print

I love this bright lemony cake so much I adapted it slightly from Dorie Greenspan by adding these super sweet little strawberries, Alpine strawberries.

  • 1 1/2   cup all-purpose flour
  • 2         teaspoons baking powder
  •            Pinch of salt
  • 1         cup sugar
  • 1         lemon, grated and zest
  • 1/2      cup plain yogurt
  • 3         eggs
  • 1/4      teaspoon pure vanilla extract
  • 1/2      cup citrus olive oil
  • 1         cup Alpine strawberries, whole or halved

Center a rack in the oven and preheat the oven to 350 degrees F. Generously butter an 8 1/2-x-41/2-inch loaf pan and place the pan on a baking sheet.

Whisk together the flour, baking powder and salt.

Put the sugar and zest in a medium bowl and, with your fingertips, rub the zest into the sugar until the sugar is moist and aromatic.

Add the yogurt, eggs and vanilla and whisking vigorously until the mixture is very well blended.

Still whisking, add the dry ingredients, then switch to a large rubber spatula and fold in the oil and then the strawberries. You'll have a thick, smooth batter with a slight sheen. Scrape the batter into the pan and smooth the top.

Bake for 50 to 55 minutes, or until the cake begins to come away from the sides of the pan; it should be golden brown and a thin knife inserted into the center will come out clean. Transfer the pan to a rack and cool for 5 minutes, then run a blunt knife between the cake and the sides of the pan. Unmold, and cool to room temperature right side up on the rack.

Glaze (optional)

½ cup lemon marmalade mixed with 1 teaspoon water

To Make the Glaze:

Put the marmalade in a small saucepan or in a microwave-safe bowl, stir in the teaspoon of the water and heat until the jelly is hot and liquefied. Using a pastry brush, gently brush the cake with the glaze.

Leave a comment
Share
  • Pin it
  • Share
  • Tweet
  • Share
  • Email

Bacon Wrapped Dates

1 / 23 / 18

Bacon Wrapped Stuffed Dates with Maple Glazed Walnuts and Boursin Cheese

Save
Print

Easy to make ahead of time and bake off at the last minute, make extra they go fast!

  • Maple Glazed Walnuts
  • ½ cup maple syrup
  • 1/8 teaspoon sea salt
  • 2 cups walnut halves
  • For the Dates
  • 1 package of dried Medjool Dates, 16 oz.
  • 1 12 oz. package of bacon, slices cut in half widthwise
  • 4 oz. package of Boursin cheese

Preheat the oven to 350° and line a baking sheet with parchment paper.

Mix the maple syrup and salt together, add the walnuts and stir until coated.

Spread the nuts on the baking sheet and bake for 12 - 15 minutes or until the glaze is bubbly and coats the walnuts well. Remove from oven and let cool.

Turn the oven up to 425° and line a baking sheet with a new piece of parchment paper.

Slice dates lengthwise and remove pits.

Scoop a small amount of Boursin cheese with a spoon and fill the date with the cheese, press a glazed nut into the cheese.

Wrap dates with a slice of bacon, and secure with a toothpick to hold bacon onto date. Place the dates on the parchment on their side and bake for about 7-8 minutes or until browned on the bottom and turn to the other side continue to cook for another 7-8 minutes or until the bacon is cooked and a little crispy, and the cheese is slightly melted.

Let cool and serve warm or at room temperature.

Photo: La Tienda

Leave a comment
Share
  • Pin it
  • Share
  • Tweet
  • Share
  • Email

Feb 2018 Cooking Demo

1 / 6 / 18

Join us on

Thur. Feb 8th or 22nd

6:30 – 8:30, approximately


Menu

Crab Imperial Stuffed Mushrooms

Baby Spinach Apple Salad with Pecans & Dried Cherries

Skirt Steak with Shallot Pan Sauce

Roasted Smashed Potatoes

Chocolate-Orange Panna Cotta w/Fresh Berries

$45.00

For reservations call

Temecula Olive Oil, 148 Main St. Seal Beach

(562) 296-5421

Sponsored by


Leave a comment
Share
  • Pin it
  • Share
  • Tweet
  • Share
  • Email

Chicken and Barley Soup

1 / 5 / 18


Chicken & Barley Soup

Save
Print
  • Poached Chicken
  • 1 qt. chicken stock
  • 1 stalk celery
  • 1 carrot
  • ½ small onion
  • 2 medium chicken breasts, bone-in, skin on
  • Sea salt and ground pepper
  • Soup
  • 2 stalks celery
  • 2 carrots, peeled
  • ½ small onion
  • Olive oil
  • Sea salt and ground pepper
  • 6 cups chicken stock
  • 2 medium chicken breasts, bone-in, skin on
  • 1 cup cooked barley*
  • 1 small can diced tomatoes
  • ½ cup frozen peas
  • ½ cup snow peas, cut diagonally into bite sized pieces
  • 1 cup baby spinach
  • zest of 1 lemon plus 1 Tb. or more of juice

Poach chicken or purchase 2 cups cooked chicken.

To poach the chicken, bring chicken stock to a boil, turn heat down so the stock is just barely simmering. Roughly chop the celery, carrot and onion and add to the stock along with the chicken, season with a little sea salt and fresh ground pepper, and simmer for 20 min. to ½ hour or until chicken is cooked through but not dry. Remove the skin from the chicken and pull the meat from the bone, discard skin and bone. Shred or chop the chicken into pieces and strain the stock through cheesecloth and reserve.

For the soup:

Cut celery, carrots and onion into bite sized pieces. Heat a Dutch oven or lg. saucepan over medium high heat, add just enough olive oil to lightly coat the bottom of the pan, add the vegetables and sprinkle with sea salt and fresh ground pepper and sauté until lightly translucent and soft. Add enough chicken stock to the reserved stock to measure 6 – 8 cups and add to the vegetables. Add remaining ingredients except the lemon juice and simmer until the spinach is barely wilted, adjust seasonings and serve with a little squeeze of lemon juice.

*See How to Cook Barley, Debskitchen.com

Leave a comment
Share
  • Pin it
  • Share
  • Tweet
  • Share
  • Email

How to Cook Barley

1 / 5 / 18

Barley Basics


There are several types of barley, flaked, flour, grits, hulled, pearl and more. Most of the barley you’ll find in the supermarket is pearl barley or polished barley, which has had its hull removed, and most of the nutrients that go with that, but also reduces the cooking time (slightly). An un-hulled barley can take up to 20 minutes longer to cook but it’s an excellent source of fiber and keeps you fuller longer. Bob’s Red Mill has a great ‘hull-less’ barley that still contains the bran. It’s an ancient variety that grows in a loose hull thus saving much of the nutrition but it does take as long to cook as the un-hulled barley. Use 3 parts water or stock to 1 cup of barley; if using pearl barley start checking after about 20 minutes of cooking, barley can take up to 1 hour to cook. Try using a pressure cooker making a larger batch than you need and freezing the cooked barley in 1 or 2 cup packets for later use in soups or salads or as a side dish.


Some people like to soak their barley overnight or even for just a few hours. It doesn’t cut down much on cooking time and may alter the appearance or color of the grain but if you have trouble digesting whole grains this may work for you. Whole grains contain an anti-nutrient called phytic acid which binds with certain minerals (e.g.  zinc, phosphorous, calcium and iron) and prevents them from being absorbed by the body.  Phytic acid is also very hard on the digestive system.  Most of the phytic acid is contained in the exterior bran and germ layers of the grain.  Ironically, whole grains are much higher in minerals than polished or refined grains, but we won’t receive those benefits unless we neutralize the phytic acid. Soaking your grains before cooking them will neutralize the phytic acid and release the enzyme inhibitors, making them easier to digest and the nutrients easier to absorb. Soak overnight with a little squeeze of lemon juice or other acidic liquid (apple cider vinegar etc.), drain and rinse before using.

Barley Basics

Save
Print

To make in a pressure cooker or Instant Pot check the manufacturer’s instructions or try this website for info, https://instantpot.com/instantpot-cooking-time/

  • 3 cups water or stock
  • 1 cup barley
  • 1 generous pinch of salt, optional

Combine the barley and water or stock in the saucepan. Add the salt if using.

Bring to a boil over high heat, then lower the heat, cover and simmer, checking at 20 minutes for pearl or polished barley. Keep an eye on the pot as barley will give off a lot of foam at first and can cause the pot to boil over, for hulled barley, start checking at 40 minutes. The barley is done when it has tripled in volume and is soft yet chewy. Add more water if the pan becomes dry before the barley has finished cooking; check every 5 minutes until desired chewiness is reached.

When the barley is done, it will have absorbed most of the water. If there is a little water still left in the pot, just leave the barley to sit for 10 minutes, covered, until it has all been absorbed. If there is a lot of water left, drain the barley. If you want to cool it quickly to freeze, spread it out on a half sheet pan until cool, then measure and freeze.


Leave a comment
Share
  • Pin it
  • Share
  • Tweet
  • Share
  • Email

Salisbury Steak

12 / 30 / 17


Salisbury Steak with Mushroom Gravy

Save
Print

Here’s a great recipe for a weeknight dinner, easier than stopping at the store or fast food for dinner. Make sure to stock your pantry ahead of time.

  • Salisbury Steak
  • 1 pound ground beef
  • 1/2 cup panko breadcrumbs (or 1/3 cup ordinary breadcrumbs)
  • 1 egg
  • 2 tablespoons ketchup
  • 1/2 teaspoon Worcestershire sauce
  • 2 teaspoon dry mustard powder
  • 1 teaspoon garlic powder
  • Large pinch of sea salt and pepper
  • 1 tablespoon olive oil
  • ½ onion, finely chopped
  • 1 package mushrooms, sliced or 5 oz.
  • Gravy
  • 2 tablespoons unsalted butter
  • 3 tablespoons flour
  • 2 cups beef stock
  • 2 teaspoon Dijon mustard
  • 2 teaspoon Worcestershire sauce
  • Sea salt and pepper

Be sure to form the patties into ¾” thick ‘burgers’ and cook according to directions. This will ensure that your Salisbury Steaks come out perfectly cooked and not overdone. The recipe is really as easy as cooking one of those frozen dinners and tastes so much better! Serve with mac and cheese, mashed or roasted potatoes.

Mix the Salisbury steak ingredients with your hands or a wooden spoon, form into 4 thick patties (about ¾” thick) and set aside.

In a deep sided skillet, heat oil and when hot add onion and sauté until translucent. Add the mushrooms into the pan and cook, stirring until lightly browned. Transfer into a bowl.

Add a splash of oil, if needed to the pan and add the meat patties, cook the first side for 1 minute or until browned, then flip and brown the other side (they will still be raw inside).

Take the skillet off the stove and transfer meat patties onto a plate. Turn the heat down to medium low.

Return skillet to the stove and add butter. Once melted, add flour and cook for 30 seconds. Whisk in remaining Gravy ingredients until smooth. Increase heat to medium then transfer the reserved onions and mushrooms into the gravy. Stir, then add the patties into the gravy along with the juices on the plate. Cook for 7 minutes, or until gravy is thickened and patties are just cooked through, stirring occasionally around the steaks. If the gravy thickens too quickly, add more water.

Remove steaks onto a plate. Adjust the seasoning, if needed, with salt and pepper.

Adapted from Recipe Tin Eats

Photo: Recipe Tin Eats

2 Comments
Share
  • Pin it
  • Share
  • Tweet
  • Share
  • Email

Holiday Roast

12 / 21 / 17

Prime Rib actually refers to the grade of the beef that you are using, prime grade is the best you can buy and you will pay dearly for it but it’s a true holiday treat. You could purchase a Choice grade standing rib roast and still have a very lovely dinner for a lot less money. If you don’t like meat rare to medium then you’ll be better off serving another cut of meat for a special dinner as the roast can be dry and tough if overcooked.

Prime Rib

Save
Print

The easiest holiday roast you can make. Add some scalloped potatoes, a great salad or side vegetable and you’re done in the kitchen.

  • Serves 2 – 4
  • 1 Bone in standing rib roast, prime or choice grade, about 2 ½ - 3 lbs.
  • Sea salt and fresh ground pepper, I like Himalayan Pink Sea Salt
  • Mild flavored olive or vegetable oil
  • Butcher twine, optional
  • Probe meat thermometer (not optional)

Preheat your oven to 400°. Line a baking or sheet pan with parchment paper and set aside.

*If you’d like to make the roast easier to carve when hot, cut the bone off the meat before cooking. Use a boning knife and slice as close as possible to the bone between the bone and the meat. Now tie the bone back on to the meat with butcher twine, when the roast is ready to slice just cut the twine and remove the bone, saving to make stock or soup, and slice the meat as desired. Remember to always cut across the grain of the meat.

Remove the meat from the refrigerator at least 1 hour before cooking. Dry the meat well then rub it with a little of the oil and season generously with sea salt and pepper. Heat a sauté pan that’s just a little larger than the roast over medium high heat, when hot add roast and brown all sides of the meat. Do not add oil to the pan, sear the roast quickly and remove to the prepared sheet pan. If you can stand the roast to rest on the bone then do so, otherwise place on the sheet pan on one side. Insert a probe meat thermometer into the thickest part of the meat without touching any part of the bone.

Cook the roast for 10 minutes and then turn down the oven temperature to 350°. Continue to roast until temperature reaches 130°, about 10 minutes. Remove from the oven and loosely cover with foil and let rest for about 10 minutes. The temperature will rise, this is called carry over cooking time and the roast will be rare to medium rare when sliced. If you’d like the roast closer to medium, cook until the temperature reaches 135°; do not overcook.

Leave a comment
Share
  • Pin it
  • Share
  • Tweet
  • Share
  • Email

Fudgy Peppermint Brownies

12 / 21 / 17

If you google how to bake brownies in a skillet you will find recipes that actually cook in the oven in a skillet rather than a recipe you can cook in a skillet on the stove top. Why bother unless you’re going to serve the brownies to your guests in the pan? I’m talking about actually BAKING them in a skillet on the stove top. This makes them super fudgy but a little difficult to get out of the pan so be sure to use a good nonstick skillet. Here are two recipes, one traditional and one cooked in a skillet (a cheater recipe as I used a box mix-yes a box!) You decide which one works for you!

Fudgy Peppermint Skillet Brownies

Save
Print

This recipe yields 2 pans of yummy, fudgy brownies using an 11″ skillet (w/lid) or sauté pan.

  • 1 box brownie mix, plus ingredients on box
  • ¼- ½ teaspoon peppermint extract
  • peppermint candies, crushed

Mix brownies according to package directions, adding peppermint extract.

Add ½ of the batter to skillet and stir it around over low to medium heat while it ‘bakes’ and solidifies. Cover and cook over low heat for approximately 10 minutes or until the sides start to crisp. Add candies to the top of the brownies, turn off heat and let the pan sit for about 5 minutes before cutting.

Fudgy Brownies

Save
Print
  • 1 cup flour
  • ¾ cup Dutch cocoa powder
  • 2 cups sugar
  • ¼ teaspoon salt
  • ¼ teaspoon baking powder
  • 3 lg. eggs
  • ½ cup butter, melted (8 Tb)
  • ¼ cup oil, vegetable, olive or flavored olive oil
  • 2 teaspoons vanilla, substitute any flavored extract
  • ¼ cup chopped nuts, chocolate chips, peppermint pieces etc.

Preheat the oven to 375° and lightly grease a 9x13 pan.

Add all the ingredients to a large bowl in the order they are listed. Stir together and beat until the mixture is smooth. Mix in nuts, chips etc. that you’d like to use.

Spoon into the prepared pan and bake 25-30 minutes, or until just barely beginning to pull away from the sides of the pan, remove from oven and let cool.

Leave a comment
Share
  • Pin it
  • Share
  • Tweet
  • Share
  • Email

Mexican Skillet Fry

12 / 18 / 17


I use this mix for tostada’s and scoop it over some great refried beans or top with tamale topping and bake or even spread on nachos or in tacos and burritos. Feel free to use other ingredients as well, look to see ‘What’s In Your Pantry’

Mexican Skillet Fry

Save
Print
  • 1 lb. ground beef or turkey
  • 1 small onion, diced
  • 2 bell peppers, diced, I used 1 red & 1 green
  • 1 8oz can diced tomatoes with green chile
  • 1 cup long grain white rice
  • 2 cups chicken or beef stock
  • 2 teaspoons taco seasoning
  • Sea salt
  • 1 cup shredded Mexican cheese or a mixture of jack & cheddar cheese*
  • 3 green onions, sliced to garnish
  • Optional
  • Tamale Topping:
  • 1 ½ cups milk
  • 1 teaspoon salt
  • 2 tablespoons butter
  • 1/2 cup yellow cornmeal
  • 1 cup shredded Cheddar cheese
  • 2 eggs, lightly beaten

In a large pan skillet with a lid, brown ground beef (sauté the meat until you can break it up but don’t cook all the way through before adding next ingredients. Do not drain, if using ground turkey, you may have to add a little vegetable oil to the pan.

Add onions & peppers and cook until they are soft, then add spices and a little salt to taste, mix well.

Add can of tomatoes with green chile’s (including juice), rice, and stock and stir together, cover and let simmer until liquid is absorbed and the rice is cooked, about 10 minutes. Taste and re-season if needed, top with cheese and cover, cook over low heat until the cheese has melted. Garnish with chopped green onions.

Serve with soft tortillas or chips.

*Omit cheese if using the tamale topping.

Follow these instructions for Tamale Pie:

Preheat oven to 375°.

In a medium saucepan, heat milk with 1 teaspoon salt and the butter. When the milk is hot, but not boiling, gradually stir in the 1/2 cup yellow cornmeal. Continue cooking until thickened, stirring constantly.

Remove from heat and stir add the cheese and beaten eggs. Stir to blend.

Place meat mixture into an oiled baking dish and top with tamale mixture, bake for 20-25 minutes or until lightly browned.

Leave a comment
Share
  • Pin it
  • Share
  • Tweet
  • Share
  • Email

Cranberry, Apple & Pear Relish

12 / 13 / 17

Cranberry, Apple and Pear Relish

Save
Print

A perfect relish or conserve for fall and winter use. Serve it with chicken, beef, duck or other game meat; it also makes a great spread or dip mixed with cream cheese.

  • 2 cups peeled and chopped apples
  • 2 cups peeled and chopped pears
  • 12 oz. fresh cranberries
  • 2 1/2 cups sugar
  • 1 1/2 cups water
  • 2 orange, zested and juiced
  • 1/4 teaspoon nutmeg
  • 6 - 8 whole cinnamon sticks
  • 1 cup chopped walnuts

Makes 6 pints, approximately

In a large pot combine apples, pears, cranberries, sugar, water and orange juice.

Simmer, stirring frequently, for 15 minutes.

Stir in the nutmeg and walnuts, and then cook for 5 more minutes.

Use fresh or can for future use. To process follow these instructions.

Place a whole cinnamon stick in each sterilized jar, then ladle the hot relish into jars leaving 1/4″ headspace.

Process for 15 minutes in a boiling water canner.

Adapted from Farmers Daughter

Leave a comment
Share
  • Pin it
  • Share
  • Tweet
  • Share
  • Email

January Cooking Demo

12 / 13 / 17

Join Us

Thur., Jan 18th & 25th

6:30 – 8:30, approximately

Menu

Citrus – Avocado Salad

      With Basil Vinaigrette

 Chicken Cacciatore

     Mini Gnocchi with Cheese Sauce

      Garlic Roasted Broccoli Rabe

Chocolate Amaretti Cake


$45.00

For reservations call

Temecula Olive Oil,  148 Main St. Seal Beach

(562) 296-5421

Sponsored by

Related Posts Plugin for WordPress, Blogger...
Leave a comment
Share
  • Pin it
  • Share
  • Tweet
  • Share
  • Email

Posts navigation

Previous Page 1 2 … 7 8 9 10 11 … 21 22 Next Page
Deb

Meet Chef Debbi

READ BIO

Join-Us Sign up for our newsletter to receive exclusive tips 'n tricks, and special offers on classes, tours, and more!

Recent Posts

  • New E-Book!
  • From the Pantry
  • Spaghettini at Home
  • Growing Corn
  • Spring IS Coming!

Categories

BookCUT

What's in Your Pantry?

How to stock your pantry to create delicious dishes.

Learn Chef Debbi's pantry essentials and how to substitute ingredients for pantry staples in her basic recipes for quick and easy meals.
BUY BOOK>

FacebookTwitterInstagramGooglepinterest


© 2014, DEB'S KITCHEN
Angie Makes Feminine WordPress Themes