Deb's Kitchen - Farm, Food, Wine & Lifestyle Adventures
  • Facebook
  • Google
  • Twitter
  • Instagram
  • Pinterest
  • Email
Menu
Skip to content
  • Home
  • Blog
  • Events
    • Classes
    • Tours & Adventures
  • Edible Gardening
  • Preserving
  • Recipes
    • Appetizers
    • Soups and Salads
    • Main Dishes
    • Side Dishes
    • Desserts
  • About
    • Whats In Your Pantry
    • Ask Debbi
    • Deb’s Kitchen Botanicals
    • Press
  • Contact

Category Archives: Food

Santa Maria Style BBQ

9 / 2 / 16

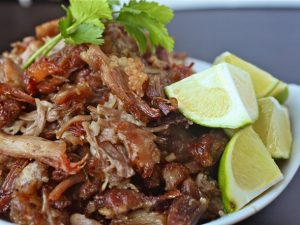
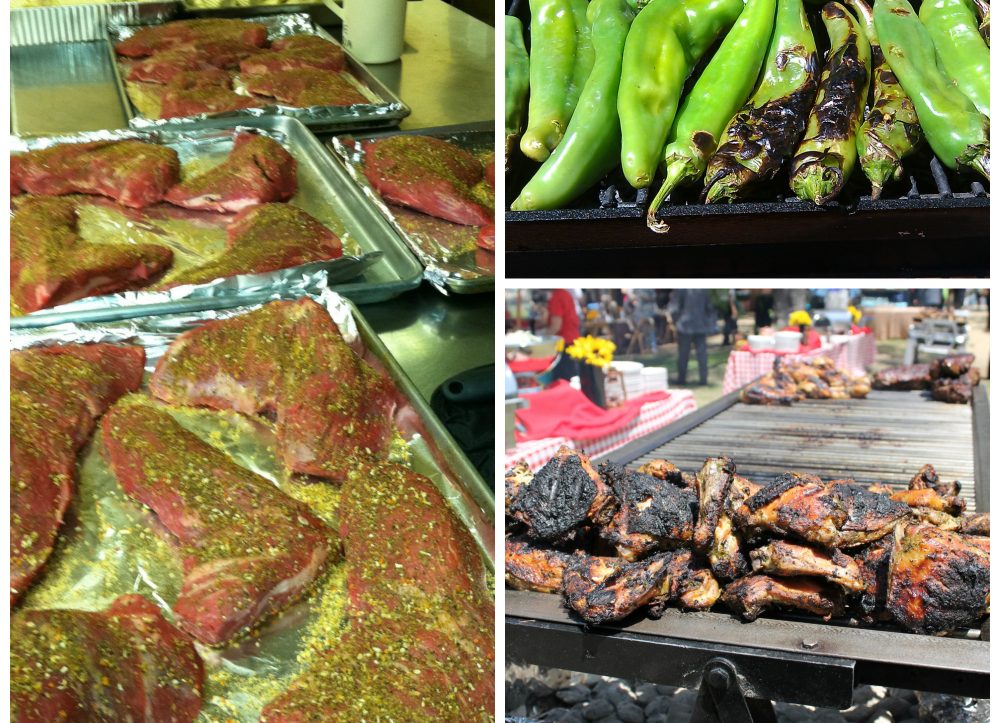
Santa Maria style bbq tri tip is traditionally made with a simple rub and grilled over hard wood, sliced thin and served with salsa, pinquinto beans and tortillas. You can find bbq’s on most street corners in Santa Maria but if you can’t get there, grill up your own. I prefer a wet marinade for a little extra flavor and sometimes I’d rather cook it in the oven so I’ve offered a recipe for both. Be sure to let it rest after grilling and slice it thin against the grain. Make extra for sandwiches or tacos or heating leftovers up to serve with some nice fried eggs. You’ll want to make sure you have enough so plan on 1/2 # per person.


tri tip, hatch chile collage

Santa Maria Style Tri Tip

Save
Print
  • 1/2 cup red wine
  • 1/2 cup olive oil
  • 2 tablespoons Worcestershire
  • 1 tablespoon soy sauce
  • 1 lemon, juiced
  • 3 cloves garlic, minced
  • 1/4 teaspoon dry mustard
  • 1 tri tip, about 2 1/2 – 3 pounds

Combine red wine, oil, Worcestershire, soy, lemon juice, garlic and mustard.

Marinate meat in sauce in refrigerator for up to 2 hours, turning several times.

Grilling Method

Remove from refrigerator 2 hours before grilling. Grill over medium heat about 15 to 20 minutes on each side, brushing frequently with marinade. For a more accurate temperature use a probe style thermometer that has been designed to be used with a grill. Use the temperature guides below for cooking.

Oven Method

Preheat the oven to 450°. Remove the meat from the marinade and pat it dry. Discard the marinade.

Place the tri-tip, fat side up, on a rack in a shallow roasting pan. Use a probe style thermometer inserted into the center of the meat. Set temperature for 115° - 120° for rare, 120° - 125° for medium-rare or 130° for medium, it is not recommended to cook tri tip higher than 130°, the meat will be tough and dry.

Transfer the meat to a carving board or platter, cover loosely with foil, and let it rest for 10 to 15 minutes before carving to allow the residual heat to complete the cooking and the juices to stabilize.

Slice the meat into thin slices across the grain.

Santa Maria Pinquinto Beans

Save
Print
  • 1 pound Rancho Gordo dried heirloom Santa Maria pinquito beans
  • 10 cups water, divided
  • 3 tablespoons olive oil, divided
  • 1 carrot, peeled
  • ½ onion, chopped
  • 1 celery stalk
  • 3 teaspoons kosher salt, divided
  • 2 slices bacon, diced
  • 1 large red onion, chopped
  • 3 cloves garlic, minced
  • 6 ounces tomato purée
  • 2 tablespoons brown sugar
  • 2 teaspoons ground dry mustard
  • 1 teaspoon Tabasco sauce, optional

Pick through the beans and remove any foreign matter. Rinse with cold water. Place the beans in a large bowl, cover with 6 cups of water and refrigerate overnight.

Drain the beans and rinse. Place the beans in a pot with 4 cups of water, 1 tablespoon olive oil, carrot, onion and celery. Bring to a boil and then reduce to a simmer. Cover and cook for 1 hour or until the beans are tender.

Season with 1 teaspoon kosher salt, then allow the beans to cool in the liquid. Once cool, remove and discard the carrot, onion and celery.

In a large pot set over medium heat, add bacon and remaining olive oil. Cook until bacon is golden brown. Add the red onion and cook for 5 minutes, stirring occasionally. Add the garlic and cook for 2 minutes more. Add the tomato purée, brown sugar, dry mustard and Tabasco sauce. Next, add the reserved beans, 2 cups of the bean-cooking liquid, 2 teaspoons kosher salt and cook for 30 minutes at a low simmer. The beans can be refrigerated for up to one week, or freeze for up to 3 months.

Courtesy of Cambria Winery

Rancho Gordo Beans can be purchased from www.ranchogordo.com

Santa Maria Style Salsa

Save
Print
  • 3 medium fresh tomatoes, chopped
  • ½ cup finely chopped celery
  • ½ cup chopped green onions
  • ½ cup finely chopped California green chiles
  • 2 tablespoons snipped cilantro
  • 1 teaspoon vinegar
  • Dash of Worcestershire sauce
  • Pinch of garlic salt
  • Pinch of dried oregano, crushed
  • Few drops of hot pepper sauce

Combine all ingredients in a bowl, cover and let stand for one hour to blend flavors.


Leave a comment
Share
  • Pin it
  • Share
  • Tweet
  • Share
  • Email

Grilled Pizza

7 / 6 / 167 / 6 / 16

Pizza on the grill 1

I love pizza on the grill! The first time I cooked pizza on the grill I was worried the dough would slip through the grates but it doesn’t! The grill is a perfect tool for a backyard dinner, the house stays nice and cool and you can relax with a cold drink while your pizza cooks. First you have to heat your grill to it’s hottest! Pizza likes a good 500° – 600° oven to produce a great crust.

Buy or make your crust in the morning so it’s ready to go when you are. Prep your ingredients ahead of time. Grate or slice the cheese, pepperoni or salami, slice the mushrooms (store in a small bowl with a slightly damp paper towel over them), cut or tear your herbs such as basil, thyme and/or make a pesto for your pizza. Be creative and be organized.

Once your grill is at its hottest, roll out your dough on a lightly floured surface (or if you’re into hands on-flour your hands and stretch the dough out into any shape you like). Put your dough on a pizza peel that has been lightly dusted with flour or cornmeal, make sure the dough slides around on the peel so that when you put it on the grill it will slide off easily.

Brush your grill with oil and slide the dough onto that spot. Turn down the burners if you’re using a gas grill.* Grill for 2-3 minutes or until lightly charred. Turn your pizza over, brush the cooked side with a little olive oil if you like, add your sauce and any of the toppings you’ve chosen. Close the grill lid and let the pizza cook until the bottom is nicely charred and your toppings have melted and cooked. Remove from the grill with the pizza peel, let sit for a minute or two before slicing. Enjoy with a cold beer and tossed salad! That’s how to beat the heat at my house. Have a great summer!

*If using a grill with charcoal or wood you’ll want to make a direct heat side and an indirect heat side. You’ll be cooking the pizza on the indirect side.

Here’s the recipe

No Knead Pizza Dough

Save
Print

This is Jim Lahey’s no knead recipe for pizza dough, it’s easy and so much better than store bough pizza dough. The hardest part is to remember to make it ahead of time. You can store the dough up to 3 days in the refrigerator so it’s easy to plan ahead. This recipe makes 4 balls of dough (4 pizza’s). Jim likes to weigh all the ingredients and in reality you do get a much better and more consistent product but if you insist on measuring, I’ve included his instructions for that also.

  • 500 grams all-purpose flour, 17 ½ ounces or 3 ¾ cup, plus a little extra for shaping
  • 1 gram active dry yeast, ¼ teaspoon
  • 16 grams fine sea salt, 2 teaspoons
  • 350 grams water, 1 ½ cups

In a medium bowl, thoroughly blend the flour, yeast, and salt. Add the water and, with a wooden spoon or your hands, mix thoroughly.

Cover the bowl with plastic wrap or a kitchen towel and allow it to rise at room temperature for 18 hours or until more than doubled. It will take longer in a cook room and less time in a warm one.

Flour a work surface and scrape the dough out of the bowl, divide into 4 equal parts and shape them.

For each portion, start with the right side of the dough and pull it toward the center, then do the same with the left, then the top, then the bottom. (The order doesn't actually matter; what you want is four folds.) Shape each portion into a round and turn seam side down. Mold the dough into a neat circular mound. The mounds should not be sticky; if they are, dust with more flour.

If you don't intend to use the dough right away, wrap the balls individually in plastic and refrigerate for up to 3 days. Return to room temperature by leaving them out on the counter, covered in a damp cloth, for 2 to 3 hours before needed.

Leave a comment
Share
  • Pin it
  • Share
  • Tweet
  • Share
  • Email

Galette, Crostata or Tart

6 / 24 / 16

Galettes, Crostata and Tarts are similar in nature, they all can be sweet or savory and they all have a tasty butter crust. Really the only difference is Galettes (French) and Crostata’s (Italian) are free form on a baking sheet lined with a piece of parchment. A tart is always cooked inside a ring or a tart pan so the sides are nice and neat and usually scalloped. There, that’s it!

Galette marked

Whatever you call them this is the best time of year to make them with all the wonderful fresh fruit at the farmers market. You can use any kind of fruit which makes this recipe so versatile and the crust is easy to make. Make some dough ahead of time, wrap it well in plastic wrap and store in the freezer for up to 2 months, defrost overnight in the refrigerator. Please don’t buy frozen pie dough from the market, you’ll be disappointed in the finished product. Most of them have no butter in them which is what makes this crust so flaky and tasty. It’s easy to do in a food processor, try it this weekend.

Rustic Fruit Galette

Save
Print

Notes:
Flour can absorb water from the air so on hot dry days the flour may take more water to come together than on a humid day. Always fluff your flour by swiping a knife through it to lighten it, flour compacts as it sits. Unless you weigh your flour this is the best method to ensure you get an even product every time you bake.
The dough can be refrigerated up to 2 days or frozen up to 2 months.

  • 1 cup sugar, divided
  • 2 cups all-purpose flour
  • ¼ teaspoon. salt
  • 2 sticks cold butter, cut into small pieces
  • 4 tbsp. ice water
  • 1-1½ cups berries or any fruit mixture
  • 1 large egg yolk, lightly beaten with 1 tbsp. milk or cream

Place ½ cup of the sugar, all the flour and salt into the bowl of a food processor, pulse to mix briefly, add the butter and pulse until butter is the size of peas. Pour the mixture into a bowl and begin to add the ice water one tablespoon at a time until the dough comes together in a ball. Divide into two and form a disc, wrap tightly in plastic wrap or parchment and chill for 1 hour.

Cut any pieces of large fruit into pieces and mix together in a bowl with ½ the remaining sugar (1/4 cup). Refrigerate until ready to bake tarts.

Preheat the oven to 450°.

Line a baking sheet with parchment paper and set aside. Take the dough out of the refrigerator one disc at a time. Roll into a round ¼” thick on a rol mat or floured surface and place on the parchment, repeat with the other disc. Use as little flour as possible to roll out the dough.

Split the berry mixture into the center of each round leaving a 1 ½” border around the edge. Fold up the edges pleating or folding to cover most of the fruit. Brush the dough with the egg wash and sprinkle the remaining sugar over the dough.

Bake for 12 minutes or until the crust is lightly browned, cool and serve with ice cream or whipped cream.

Leave a comment
Share
  • Pin it
  • Share
  • Tweet
  • Share
  • Email

Hot Weather Dinner

6 / 20 / 166 / 20 / 16

A basket of sweet corn, three ears partially husked

There is nothing like summers sweet corn on the cob. The tables at the farmers market this weekend were loaded with all kinds of corn and great prices make you want to stock up but corns sweetness will turn to starch the longer it’s stored. There’s an old saying that you should start the water boiling for the corn before you pick it. But if you don’t have a corn field in your back yard here are a couple of tips to help maintain that sweetness.

One, don’t peel and husk your corn, leave it in its little corn jacket and store in the refrigerator. This won’t maintain it’s sweetness long but it will stay sweet for about a day.

Two, peel and husk your corn, freeze separately and when frozen wrap in plastic and pop into a freezer bag. Use within a few weeks for best results.

Three, (this is my favorite), peel a few leaves off the outer ear but leave the husk and some leaves still attached. Chop off the very top and the bottom. Here’s another tip for you-usually corn worms are only found in the top of the ear, just lop that part off, the corn is still good to eat and it means that the farmer didn’t dust the corn with insecticide (a good thing). Put the corn into the microwave and cook for 5 minutes, remove carefully it will be hot. Place in a colander in the sink and run some cool water over it. After it cools, refrigerate and it will hold it’s sweetness for a day or two.

Here’s one of my favorite hot weather dinner salads using sweet corn right off the cob!

Shrimp and Avocado Salad

Save
Print
  • Dressing
  • ¼ cup Pomegranate vinegar or good red wine vinegar
  • 1 teaspoon finely diced shallots
  • 1 teaspoon Dijon mustard
  • Dash of dried parsley flakes, crushed
  • ½ cup olive oil, approximately
  • Salad
  • 1 head Bibb lettuce, peel the leaves from the core, rinse with cool water and dry well
  • 1 ear fresh sweet corn, prepare the corn as directed in the notes.
  • 1 small Persian cucumber, cut in half lengthwise and then into half moons
  • 1 medium tomato, chopped into bite-sized pieces
  • 8 large shrimp, (U16), cut into bite-sized pieces
  • 1 Haas avocado cut in half; pit removed and scoop out the whole half
  • 2 rashers (slices) bacon, cooked and crumbled
  • ¼ cup crumbled blue cheese, optional

Dressing

In a jar or small bowl add vinegar, shallots, Dijon mustard and parsley flakes, add a sprinkle of salt and pepper. Slowly whisk in the olive oil to emulsify. As soon as the dressing starts to thicken stop and taste the dressing, if it needs more continue to add the olive oil while whisking. Any extra dressing may be stored in the refrigerator for up to 3 weeks.

Tear the lettuce leaves into large pieces and add to a large bowl and toss with a little of the dressing. Add the corn, cucumber, tomato and shrimp and toss again with a little dressing. Lightly mix in the avocado and place into shallow bowls or large plates, sprinkle with bacon and cheese and serve extra dressing on the side.

Makes 2 entrée salads

Notes:

Pick up fresh corn from the farmers market, not the supermarket. The sugar in corn starts to turn to starch when it’s picked so by the time it gets to the supermarket much of the sweetness will be gone. When you get the corn home here’s an easy trick to help keep the sweetness in for a day or two. Remove some of the outer leaves but not all. Cut the top and bottom off the ear and microwave for 5 minutes. It will be hot when you bring it out of the microwave so run some cool water over it and set it aside to cool completely. This method is similar to blanching and shocking your vegetables. Use right away (peel the remaining leaves and silk then slice off the cob) or store in the refrigerator for a day or two.

In the hot weather buy the shrimp already cooked for an easy meal at the end of the day. If you purchase raw shrimp to cook it simply bring a large pot of water to a boil, add a tablespoon of Old Bay Seasoning and cook at a slow boil (bubbles just break the surface) until the shrimp is done, about 5 minutes. To test the shrimp simply take one out, run cool water over it, peel, devein and eat it!

Pomegranate vinegar can be ordered from Temecula Olive Oil Co.

2 Comments
Share
  • Pin it
  • Share
  • Tweet
  • Share
  • Email

Pop Up Cooking Demo

6 / 14 / 16

TOOC LOGO

Seal Beach tasting room
June 23rd
Thur, 6:30 – 8:30

Tuscan Al Fresco Dinner

stuffed pork loin

Artichoke Pesto Bruschetta

Tuscan Summer Salad
Gigante White Beans with Roasted Red Bell Peppers
Pork Tenderloin Stuffed with Sundried Tomatoes, Goat Cheese, Basil & Toasted Pine Nuts
Bucatini with Porcini Mushroom Sauce
Rustic Berry Tart

Call Now for reservations 

562-296-5421
Sponsored by

Leave a comment
Share
  • Pin it
  • Share
  • Tweet
  • Share
  • Email

Slow Cooker Carnitas

6 / 14 / 16

For everyone who missed this recipe from class, I thought I’d put it up on the blog for you! A great recipe for easy summer dishes!

carnitas

Save
Print

Adapted slightly from Rick Bayless

  • 2 pounds boneless pork shoulder
  • Salt
  • 1 ½ - 2 cups freshly rendered pork lard (you can buy good-quality lard from a local butcher or Mexican market; I don't recommend the hydrogenated lard that's sold in bricks)

Cut the pork into 2 ½- to 3-inch pieces and sprinkle generously on all sides with salt. Scoop the lard into a 6-quart slow cooker and turn on high. When the lard is melted, fit in the pork in a single layer (there should be few gaps between the pieces and they should be barely covered with the fat). Cover and cook until thoroughly tender, about 3 hours. Turn off, uncover and let cool.

Remove the pork to a cutting board, leaving behind as much fat as possible. (You can refrigerate the lard to use for another round of carnitas, to season beans or fry potatoes or the like.) Shred the carnitas into very large, coarse pieces. Set a heavy skillet over medium heat. When the pan is very hot, spoon in enough carnitas-cooking fat to film the bottom generously. Scoop in the pork, spreading it out evenly over the bottom of the pan. Cook undisturbed for a couple of minutes, until it is richly browned and releases itself from the bottom of the pan. Gently turn the pieces to brown the other side. Remove to a plate lined with paper towels. Sprinkle with salt (coarse salt is welcome here, if you have it).

2 Comments
Share
  • Pin it
  • Share
  • Tweet
  • Share
  • Email

Chestnut-Apple Dressing

11 / 24 / 1511 / 24 / 15

Love the taste of chestnuts in your dressing? It’s easy with Peeled & Steamed Chestnuts! I find them at Gelsons, Bristol Farms, Lazy Acres or you can order them direct from Melissas. Here’s my favorite recipe…

chestnuts

Chestnut-Apple Dressing

Save
Print
  • 1 loaf artisan bread -- cut into cubes, toasted until lightly browned
  • 1 box cornbread mix -- baked and cut into pieces (Trader Joes has an excellent brand)
  • 1 onion -- diced
  • 4 ribs celery -- diced
  • 3 tablespoons minced fresh sage leaves
  • 2 tablespoons minced fresh thyme leaves
  • 1 stick unsalted butter -- (1/2 cup)
  • 1 pound fresh chestnuts -- shelled and peeled, chopped coarse, or 1pkg. vacuum-packed whole chestnuts, chopped
  • 2 small apples (organic) -- golden delicious, cut into 1" pieces with skin
  • 1/2 cup finely chopped fresh parsley leaves
  • 1 egg -- lightly beaten
  • 1 cup turkey stock -- or chicken stock, as needed

Fresh chestnuts in shell:

With a sharp knife cut an X on the round side of each chestnut. Spread the chestnuts in one layer on a baking sheet and bake the chestnuts in a preheated 450 oven for 10 minutes, or until the shells open. Remove the chestnuts, a handful at a time, and shell and peel them while they are still hot.

Preheat the oven to 350°

For dressing:

In a large pan, sauté the onions, celery, sage, thyme in the butter over moderately low heat, stirring, until the vegetables are softened, add apples and the chestnuts, and cook the mixture, stirring, for 1 minute. Add the vegetable mixture to the bread pieces, tossing the mixture well, stir in the parsley and salt and pepper to taste, and let the stuffing cool completely. Add the egg and enough of the stock to just bring the dressing together.

Bake for 20 minutes covered; uncover and continue baking 15 minutes or until lightly toasted on top.

Leave a comment
Share
  • Pin it
  • Share
  • Tweet
  • Share
  • Email

Easy Artisan Bread

9 / 22 / 159 / 22 / 15

Bread, wtrmk


Debbi's Artisan Bread

Save
Print
  • 3 cups lukewarm water
  • 1½ tablespoons granulated yeast (2 packets)
  • 1½ tablespoons kosher or other coarse salt
  • 6½ cups unsifted, unbleached, all-purpose white flour

Add yeast and salt to the water in a 5-quart bowl or, preferably, in a resealable, lidded (not airtight) plastic food container or food-grade bucket

Mix in the flour—kneading is unnecessary: Add all of the flour at once.

Mix with a wooden spoon, a high-capacity food processor (14 cups or larger) fitted with the dough attachment, or a heavy-duty stand mixer fitted with the dough hook until the mixture is uniform. If you’re hand-mixing and it becomes too difficult to incorporate all the flour with the spoon, you can reach into your mixing vessel with very wet hands and press the mixture together. Don’t knead! It isn’t necessary. You’re finished when everything is uniformly moist, without dry patches. This step is in a matter of minutes, and will yield a dough that is wet and loose enough to conform to the shape of its container.

(I placed dough onto parchment paper and baked it on parchment in a Dutch oven.)

Cover with a lid (not airtight) or a towel. Do not use screw-topped bottles or Mason jars, which could explode from the trapped gases. Lidded plastic buckets designed for dough storage are readily available. Allow the mixture to rise at room temperature until it begins to collapse (or at least flattens on the top), approximately 2 hours. Longer rising times, up to about 5 hours, will not harm the result. You can use a portion of the dough any time after this period. Fully refrigerated wet dough is less sticky and is easier to work with than dough at room temperature. So, the first time you try our method, it’s best to refrigerate the dough overnight (or at least 3 hours), before shaping a loaf.

BAKING

Cut a piece of parchment paper a little bigger than a notebook size of paper, dust with a little flour.

Dust the surface of your refrigerated dough with flour. Pull up and cut off a 1-pound (grapefruit-size) piece of dough, using a serrated knife. Hold the mass of dough in your hands and add a little more flour as needed so it won’t stick to your hands. It will be very sticky. Gently stretch the surface of the dough around to the bottom on all four sides, rotating the ball a quarter-turn as you go. Most of the dusting flour will fall off; it’s not intended to be incorporated into the dough. The bottom of the loaf may appear to be a collection of bunched ends, but it will flatten out and adhere during resting and baking. The correctly shaped final product will be smooth and cohesive. The entire process should take no more than 30 to 60 seconds.

Rest the loaf and let it rise on the parchment. Allow the loaf to rest for about 40 minutes (it doesn’t need to be covered during. the rest period). Depending on the age of the dough, you may not see much rise during this period; more rising will occur during baking (“oven spring”).

Twenty minutes before baking, preheat the oven to 450°F, with a baking stone placed on the middle rack. Place an empty broiler tray for holding water on any other shelf that won’t interfere with the rising bread.

Debbi's notes: I take a 2 qt. Le Crueset (or any stone-ware or cast iron) Dutch oven and put it in the oven with the lid (make sure if the knob on the lid top is plastic to wrap it in tin foil so it doesn't melt). Let it preheat with the oven. When the oven is hot and the dough is ready pick up the parchment paper and plop it into the hot Dutch oven pan, Put the lid back on and carefully slide it into the oven. Alternatively you could slide the dough, still on the parchment paper, onto a pizza or baking stone that you heated with the oven.

Dust and slash: Unless otherwise indicated in a specific recipe, dust the top of the loaf liberally with flour, which will allow the slashing knife to pass without sticking. Slash a ¼-inch-deep cross, “scallop,” or tic-tac toe pattern into the top, using a serrated bread knife.

Bake for about 30 minutes, or until the crust is nicely browned and firm to the touch. Because you’ve used wet dough, there is little risk of drying out the interior, despite the dark crust. When you remove the loaf from the oven, it will audibly crackle, or “sing,” when initially exposed to room-temperature air. Allow to cool completely, preferably on a wire cooling rack, for best flavor, texture, and slicing. The perfect crust may initially soften, but will firm up again when cooled.

I found that it may take more than 30 minutes to bake, up to 40 to completely bake the inside. If you can use a hot pad and turn the bread over in your hand, tap the bottom of the loaf with your finger, it should make a hollow sound. If it's still a little soft, return it to the oven for a few minutes.

Store the remaining dough in the refrigerator in your lidded (not airtight) container and use it over the next 14 days: You’ll find that even one day’s storage improves the flavor and texture of your bread. This maturation continues over the 14-day storage period. Refrigerate unused dough in a lidded storage container (again, not airtight). If you mixed your dough in this container, you’ve avoided some cleanup. Cut off and shape more loaves as you need them. We often have several types of dough storing in the refrigerator at once. The dough can also be frozen in 1-pound portions in an airtight container and defrosted overnight in the refrigerator prior to baking day.

FOR PIZZA:

Pinch off a palm sized piece of dough, shape into a round, rectangular or square shape. Dough is sticky so keep some extra flour nearby, dust your hands as necessary to shape the dough. If the dough starts to snap back you should let it rest for a few minutes and then resume shaping.

Place onto parchment paper, a dusted pizza peel or the bottom of a dusted baking sheet. You can use anything you want providing the pizza can slip right off onto the rack.

If you are baking in an oven, preheat your oven to 500° or as high as it will go. Top the dough with anything you like, slid it into the hot oven and bake for 12-14 minutes.

If you are grilling dough, preheat bbq to high. Slide dough onto rack and cook 5-10 minutes on one side. Remove from grill, top the cooked side and return to the grill. Close the lid so the toppings will cook evenly.

Francois, Zoe; Hertzberg, Jeff , MD (2007-11-13). Artisan Bread in Five Minutes a Day: The Discovery That Revolutionizes Home Baking (pp. 26-27). Macmillan. Kindle Edition.


Leave a comment
Share
  • Pin it
  • Share
  • Tweet
  • Share
  • Email

So. Coast Plaza Garden Show Recipes

4 / 25 / 154 / 29 / 15

Windrose Farms Oct 2014-Herb & Cheese Tart w.


Spring Herb Tart

Save
Print
  • 1 recipe pate Brisée recipe, with
  • 1 Tb. chopped fresh thyme, add thyme to flour and stir well
  • ½ pound fontina cheese, grated (or more-to your taste)
  • 1/2 pound fresh asparagus, trimmed and cut into ¼” pieces
  • 1 tablespoon Parmigiano-Reggiano
  • Salt and pepper, to taste

Preheat the oven to 400°. Pre-bake the shell according to directions in Pate Brisée recipe. Let cool to room temperature or cool overnight. Sprinkle with the cooled crust with fontina cheese. Arrange the asparagus pieces around the bottom of the shell, season with salt and pepper; sprinkle with Parmigiano-Reggiano. Bake until the cheese is melted, about 15 minutes. Garnish with fresh herb sprigs. Serve room temperature or slightly warmed. Can be served along with a light salad tossed with vinaigrette dressing.

Serves 6

If you wanted to turn this into a quiche mix together 4 eggs & one cup of cream, half and half or milk. Pour it over the cheese and asparagus and bake approximately 40 minutes. You may have to cover the edge of the crust with foil to prevent it from burning.

Adapted from 'What's In Your Pantry' by Debbi Dubbs

Pate Brisée (Pie Crust)

Save
Print

From ‘What’s In Your Pantry’

www.debskitchen.com
[email protected]

  • Pâte Brisée (Pie Dough)
  • 2 ½ cups flour, (10 ¾ oz.)
  • 1 teaspoon salt
  • 2 sticks butter, cut into pieces
  • 3-5 tablespoons ice water
  • 1 tablespoon sugar (for Pâte Sucrée, sweet pie dough)

Add flour and salt (sugar also if making Pâte Sucrée) into the bowl of a food processor; pulse a few times to incorporate all the ingredients.

Add the butter and process until the mixture is crumbly and the butter is pea size.

Place the mixture into a wide bowl and add water 1 tablespoon at a time until the mixture comes together. Don’t overwork the dough or it will be tough, not flaky. Once the dough comes together in a ball, divide it into two pieces, flatten into disks, wrap in plastic wrap and refrigerate for 30 minutes.

Dough can be wrapped well at this point and frozen for up to three months. Let the dough defrost overnight in the refrigerator before using.

Roll one chilled disk out on a floured counter or rolling mat, lifting and moving the dough every few rolls to help prevent sticking. Add only enough flour to the counter to keep the dough from sticking.

Place your pan on top of the dough to make sure it is the correct size, it should be slightly larger than the pan, then roll the dough onto your rolling pin and unroll over your pan. Gently lift and lay the dough to fit the pan, never pull the dough to stretch it. Lightly press the dough into the pan, roll your rolling pin over the top edge of the tart or pie pan and remove excess pastry.

Cover and refrigerate for 30 minutes. Preheat your oven to 400°.

To blind bake:

Blind baking is baking the dough without filling.

Prick the bottom and sides of the dough; cut a piece of foil large enough to cover the bottom and sides of the dough, butter the dull side and lay the buttered side on the bottom of the dough and press into the sides. Line with pie weights or dried beans and bake in the center of the oven for 20-25 minutes or until lightly browned. Remove the weights and foil and let cool before filling

Makes 2 - 10” crusts

Berry Salad with Pomegranate Vinaigrette

Save
Print
  • ½ shallot, minced
  • 2 teaspoon Dijon mustard
  • ½ cup Pomegranate vinegar, another light vinegar could be used as well
  • ¾ cup extra virgin olive oil, approximately
  • 6 cups baby greens, washed and dried well
  • 2 small Persian cucumbers, sliced
  • 2 cups croutons
  • 1 container each of strawberries, blueberries and raspberries (strawberries sliced)
  • 2 avocados, diced, optional

In a small bowl mix together the shallot, Dijon mustard and vinegar. Add a pinch of sea salt and a little grind of pepper. While whisking slowly pour the oil in until the dressing starts to thicken a little and emulsify. Stop and taste the dressing before adding the remaining oil. You may not need all of the oil depending on the flavor of the vinegar. Add more as necessary.

In a large salad bowl toss together the lettuce, cucumbers and croutons with a little of the dressing. Just until the greens have a shimmer of dressing on them. Season with sea salt and pepper, toss again, taste and adjust dressing and seasonings. Add berries and avocados and drizzle with a little of the dressing.

Serves 6

Leave a comment
Share
  • Pin it
  • Share
  • Tweet
  • Share
  • Email

Mushroom and Gruyere Puff Pastries

12 / 14 / 14

Mushroom-Herb-and-Gruyere-Cheese-Mini-Turnovers6-690x400


Mushroom and Gruyere Puff Triangles

Save
Print

A wonderful easy appetizer to make ahead and freeze individually, pull out cook as many as you need.

  • 1 tablespoon olive oil
  • 1 tablespoon butter
  • 2 cups finely chopped Cremini mushrooms
  • 1 onion, chopped finely
  • 1 teaspoon dried Italian herbs, crushed
  • Sea salt & fresh ground pepper to taste
  • 2 tablespoon flour
  • ½ cup heavy cream
  • 3 tablespoons dry white wine
  • 1/3 cup shredded Gruyere cheese
  • 2 sheets of puff pastry, thawed (12x12 inches)
  • 1 egg + 1 tablespoon water, whisked together

Serves: 32

Preheat your oven to 400°.

Line 2 baking sheets with parchment paper. Set aside.

Heat a medium sauté pan over medium high heat, add butter and olive oil, and add the onion and sauté until translucent. Add the mushrooms, herbs, sea salt and pepper and cook until the mushrooms are lightly browned and no liquid remains in the pan.

Stir in the flour and cook for 1 minute, add the wine and cream.

Remove from the heat, and stir in the Gruyere cheese. Chill.

Place a rolling mat on your counter, or a large piece of parchment paper. Add a little flour and lightly roll out the puff pasty, cut into 16 pieces using a pizza cutter or knife.

You should keep the puff pastry as cold as possible, if it starts to stick or becomes doughy, return it to the refrigerator for about 10 min. Keep the second piece of puff pastry in the refrigerator while you work on the first one.

Scoop about 1 t tablespoon of the cold mushroom mixture into the center of the dough (do not overfill or they will leak). Fold the over in a triangle and, using a fork, press the edges together to seal them.

Place the mini turnovers onto your prepared baking sheet, at least 1 inch apart. Place in the refrigerator for 20 minutes and prepare the second batch. Refrigerate the second batch for 20 minutes for best results.

Brush the sealed edges and tops of the turnovers with the egg mixture.

Bake each tray for about 15 minutes, or until the tops are golden brown.

Adapted from Jo-Anna, A Pretty Life in the Suburbs, courtesy of Kendall Jackson

Leave a comment
Share
  • Pin it
  • Share
  • Tweet
  • Share
  • Email

Summer Ceviche

9 / 24 / 1412 / 3 / 14

ceviche

Ceviche with Avocado and Tomato Broth

Serves 4, approximately

1          pound white fish halibut, red snapper, sole,
2         teaspoons mild or hot pepper
2          tablespoons cilantro, minced
1          tablespoon shallot, minced
1          large rib celery, cut into a small dice
1          medium tomato, cut into the same size as the fish, squeeze out the seeds
1/2      cup freshly squeezed lime juice, or enough to cover ingredients
1          splash olive oil

Tomato Broth

1          slice white bread
1          can whole tomatoes, with juice
1          cucumber, peeled, rough chopped
1          small shallot, rough chopped
1          cup tomato juice
1          tablespoon red wine vinegar
1         tablespoon olive oil
1          pinch garlic powder
Salt and pepper
1         pinch sugar

To Serve:
2          Haas avocadoes, peeled, cut in half, pit removed
1          lemon or lime zested

cilantro sprigs, for garnish

Ceviche:

Chop the white fish into small dice, add to a mixing bowl and set aside.

Clean the pepper of stems, seeds and ribs and mince into a fine dice. You may want to wear glove to do this.

Mix all ingredients together well; making sure it’s all covered by the lime juice and olive oil. Refrigerate for at least 3 hours.

Tomato Broth:

Place the bread into the bowl of a food processor and process until you have coarse crumbs. Add remaining ingredient and process until pureed. Chill for 30 minutes before serving.

Ladle some tomato broth into a cup or bowl. Place avocado into center of bowl, place ceviche into the center and top wit


Leave a comment
Share
  • Pin it
  • Share
  • Tweet
  • Share
  • Email

Pate Brisée

9 / 4 / 1412 / 3 / 14

Pate Brisée is  French term for a short crust, sweet or savory, and used for many pies, tarts, quiches and more. A standard pie crust could be used instead.

make-perfect-pie-crust-1

2 ½      cups all-purpose flour

1          teaspoon salt

1          tablespoon sugar, for sweet dough or

1          tablespoon fresh herbs, chopped, for savory dough

1          cup unsalted butter, chilled and cut into 1” pieces

4          tablespoons ice water, or more if needed

In a food processor, place the flour, salt, and sugar and process until combined. Add the butter and process until the mixture resembles coarse meal (about 15 seconds). Place mix into wide bowl. Add 3 Tb. water and toss to combine. If needed, add more water 1 TB. at a time until dough just comes together. Don’t overwork dough, be light and gentle for a flaky crust.

Turn the dough out onto your work surface and gather it into a ball. Divide the dough into two equal pieces, flatten each portion into a disk, cover with plastic wrap, and refrigerate for 30 minutes to one hour before using. This will chill the butter and allow the gluten in the flour to relax. At this point you can also freeze the dough for later use.

For each disk of pastry, on a lightly floured surface, roll out the chilled pastry to fit it into a 8 or 9 inch tart pan. To prevent the pastry from sticking to the counter and to ensure uniform thickness, keep lifting up and turning the pastry a quarter turn as you roll (always roll from the center of the pastry outwards to get uniform thickness). To make sure it is the right size, take your tart pan, flip it over, and place it on the rolled out pastry. The pastry should be about an inch larger than your pan.

When the pastry is rolled to the desired size, lightly roll the pastry around your rolling pin, dusting off any excess flour as you roll. Unroll on the top of your tart pan. Never pull pastry or you will get shrinkage (shrinkage is caused by too much pulling of the pastry when placing it in the pan). Gently lay in pan and with a small floured piece of pastry, lightly press pastry into bottom and up sides of pan. Roll your rolling pin over top of pan to get rid of excess pastry. With a thumb up movement, again press dough into pan. Roll rolling pin over top again to get rid of any extra pastry. Prick bottom of dough (this will prevent the dough from puffing up as it bakes). Cover and refrigerate for 20 minutes to chill the butter and to rest the gluten.

To blind bake (bake without ingredients) the tart shell: Preheat oven to 400° and place rack in center of oven. Line the unbaked pastry shell with parchment paper or aluminum foil. Fill tart pan with pie weights or beans, making sure the weights are to the top of the pan and evenly distributed over the entire surface. Bake crust for 20 to 25 minutes or until the crust is dry and lightly browned. Remove weights and cool crust on wire rack. Proceed with desired recipe that calls for a pre-baked shell.

Makes two – 9 inch tart shells.

Related Posts Plugin for WordPress, Blogger...
Leave a comment
Share
  • Pin it
  • Share
  • Tweet
  • Share
  • Email

Posts navigation

Previous Page 1 2 … 4 5 6 7 Next Page
Deb

Meet Chef Debbi

READ BIO

Join-Us Sign up for our newsletter to receive exclusive tips 'n tricks, and special offers on classes, tours, and more!

Recent Posts

  • New E-Book!
  • From the Pantry
  • Spaghettini at Home
  • Growing Corn
  • Spring IS Coming!

Categories

BookCUT

What's in Your Pantry?

How to stock your pantry to create delicious dishes.

Learn Chef Debbi's pantry essentials and how to substitute ingredients for pantry staples in her basic recipes for quick and easy meals.
BUY BOOK>

FacebookTwitterInstagramGooglepinterest


© 2014, DEB'S KITCHEN
Angie Makes Feminine WordPress Themes