Where’s Chef Debbi?
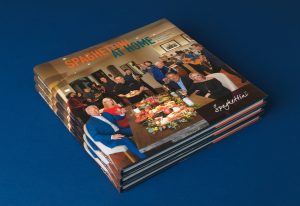

New Cheese Education & Demo Class with lunch
Take home a free copy of my book, A Little Book of Cheese
and a cool Chefs gift bag
Sat. March 25th 12-3
$125.00, BYOB
Menu:
Charcuterie Board
Spring Salad
Cheese Stuffed Shells
Ojai Pixie Tangerine Cheesecake
We’ll be serving one glass of wine with lunch as well but you’re welcome to bring your own!
Cheese and Charcuterie
Individually they are fantastic, but together they are even better! This exciting and informative class will teach you the principles of pairing the finest cured specialties with an incredible array of artisan cheeses to create a perfect match that’s all your own. There’s a delicious and tasty education coming your way
Class will be presented in a beautiful professional kitchen
Ethos Culinary
Carlsbad, Ca.
Address given with payment
The bright star of the season, Meyer Lemons are the sweetest lemons to use in cooking. Thin-skinned, juicy and brightly colored you can use every part of the lemon, well, except maybe the seeds! In season now you can find them in all markets and at your local farmers market. If you have your own tree about now you might be wondering what to do with all those lemons. If you have trouble finding them you can call our friends at Melissa’s Produce and they can fill up your pantry!
Below you’ll find a few of my favorite recipes.
Meyer Lemon Season (Commercial) Nov-May
Home Tree will fruit late Summer-April/May
Choose, Store and Use Meyer Lemons:
Pick lemons that have a smooth, yellow skin with no signs of bruises or cuts. Lemons that are heavy will have more juice in
them; unfortunately, Meyer lemons also contain many seeds. Easily seeded if cut in half, most of the seeds are centered in the middle of the fruit.
Store lemons in a bowl on the counter in a cool place with no direct contact with the sun. If the lemons begin to become soft, refrigerate and use within a few days. If using refrigerated lemons, let them come to room temperature if possible. Roll all lemons around on the counter to help free up the juice.
Extra lemon juice can be poured into ice cube trays, frozen and then placed into a freezer bag and used within 6 months.
Meyer lemon trees grow well in pots in So. California, use a fast draining soil. They are hungry fellows so feed with an organic citrus fertilizer according to directions. They love the So. California sunshine but not so much our sometimes-windy weather. Meyer lemons like to be moist but not wet, deep infrequent watering and don’t let water sit in the liner or pot. If the weather threatens to freeze, water well and cover with a blanket or row cover at night, be very careful not to know off the fruit or flowers on the tree. Feed with an organic citrus food as directed and keep a close watch for citrus pests. Fruit will hold a long time on the tree, make sure they are nice and yellow before picking and after fruiting a little light pruning, if necessary will keep them compact and tidy.
Preheat oven to 400°.
Wash and dry chicken inside and out then dry well. Fit chicken into a roasting pan (you want no more than 1" of space on any side of the chicken otherwise the juices will burn).
Mix together onion, carrot, celery, lemon zest, and 1/2 of the minced herbs. Loosely stuff cavity with some of the ingredients, place the remainder on the bottom of the roasting pan and place chicken on top of the aromatic vegetables.
Mix remaining minced herbs with butter. Gently separate the chicken skin from the breast meat and carefully rub herb butter on breast under the skin.
Rub the chicken with lemon olive oil and season with salt and pepper. Squeeze lemon over chicken and place rind into cavity. Insert probe thermometer into thigh and set for 165 degrees. Pour half of the wine and chicken stock in the bottom of the pan and place, uncovered in hot oven.
Baste after 1/2 hour, if you don't have enough juice in pan use some chicken stock. Do not cover bird until browned and then loosely place foil over breast. If wings start to brown to early wrap with foil.
Remove chicken to a warm plate and loosely cover with foil. Let rest for 10 minutes before carving.
Remove some of the fat in the pan by using a paper towel or ice cubes. (Dredge the paper towel through the juices to pull out some of the fat or pour off the juices into a heat proof measuring cup. Add a few ice cubes; the fat will stick to the cold cube, discard cube. You may have to do this several times).
Put the roasting pan on top of the stove over medium-high heat and bring a boil, add remaining wine and stock scraping the fond (the yummy pieces stuck to the pan) from the bottom of the pan. Reduce by half, add demi-glace if using and serve with chicken.
Photo: Annabelle Breakey; Styling: Dan Becker
I love this bright lemony cake so much I adapted it slightly from Dorie Greenspan by adding these super sweet little strawberries, Alpine strawberries.
Center a rack in the oven and preheat the oven to 350 degrees F. Generously butter an 8 1/2-x-41/2-inch loaf pan and place the pan on a baking sheet.
Whisk together the flour, baking powder and salt.
Put the sugar and zest in a medium bowl and, with your fingertips, rub the zest into the sugar until the sugar is moist and aromatic.
Add the yogurt, eggs and vanilla and whisking vigorously until the mixture is very well blended.
Still whisking, add the dry ingredients, then switch to a large rubber spatula and fold in the oil and then the strawberries. You'll have a thick, smooth batter with a slight sheen. Scrape the batter into the pan and smooth the top.
Bake for 50 to 55 minutes, or until the cake begins to come away from the sides of the pan; it should be golden brown and a thin knife inserted into the center will come out clean. Transfer the pan to a rack and cool for 5 minutes, then run a blunt knife between the cake and the sides of the pan. Unmold, and cool to room temperature right side up on the rack.
Glaze (optional)
½ cup lemon marmalade mixed with 1 teaspoon water
To Make the Glaze:
Put the marmalade in a small saucepan or in a microwave-safe bowl, stir in the teaspoon of the water and heat until the jelly is hot and liquefied. Using a pastry brush, gently brush the cake with the glaze.
You can make this cake with any flavored or un-flavored olive oil that you like. Instead of poppy seeds try adding some dried cranberries or cherries. For serving dust with powdered sugar or make a citrus glaze with orange or lemon juice mixed with some powdered sugar and drizzle over the top of the cake, I like serving this with fresh raspberries on the side and a dollop of freshly whipped cream wouldn’t hurt either!
I’ve used cake pans, bundt cake pans and small Mason jars for this cake, just be aware of your baking time, test by inserting a clean toothpick into the center of the cake and it comes out dry.
Preheat the oven to 350°.
Sift together the flour, sugar, salt, baking powder and baking soda Make a well in the center of the dry ingredients and whisk in the eggs, milk, olive oil, zest and vanilla.
Add the almonds and poppyseeds to the batter, and mix with a spatula or wooden spoon.
Pour the batter into a greased Bundt cake pan. Bake for 55 to 60 minutes, until the cake is golden on top. Cool the cake, invert on a plate and dust with confectioners sugar if you like.
If using Mason jars, spray the inside of the jar with oil spray and fill only 2/3 of the jar with batter. Place jar on a baking sheet and when all jars are done place the sheetpan into the oven and bake accordingly. Check the cakes at 30 minutes and then every 5 minutes until a toothpick comes out clean.
While it’s still pretty hot out in So. California it’s hard to go into the kitchen to cook. Here are some light recipes that are quick and easy to prepare. Mangia!
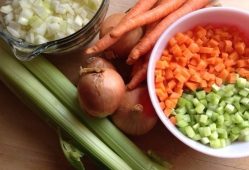
Serves 2
Remove any stems from the spinach and place in a salad serving bowl.
In a heated sauté pan add bacon and cook until crisp, drain on paper towels. Remove all but 2 Tb. of bacon grease and add vinegar, whisk in Dijon mustard and taste for seasoning. Pour over salad and toss quickly, scatter with mushrooms and eggs.
Serve while still warm.
Drain the artichoke hearts. If they are marinated in oil, you can omit draining the hearts and adjust the oil measure downwards appropriately.
Add the artichoke to the food processor with the nuts, cheese, and garlic and pulse until you have a paste. Add in the lemon juice and with the motor running, drizzle in the olive oil. Scrape down the sides of the processor as needed and pulse until you have a uniform paste-like consistency.
Taste and season with salt, pepper, oil, and lemon juice to taste.
Heat oven to 450°. Roll pizza dough out to desired shape, place onto parchment lined baking pan. Brush 1” of the edge of the pizza dough with olive oil, spoon on the artichoke dip to the remaining dough, top with tomatoes, goat cheese and bake for 12 – 15 minutes.
Baked pastry puffs stuffed with a cream cheese, feta, bacon and spinach filling. These are great appetizers that you can put together ahead of time and bake off as needed.
Yield: 10 puffs
Preheat oven to 400°. Grease round or square muffin pan.
Place the cream cheese into a food processor, add egg, oil and dill and pulse until combined.
In a separate bowl mix the spinach, feta and bacon. Pour the cream cheese mixture over top, season it with salt and pepper and stir until combined.
Line the muffin pan with the pastry squares, stretching them out a little if needed; press them into the bottom of the cups. Divide the spinach among the cups as evenly as possible. Bring the 4 points together over the filling and press them together.
Lightly brush with the melted butter.
Bake about 25 minute until golden brown and puffy. Allow to cool in pan on wire rack 10 minutes then run a knife around the edges to loosen them and help pop them out.
Pesto
In a food processor, rough chop pine nuts and garlic. Add basil and process using pulse until the leaves start to break down. Add the cheese and blend until you have a rough paste. With machine running add olive oil to emulsify. Season with salt and pepper.
Preheat oven to 425° and put a pot of water on to boil for the pasta.
Mix the goat and Boursin cheese with enough cream to make it soft and spreadable. Season with salt and pepper.
Cut the tops off of the tomatoes and scoop out the insides. Lightly salt and place, cut side down, on paper towels to drain for 20 min. Spread a little pesto on the inside of the tomato and fill to the top with the goat cheese mixture. Place in a lightly oiled baking dish. Drizzle a little olive oil over each one and bake until they start to shrivel, and the cheese is lightly browned, about 20 min.
Cook the pasta until al dente, reserving about 1 cup of the cooking water.
Transfer to a large serving bowl and toss with the pesto, adding a bit of the pasta water if necessary, to loosen the pesto. Plate the pasta and add a tomato in the center. Top with a sprinkling of toasted pine nuts.
Heat a medium sauté or saucepan. Add enough oil to coat the bottom of the pan, add onion and sauté until lightly translucent. Add garlic and stir for about a minute. Crush or squish tomatoes and add tomatoes and remaining ingredients except the fish then simmer about 10 minutes. Set aside and keep warm.
Heat a large sauté pan over medium heat; add enough oil to coat the bottom of the pan. When oil is hot carefully place dried fish fillets into oil, it should start to simmer right away. Cook about 3-4 minutes and turn carefully for another 4 minutes.
Serve with sauce.
Preheat the oven to 350°F. Grease a 9-inch springform or regular cake pan with butter or nonstick cooking spray. If using a regular cake pan, line the bottom of the pan with parchment paper and grease again.
In a small bowl, whisk together the flour, baking powder and salt.
Using a handheld mixer with beaters or a stand mixer with the paddle attachment, cream the butter and granulated sugar until light and fluffy, about 3 minutes. Add the eggs, one at a time, beating well and scraping down the sides of the bowl after each addition. Beat in the vanilla and rum. Don't worry if the batter looks grainy at this point; that's okay. Add the flour mixture and mix on low speed until just combined. Using a rubber spatula, fold in the chopped apples.
Scrape the batter into the prepared pan and even the top. Sprinkle evenly with 1 tablespoon of granulated sugar. Bake for about 40 minutes, or until the cake is golden and a toothpick inserted into the center comes out clean. Allow the cake to cool on a rack. Run a blunt knife around the edges of the cake. If using a springform pan, remove the sides. If using a regular cake pan, carefully invert the cake onto the rack, remove the parchment paper, then gently flip the cake over and place right-side-up on a platter. Using a fine sieve, dust with Confectioners' sugar (if using). Cake can be served warm or room temperature, plain or with lightly sweetened whipped cream or vanilla ice cream.
Freezer Friendly Instructions: The cake can be frozen for up to 3 months. After it is completely cooled, cover it tightly with aluminum foil or freezer wrap. Thaw overnight on the countertop before serving.

I’m guessing you all noticed that summer finally arrived and so did the desire NOT to cook anything. Here are a few recipes to help you navigate through this heat wave, some recipes are no cooking at all but there are a couple using an Instant Pot or Pressure Cooker and a Slow Cooker. So, break out those appliances that are probably stashed away somewhere.
Make vinaigrette:
In a small bowl whisk together vinegar, mustard, basil, salt and pepper. Slowly add oil while whisking constantly to emulsify. If using right away, let sit at room temperature. Refrigerate after using but let come to room temperature before using.
Spoon dressed romaine onto a large plate and arrange with peppers, artichokes, olives, pepperoncini, tomatoes, onion and cold cuts.
Whisk vinaigrette again and drizzle over salad. Serve with some crusty bread and butter.
Serves 2-4
Rough chop the vegetables and add to a blender, for a chunkier texture process in a food processor instead of a blender.
Squeeze the water from the French bread cubes and add to a blender along with the vegetables. Add olive oil and vinegar and blend to a puree. Season with salt, pepper (if needed), lemon juice, zest and Worcestershire sauce. Refrigerate over night for best flavor.
To serve, check for seasoning again before pouring into a bowl. Garnish the top of the soup with the chopped avocado and shrimp if using.
Goes very well with a nicely toasted slice of cheesy garlic bread.
Lay the tortilla or flatbread on a flat surface. Starting on the edge closest to you, layer a stripe of red pepper about 1/2 inch inside the outer edge. Place the chicken slightly overlapping the peppers, add a strip of arugula, provolone cheese and tomato. Top with the artichoke bruschetta then olives, sliced red onion and drizzle lightly with the balsamic glaze.
Starting from the edge closest to you, fold the portion of the tortilla with the red pepper and chicken into itself, and fold the outer edges of the sides inward, then continue to tightly roll and wrap the sandwich. Slice the wrap in half and serve or cut the halves into even portions to serve as pinwheels. Make the day before or refrigerate for 2-3 days.
Makes 4 Cuban sandwiches
Preheat a pancake griddle or large fry pan to medium hot.
Cut the bread into sections about 8 inches long. Cut these in half and generously spread butter & mustard on both halves (inside.)
Make each Cuban sandwich (Cubano) with the ingredients in this order: pickles, roasted pork, ham, and cheese. Be generous!
Spread a little butter on the hot griddle or fry pan and place the Cubano sandwich on the pan. Use a heavy skillet, bacon press, or foil-wrapped brick to flatten the sandwich. (You really want to smash the Cubano sandwich, compressing the bread to about 1/3 its original size!)
Grill the sandwiches for two to three minutes then flip them over to toast the other side. Once the cheese is melted and the bread is golden brown on both sides, the Cubano sandwiches are done.
Make sure your griddle or fry pan is not TOO HOT! Otherwise, the crust will burn before the cheese melts.
Slice the sandwich in half diagonally and serve.
Tip: Let your meats and cheese come to room temperature. This way you avoid over toasting the bread and the cheese melts perfectly! This is especially helpful when you have a lot of meat in your Cubano sandwich.
You may substitute French bread if you must, but NOT a baguette! Additional bread options: hoagie roll, Mexican bolillo, or ciabatta bread rolls.
Put vinegar, garlic powder, shallots, mustard and herbs together in a bottle or medium bowl, whisk in enough oil to emulsify dressing. Season to taste with salt and pepper. Set aside.
Toss all salad ingredients together in a large bowl. Add a little dressing and toss again, taste and add more dressing as necessary.
*Blanch and cool green beans: Bring a large pot of water to a boil. Meanwhile prepare an ice water bath, a large bowl filled with ice and water.
When the water boils add the green beans and a good amount of salt, boil for 3 minutes then plunge them into the ice water bath.
Serve with optional ingredients sour cream, guacamole, shredded Mexican blend cheese, chopped tomatoes, shredded lettuce, salsa
Cut flank steak into 6 or 8 pieces and marinate in lime juice and oil for about 30 minutes.
Add all the ingredients except tortillas into the crockpot and mix well.
Cook on low for 8 or 9 hours, until the beef is tender and can be shredded easily.
Remove from slow cooker and shred the meat. Return meat to slow cooker and stir.
For the fajitas, spread meat mixture onto warm flour tortillas and add your favorite toppings.
If you can’t find flank steak, you can substitute skirt steak, london broil or flat iron steak
Cut the pork into several pieces so that it fits into the Instant Pot below the fill line. Season the pork with salt and pepper, then brown it on all sides on the searing or frying setting.
Add the onion, celery and carrot around the pork and cover with chicken stock keeping below the fill line. Add the lid to the pot and make sure to turn the steam release vent to the sealing position. Cook on manual for 1 hour. Let the pressure release naturally for 10 to 20 minutes
Remove the pork and slice or shred, add any sauce you like. I use plain shredded or sliced pork for my Cuban Sandwiches.
The meat freezes well for up to 6 months.
Serves 4
Mix together pudding mix and milk according to package directions. Let
thicken slightly and spoon into parfait glasses leaving 2" at the top.
Before serving, whip cream and add a little powdered sugar to your liking. Top
pudding with a layer of pie filling and finish with a spoonful of whipped
cream.
Here’s a ‘pantry’ style dish, use leftover or rotisserie chicken, frozen (defrosted) shrimp, lobster or leave all protein out and just enjoy.
The best rice to use is Arborio or Carnaroli rice from Italy. This short grain rice will release its starch into the dish as you add stock and stir making the risotto nice and creamy.
Another pantry ingredient is dried mushrooms, keep them around all year to add deep flavor to any dish. You could add some sliced fresh mushrooms as well if you like. I also keep lots of chicken stock in my pantry/freezer, organic and low sodium if I don’t make it myself. Be sure to soak the dried mushrooms in chicken stock for at least 20 minutes to rehydrate. Drain the mushrooms, strain the liquid and use as part of the stock in the recipe, the liquid gives a rich deep flavor to the dish. Use a drinkable dry white wine, unsalted butter and freshly grated parmesan cheese, which you should also have in your pantry.
Optional ingredients are chopped garlic (you all know I’m allergic so it’s a no-no for me), a teaspoon of saffron threads.
That’s it, all you need to make a great risotto with items from your pantry. Need to stock your pantry? Check out my first book, ‘What’s In Your Pantry’.

Serves 4
Place the mushrooms in a bowl and cover with chicken broth. Let stand at least 20 minutes to soften. Drain and place the stock into a saucepan with the rest of the 1 qt. of stock. Heat and keep warm. Chop the mushrooms and set aside.
In a large sauté pan heat the oil over moderate heat. Add the shallot and cook, stirring occasionally, until translucent. Add the rice and stir until it begins to turn opaque, about 2 minutes.
Add the wine and cook until all of the wine has been absorbed.
Add about 1/2 cup of the simmering broth and cook, stirring frequently, until it has been absorbed.
Continue to cook the rice, adding broth 1/2 cup at a time and allowing the rice to absorb it before adding the next 1/2 cup. Cook the rice in this way for about 20 -25 minutes in. If you use all the broth but the rice isn’t cooked through you can add water and cook until it’s done.
Add the chicken, mushrooms, Parmesan cheese and heat through. Taste for seasoning and add salt and pepper as needed.
Serve the risotto with additional Parmesan.
Here are a few Cooking From The Pantry recipes for you to enjoy. For more ideas on how to stock your pantry and learn new ways to cook, check out my first book, ‘What’s In Your Pantry’. Available below

Stir the first 6 ingredients together in a large bowl. Stir in the warm water. The dough will be sticky. Gently shape into a ball as best you can. Cover tightly with plastic wrap or aluminum foil. Set on the counter at room temperature and allow to rise for 12-18 hours. The dough will double in size, stick to the sides of the bowl, and be covered in air bubbles.
Turn the dough out onto a lightly floured work surface and, using lightly floured hands, shape into a ball as best you can. Doesn't have to be perfect! Transfer dough to a large piece of parchment paper.
Using a very sharp knife, gently score an X into the top. Cover dough lightly with plastic wrap and leave alone for 30 minutes.
Preheat the oven to 475°. Place your Dutch oven (with the lid) inside for 30 minutes so that it's extremely hot before the dough is placed inside. After 30 minutes, remove the Dutch oven from the oven and carefully place the dough inside by lifting it up with the parchment paper and sticking it all-- the parchment paper included-- inside the pot. Cover with the lid.
Bake for 25 minutes with the lid on. Carefully remove the lid and continue baking for 8-10 more minutes until the bread is golden brown. Remove pot from the oven, carefully remove the bread from the pot, and allow to cool on the counter for 30
minutes before breaking/slicing/serving.
Cover and store leftover bread at room temperature for 1 week.
Adapted from Sally’s Baking Addiction
Preheat oven to 350°. Butter a 9x 13” baking dish and line the bottom with parchment paper.
In a medium size bowl, mix together the flour, baking powder, salt, oats and brown sugar. Stir together to mix the dry ingredients. Using a pastry blender or your fingers, mix the butter into the dry mix. If using your fingers pinch the butter into the dry mix to distribute the butter into small pieces about the size of a pea.
Press half of the mixture into the prepared pan. Spread the jar of jam or fruit spread evenly on top of the crust. Sprinkle the other half of the oat mixture on top of the fruit spread. Bake in your oven for 30 – 40 minutes. Cool completely in the pan. Cut into squares.
Recipe adapted from Just Jans
Place chicken into a freezer type bag and pound until about ½” thick. Pound each piece until ½ inch thick. Sprinkle with salt and pepper.
Set up a dredging station, place each of the following next to each other beginning with the flour.
Mix flour with garlic powder and Italian spices, place on a plate or shallow dish for dredging.
Place whisked egg into a shallow bowl and set next to flour.
Mix breadcrumbs and Parmesan cheese and place into another shallow dish or plate next to the egg.
Serves 4
Dip the chicken pieces, one at a time into the flour, then egg and then the Parmesan breadcrumb mixture.
Heat a pan large enough to hold all the chicken pieces so they don’t touch, add olive oil and then the chicken, don’t overcrowd the pan or the pieces won’t brown. Cook until lightly browned then set aside, if needed, and cook remaining pieces.
When finished browning the chicken you can add them back to the pan or place on a sheet pan and top with a little marinara sauce and mozzarella cheese, broil until cheese has melted.
Serve immediately.
Serves 4
Cook pasta according to directions on package. Drain and set aside.
In a medium saucepan over low heat, heat cream and butter, stirring
constantly. When cream begins to simmer mix in a small amounts of Parmesan
cheese, stirring constantly, until all cheese is added, and sauce has
reduced. It should be thick and easily cover the back of a spoon.
Stir in nutmeg and black pepper. Toss with warm fettuccini and serve.
Prepare the filling by combining all the ingredients in a bowl and mixing with an electric mixer until well-combined. Refrigerate for at least an hour and up to 2 days.
Fill a plastic zip bag with the ricotta mixture, snip off a corner of the bag, and pipe the mixture into the shells. Serve and enjoy!
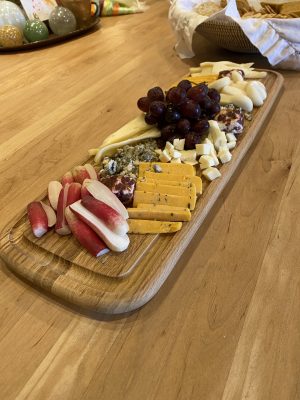
How to Build a Cheese or Charcuterie Board
Tips:
Try serving some of the jams, preserves, mustard, spreads or chutneys in small bowls. Anything that has a brine or is juicy should also go into a bowl such as olives and pickled vegetables. This will also give some height to the board, serve breadsticks in a jar or glass as well.
Serve each cheese and meat with its own cheese fork or utensil and picks for the olives or vegetables, spoons, cheese knives and mini tongs for the meat.
Try arranging the board where it will be served so as not to knock anything off while you are moving it. Make ahead and cover with a tea towel to keep out any pests.
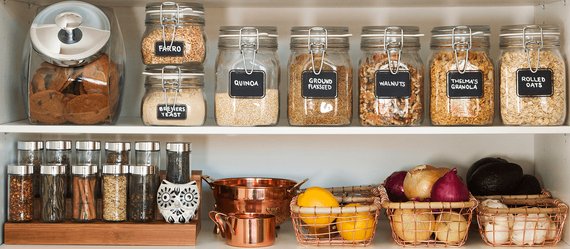
This is but a small list of fall pantry items that I like to keep for fall. With these on hand you can make breakfast, lunch, dinner and dessert without stress. There are even some items to have on hand for those friends who like to drop in for a visit. Throw the artichoke hearts in a food processor, add some spices and a little yogurt, cream cheese or mayo and bake for 20 minutes. Or drain and throw the roasted red peppers into a food processor, add a little leftover bread, walnuts, tomato paste with a little olive oil, salt and Aleppo pepper for a tasty dip for bread or crackers. Add things that your family likes to eat in the fall, for all the upcoming holidays and special events. Here’s a great fresh, homemade applesauce recipes, serve along side pork chops or bake into an applesauce cake for a warm, spiced dessert or breakfast snack. Happy Fall!
Beverages
Cocoa
Tea
Mulled Cider
Fruit
Apples (do not store with other fruit or vegetables-apples give off ethylene gas which will hasten the ripening of other fruits and vegetables)
Applesauce
Dried fruit
Pears
Pomegranates
Citrus
Vegetables
Potatoes
Carrots
Onions
Canned
Dried fruit (cranberries, apricots, blueberries etc.)
Canned pumpkin
Canned and dried beans (for soups, stews, chili)
Canned Tomatoes
Tomato sauce
Tomato Paste
Garlic
Onions
Pickles
Roasted Red Peppers, in water
Grains
Oatmeal (rolled oats & steel cut)
Alternative grains
Breadcrumbs
Rice
Soup
Pasta
Mac & Cheese Pasta
Lasagna noodles
Flour
Dairy
yogurt
cheese
Condensed milk
Unsalted butter
Variety of cheeses
Staples
Artichoke Hearts, canned in water
Breadcrumbs
Chicken, Vegetable, Beef Stock
Crackers
Honey
Maple Syrup
Molasses
Sugar, white, brown, dk. Brown
White vinegar (for pickling)
Apple Cider Vinegar
Balsamic Vinegar
Spices
Aleppo Pepper
Sea salt
Baking Spices
Cinnamon sticks
Nuts
Pickling spice
Peppercorns
Yeast
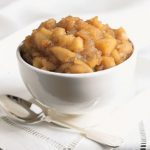
Core, peel and cut the apples into medium sized pieces. Place all ingredients into a saucepan with lid and simmer over low heat until apples are very tender, about 45 minutes. Put through a food mill to create a soft creamy applesauce or use a potato masher and serve chunky.
Pressure cooker or Instant-pot:
Combine all the ingredients in the container, cover and lock into place. Press manual button and set timer for 4 min. Let the closed pressure cooker rest for about 10 minutes, release any pressure that’s left.
Carefully open lid, angling it away from you to avoid getting burned by the steam. Use a potato masher to crush with a slightly chunky consistency or put through a food mill for a smoother one.
Summer is almost here! Not that you would know that by the weather we’re having. The rain is nice and it makes the garden grow but my other half is craving those warm summer days. Even though here in Southern California we grill all year long, Memorial Day is the official start of grilling season. Whether you grill on gas, charcoal or wood these recipes are easy do ahead recipes for cooking outdoors and picnics. So clean up that grill and set the table because dinner is served! Check out this simple cheese platter, get A Little Book of Cheese to learn all about cheese and how to make a platter!
Make this light summer pasta salad recipe a day ahead of time so that it can soak up all the bright, tangy dressing.
For dressing, mix together vinegar, Dijon, salt, pepper, and garlic powder and whisk until it comes together. While continually whisking slowly add olive oil to taste. Set aside.
Mix together remaining ingredients and toss with dressing. Serve cold.
*Boil the pasta according to package directions, drain and rinse with cold water. When pasta has cooled down a bit, shake off excess water (dry with a towel, if necessary) and toss lightly with olive oil to keep from it sticking together. Refrigerate until ready to toss with dressing. Be sure to cool your pasta before adding the dressing otherwise the pasta will soak it all up.
This is quick and easy do ahead baby back ribs. By using your Instant Pot or pressure cooker your ribs will come out nice and tender. Finish off on the grill with your favorite BBQ sauce.
Cut the racks of ribs in to sections that will fit in the pressure cooker and rub with salt and pepper.
Place onion, celery, carrot and beer in the pressure cooking pot. If you’re going to make sauce from the juices in the pressure cooker you can place the ribs directly in the liquid or put the ribs on the rack if you’re going to finish the ribs on the grill or under the broiler with another sauce.
Close and lock the lid of the pressure cooker. Select High Pressure and set the timer for 12 minutes. Press start.
When beep sounds, turn off pressure cooker and use a natural pressure release for 10 minutes and then do a quick pressure release to release any remaining pressure. When valve drops carefully remove lid.
Remove the ribs and cool to room temperature. Once cool, refrigerate until ready to serve.
To finish the ribs:
Preheat the BBQ grill to a medium high heat. Coat one side of the ribs with BBQ sauce and grill 3 minutes. Coat the other side with BBQ sauce flip and grill an additional 3 minutes. Slather on additional BBQ sauce and grill each side for an additional 3 minutes.
You could do the same as above by broiling them until just how you like them.
Serve immediately.
The perfect BBQ side dish as they can be made in advance, wrapped in foil and heated on the grill before serving.
Preheat oven to 450°. Pierce potatoes with fork. Lightly oil potatoes and
place on oven rack. Bake until cooked through, about 1 hour. If potatoes
starts to crisp and brown up, turn the oven down to 400. Transfer to baking
sheet; cool 5 minutes. Cut potato in half lengthwise. Carefully scoop meat
from the shell and mix with remaining ingredients, mashing lightly as you go. Season and taste before scooping mixture into potato shell.
Can be prepared 1 day ahead, covered and refrigerated. Bring to room temperature before the final cooking stage.
Preheat oven to 400°. Bake potatoes on baking sheet until heated through
and beginning to brown, about 25 minutes. For the grill, wrap each ½ in heavy duty foil, heat on the indirect side of the grill for about 20 minutes or until hot. Garnish with finely minced green onions, chives or crumbled bacon.
We’ve Moved!
Join us in our new home at Chef Tech in Bixby Knolls, Long Beach with owner Chef Teri.
We now have a full kitchen with tables & chairs and lots of room. We look forward to seeing you there soon! See new address at the bottom of the class menu, (you do not need to have a pay-pal account). You can sign up with Chef Debbi (call me, 562-243-3926) or click on the pay-pal button below. There is a small service charge for using pay-pal but you can always mail me a check. Classes are pre-paid reservations and cancellations are 100% refundable up to 3 days prior to class.

Wed. March 20th
6:30 – 8:30PM

Spanish Tomato Toast
Romaine Heart Salad with Marinated Olives, Hearts of Palm, Tangerines &
Shaved Manchego
Spring Asparagus, Shrimp & Scallop Paella
Individual Strawberry Cheesecakes

NEW LOCATION!
Chef Tech Cooking School
3842 Atlantic Avenue
Long Beach, CA 90807
See April class date & menu by clicking on the month.
By Reservation Only, Sign up below
$55.00
(562) 243-3926
Or
Debskitchen.com
Enjoy larger portions, Tables & More
Sponsored by