The first book in my ‘little’ series is available for pre-sale. Books will be shipped out March 11th! Please use the pre-sale link below to reserve your copy!

The first book in my ‘little’ series is available for pre-sale. Books will be shipped out March 11th! Please use the pre-sale link below to reserve your copy!
We’ve Moved!
Join us in our new home at Chef Tech in Bixby Knolls, Long Beach with owner Chef Teri.
We now have a full kitchen with tables & chairs and lots of room. We look forward to seeing you there soon! See new address at the bottom of the class menu. You can sign up with Chef Debbi (call me, 562-243-3926) or click on the pay-pal button below. There is a small service charge for using pay-pal but you can always mail me a check. Classes are pre-paid reservations and cancellations are 100% refundable up to 3 days prior to class.

Wed. April 10th
6:30 – 8:30PM
‘A Little Book of Cheese‘ is here!
Book Signing & Demo Class
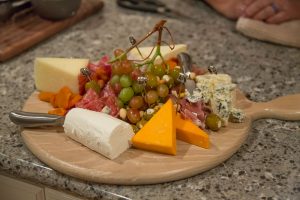
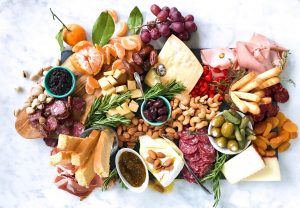
How to Prepare a Cheese & Charcuterie Board and Tasting
Smoked Gouda and Red Pepper Grilled Cheese Sandwich Bites
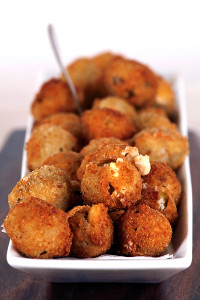
Fried Blue Cheese Stuffed Olives
Italian Stuffed Shells with Broccoli and Pine Nuts
Brie Puff Pastry Pockets
NEW LOCATION!
Chef Tech Cooking School
3842 Atlantic Avenue
Long Beach, CA 90807
See April class date & menu by clicking on the month.
By Reservation Only, Sign up below
$55.00
(562) 243-3926
Or
Debskitchen.com
Enjoy larger portions, Tables & More
Sponsored by
![]()
Get a preview of Chef Debbi’s upcoming NEW book!
Cooking Demo at Temecula Olive Oil Co. Seal Beach
Thur. Jan 31, 6:30 – 8:30, approximately
Small Cheese Tasting
Smoked Gouda and Red Pepper Grilled Cheese Sandwich Bites
Fried Blue Cheese Stuffed Olives
Italian Stuffed Shells with Broccoli and Pine Nuts
Brie Puff Pastry Pockets
$45.00
![]()
By Reservation Only
(562) 296-5421
Temecula Olive Oil Co.
148 Main Street
Seal Beach, CA 90740

Sponsored by
![]()
1 cup mixed olives
2 Tablespoons olive oil
1 teaspoon dried Italian herbs, ground
1 wedge triple cream brie
1 small jar of fig jam or fruit spread
8 ounces aged Gouda
8 ounces aged sharp cheddar, thinly sliced
1 baguette, sliced 1-inch thick
1 round of boursin, any flavor
2 packages of interesting looking crackers
1 wedge blue cheese, partially crumbled
1 small jar of honey
1 package mixed Italian meats
1 small bunch red seedless grapes
4 ounces nuts, mixed or single
1 package, 4 oz. of dried apricots
2 apples, cored and sliced tossed with lemon juice to prevent browning
Mix together olives, olive oil and ground Italian herbs, let rest for at least an hour or longer.
Don’t crowd the cheese on the platter, make the board big enough to accommodate all ingredients.
Put the mixed olives in a small bowl and place on the platter.
Place the triple cream brie on the platter and arrange the fig or fruit spread next to the brie.
Place the sharp cheddar and gouda on the board next with the baguette slices nearby.
Then arrange the boursin near the baguette slices with the crackers next.
Add the blue cheese and honey on the board filling out the outer edges of the board. Tuck in the Italian meats all around the board, add the grapes in clumps and spread the nuts throughout the board with little pockets of dried fruit. Place the apples near the cheddar cheese.

Makes 24-30
Preheat oven to 450° and line 2 pans with parchment paper or baking sheet liners.
In a large sauce pan, combine the water, milk, butter and salt and bring the mixture to a full boil over medium-high heat. When the butter has melted add the flour, all at once, and stir vigorously with a wooden spoon until the mixture forms a ball that pulls away from the sides of the pan.
Turn the heat down to medium and cook the dough for another 3 or 4 minutes to dry out and cook the flour taste out of the dough. It will look a little shiny and there will some starch remaining on the bottom of the pan and the dough will be stiff.
Transfer the dough to the bowl of a stand mixer fitted with a paddle attachment. (Alternatively, use an electric hand mixer or beat by hand with a stiff spatula.) Beat the dough on medium-low speed until it stops steaming and is just warm to the touch, about 1 minute.
Continue beating and add the eggs in one at a time. Wait for each egg to be absorbed completely before adding the next. Scrape down the sides of the bowl if needed. Once the dough comes together after the addition of all the eggs, add the cheese and mix until it’s well distributed.
Scoop rounded tablespoons of dough onto the baking sheets, spacing the about 1-inch apart. They can be piped on using a piping bag or a storage bag with the corner snipped off.
Press the top down with a fork or spoon dampened slightly with water, until the tops are smooth. Brush with the egg wash mix and bake for 5 minutes. Turn the heat down to 350° and bake for 20-25 minutes until they are golden brown. Rotate the sheets half way through the baking period. If the inside of the gougere isn’t done, turn off the oven and prop the door open with a wooden spoon for about ½ hour so they can dry out a little.
The gougere’s can be stored in the refrigerator up to a week or frozen for a month. You can fill these with any kind of cheese stuffing or serve them as a stand-alone bite.
Are you hankering for some romaine lettuce? Well, there are tons of alternatives here in So. Cal for you. From the CDC website here’s what they are saying about the current outbreak of e coli on romaine lettuce.
‘Based on new information, CDC is narrowing its warning to consumers. CDC is advising that U.S. consumers not eat and retailers and restaurants not serve or sell any romaine lettuce harvested from the Central Coastal growing regions of northern and central California. If you do not know where the romaine is from, do not eat it.’
Here’s the link for more information, CDC.
Personally, I like a mix of lettuce mostly, a little crunch, a little color and a tangy dressing. My favorite is a good old Italian dressing made with a very good red wine vinegar. I love a little cheese as well, blue, parmesan or goat goes well with a tangy Italian dressing.
Just mix a little Dijon mustard, like Maille, with your red wine vinegar, add a little minced shallot, some fresh ground Italian spices and whisk in a little olive oil, season with salt and pepper and you’re done.
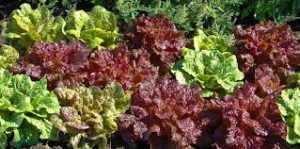
Local lettuce varieties are usually more plentiful during the winter as most lettuce prefers to grow in the cooler weather. Here are some varieties that will offer no only color but flavor to your salad bowl.
Choose lettuce that is bright with no brown edges or spots. Try and get them not too wet, if they are wet, they have a tendency to go bad faster. Pick whole heads of lettuce rather than bagged lettuce. The more lettuce is handled from field to bag the greater chance it can pick up any bacteria. Bagged lettuce can also be washed with chlorinated water and tends to be older than a non-bagged lettuce. Are you tempted to buy the bag that says triple washed and leave it at that? That lettuce may be contaminated with more than just chlorinated water and if it’s wet at all it will likely rot within a couple of days in that bag. Buy un-bagged lettuce, wash and dry well before storing. You might notice that if you purchase your lettuce at a farmers market that it lasts longer than a store bought lettuce, it’s because your farmers market lettuce was probably picked within a couple of days. I’ve had lettuce last up to 2 weeks from my farmers markets. So here are just some of the lettuce types you should be able to pick up anywhere.
Arugula (Rocket)-spicy and peppery, the larger the leaves the more bite it will have
Batavia is a loose-leaf lettuce similar to red or green leaf lettuce with a mild flavor
Belgian Endive-these can be a tad bitter, but they will add crunch to any salad mix
Butter-a very mild lettuce with big cupped leaves, great for serving topped with a crab salad
Frisee (Curly Endive)-Sometimes called chicory, the leaves are thin and curly with a little bit of a bite, aka peppery.
Iceberg-A dense head of lettuce with lots of crunch but little flavor
Leaf Lettuce, Red or Green-Another loose leaf lettuce with mild flavor but both add a lot of color to a salad bowl, great on sandwiches as well.
Little Gem-This lettuce looks like a mini version of romaine but it’s not as crunchy, mild flavor
Oakleaf-Another beautiful bi-colored loose-leaf lettuce that has a mild taste
Radicchio-There are numerous colors of radicchio, most have a little bitterness but a great addition to any salad.
Spring Mix-Usually a variety of small lettuces, some are mild, and some mixes can be spicy.
Watercress – Although probably a little difficult to find it makes a nice addition to a mixed salad or added to a rustic piece of bread slathered with some soft cheese. It has a peppery bit, much like Arugula. Use smaller leaves for less intense flavor.
![]()
Join us in Seal Beach
NEW DATES/DAYS
Thur. Jan 10th
Tue Jan 22
6:30 – 8:30, approximately
Menu
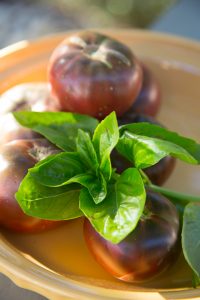
Pink Grapefruit, Avocado & Watercress Salad with Pomegranate Vinaigrette
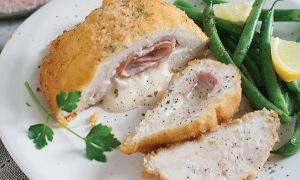
Chicken Cordon Bleu
Spaghettini with Vodka Cream Sauce
Winter Roasted Vegetables with Basil Vinaigrette
Lemon Curd Cream Puffs
$45.00
Taking reservations now, call:
Temecula Olive Oil, 148 Main St. Seal Beach
(562) 296-5421
![]()
Sponsored by our friends at
![]()
![]()
Join us in Seal Beach
Thursday,
July 12th & 19th,
6:30 – 8:30, approximately
Caprese Skewers with Fresh
Sprouts & Edible Flower Salad
Couscous with Sautéed Green Beans and Almonds
Balsamic Glazed Pork Tenderloin with Stone Fruit Salsa
Peach Crisp
$45.00
For reservations call
Temecula Olive Oil, 148 Main St. Seal Beach
(562) 296-5421
Sponsored by
![]()

Cambria Pines Lodge, Cambria, Ca
Hot Buffet Breakfast Included

Dinner and Culinary Demo with Chef Debbi and the Debettes
Climb aboard with The Wine Wrangler
We’ll travel to the Westside of Paso Robles to Halter Ranch Vineyard & Winery
Experience a private Cave Tour with a Barrel Tasting from 3 Cave Barrels
Private Tasting of Halter Ranch’s available vintages in the new Tasting Room overlooking their fabulous vineyards
Vineyard Picnic Lunch on Halter Ranch’s Patio Deck overlooking the vineyards
Created for you by Chef Debbi & her Debette team
After lunch climb aboard with The Wine Wrangler to travel to
Stepladder Ranch in San Simeon
We’ll visit with their Lamancha goats and taste a variety of cheeses made from their goat milk. This farm is accessible only by invitation and is hidden in the hills above San Simeon and the Pacific Ocean

Our last stop for the day will be a visit (and tasting) at The Hearst Ranch Tasting Room in San Simeon. Step out on the porch for an exquisite view of San Simeon Beach and Harbor
Return to Cambria for late afternoon & evening private time
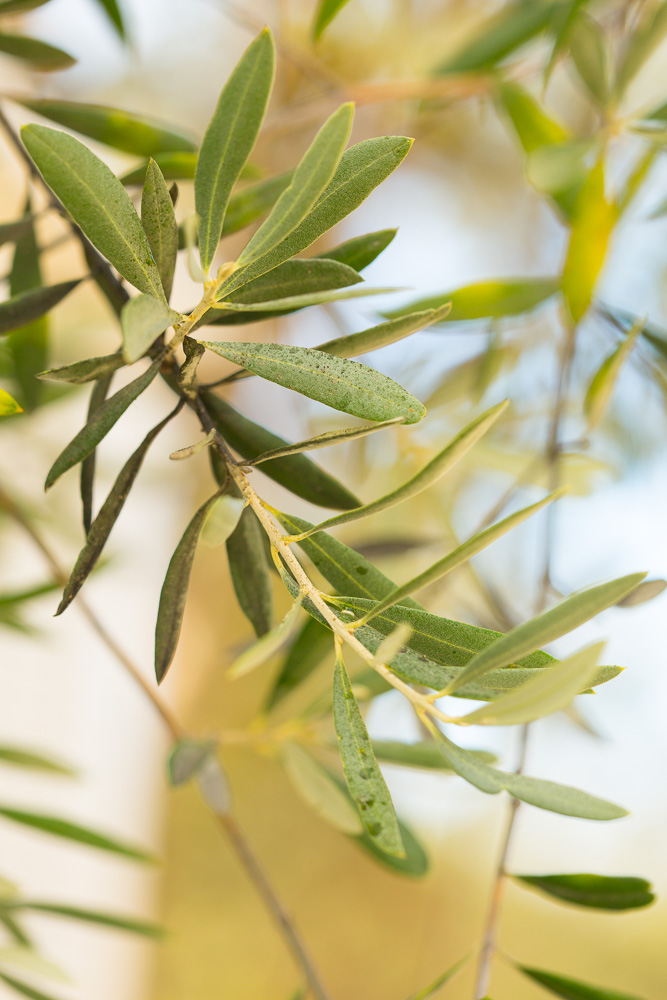
The Groves on 41 Olive Oil Farm Tour & Tasting
Picnic Lunch
Don’t Miss The Cambria Scarecrow Contest the month of Oct!
Limited Availability, First Come-First Served
Price is Per Person based on Double Occupancy for all rooms
Sponsored by
![]()
Preferred Method of payment, save Paypal fees by paying by check!
To pay by check:
Please send an email to Debbi @ [email protected]m for instructions
![]()

Easy to make ahead of time and bake off at the last minute, make extra they go fast!
Preheat the oven to 350° and line a baking sheet with parchment paper.
Mix the maple syrup and salt together, add the walnuts and stir until coated.
Spread the nuts on the baking sheet and bake for 12 - 15 minutes or until the glaze is bubbly and coats the walnuts well. Remove from oven and let cool.
Turn the oven up to 425° and line a baking sheet with a new piece of parchment paper.
Slice dates lengthwise and remove pits.
Scoop a small amount of Boursin cheese with a spoon and fill the date with the cheese, press a glazed nut into the cheese.
Wrap dates with a slice of bacon, and secure with a toothpick to hold bacon onto date. Place the dates on the parchment on their side and bake for about 7-8 minutes or until browned on the bottom and turn to the other side continue to cook for another 7-8 minutes or until the bacon is cooked and a little crispy, and the cheese is slightly melted.
Let cool and serve warm or at room temperature.
Photo: La Tienda
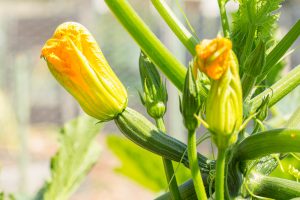
I first tasted these at The Santa Monica Farmers Market about 15 years ago when The Two Hot Tamale girls were doing a demo for their restaurant, Border Grill (now closed, sadly). It’s a perfect little snack for an early summer day, zucchini plants are going wild with flowers and are daring to be picked & stuffed. Make sure you pick all male blossoms rather than female blossoms or you won’t have any fruit. To tell the difference look at the bottom of the flower, you’ll see a round little nub or small zucchini attached, this is a female blossom….move on. The male blossoms are attached just by them stem with no nub at the bottom, you’ll be able to tell. Open the flowers gently as there may be a bee inside collecting pollen, he will fly away when you open the petals, be gentle. If you want to wash them use cool water and dry well but do this just before you’re ready to prepare the dish. Or you can buy them at your local farmers market, the blossoms are delicate and will last no more than a day so pick right before you’re going to make the quesadillas.
Mix together all ingredients together seasoning with salt and pepper, to taste.
Heat a grill pan or griddle, add 1 Tb. butter. Add a tortilla and cook it on one side until it puffs (about 30 seconds).
Flip tortilla over and sprinkle over entire surface 1/4 cup of squash blossom filling.
Top with another tortilla, and after cheese has melted and the two tortillas stick together (a couple of minutes), flip quesadilla and cook for a couple of minutes more.
Repeat for the remainder of the filling and tortillas.
For the Tomatillo Salsa
Place all ingredients in a blender or food processor and pulse to combine. Blend on low speed until a coarse puree is formed.
Pour into a bowl, taste and add more salt or lime if desired. Salsa can be thinned with a bit of water if desired.
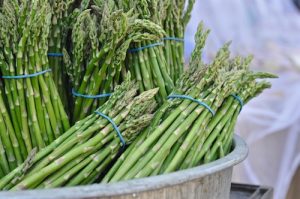
I love sweet California asparagus, especially the small early stalks simply sautéed in butter and seasoned with a little lemon zest, sea salt and freshly ground pepper. But for serving to guests I also enjoy this quick and easy gratin, it pairs well with Lemon Roasted Chicken and a cold glass of Viognier.
Adjust oven rack to upper-middle position and heat broiler.
Prepare an ice bath (cold water and ice) large enough to hold the asparagus.
Cut ends off the asparagus and set aside.
Fill a large skillet ¾ full of hot water, bring to a boil. Add asparagus and a heaping tablespoon of salt. Cook for about 2-4 minutes or until lightly cooked. Immediately plunge asparagus into ice bath to stop the cooking.
Melt butter in now empty skillet over medium heat. Add flour and cook, stirring constantly until golden, about 1 minute. Whisk in milk and bring to boil. Reduce heat to medium-low and simmer until thickened, 3-5 minutes., whisk in ½ cup Parmesan and Monterey jack until smooth, season with salt and pepper. Turn off heat. Cover and let stand for 5 minuets.
Place asparagus into an oven proof serving dish and drizzle sauce over center of asparagus and top with remaining Parmesan. Broil until cheese is golden and asparagus is tender, 4-8 minutes. Serve.
Photo: LA Times