Deb's Kitchen - Farm, Food, Wine & Lifestyle Adventures
  • Facebook
  • Google
  • Twitter
  • Instagram
  • Pinterest
  • Email
Menu
Skip to content
  • Home
  • Blog
  • Events
    • Classes
    • Tours & Adventures
  • Edible Gardening
  • Preserving
  • Recipes
    • Appetizers
    • Soups and Salads
    • Main Dishes
    • Side Dishes
    • Desserts
  • About
    • Whats In Your Pantry
    • Ask Debbi
    • Deb’s Kitchen Botanicals
    • Press
  • Contact

Tag Archives: pie crust

Pie Crust

11 / 17 / 1511 / 17 / 15

Nothing beats a great pie, perfectly balanced filling and a tender, flaky piecrust. Piecrusts are easy to do, don’t let them intimidate you! My Grandmother taught me her secrets to a good crust, use good butter (unsalted), keep all of your ingredients very cold and work quickly. So there’s a little more to it than that but remember those three things and you’ll be fine.

pie-crust-guide

This recipe calls for shortening which creates a tender, flaky crust, my Grandmother used lard and if it’s available to you it may be a better choice than shortening (which is another discussion). If you’d rather not use lard or shortening you could use all butter and the pie will be just as delicious.

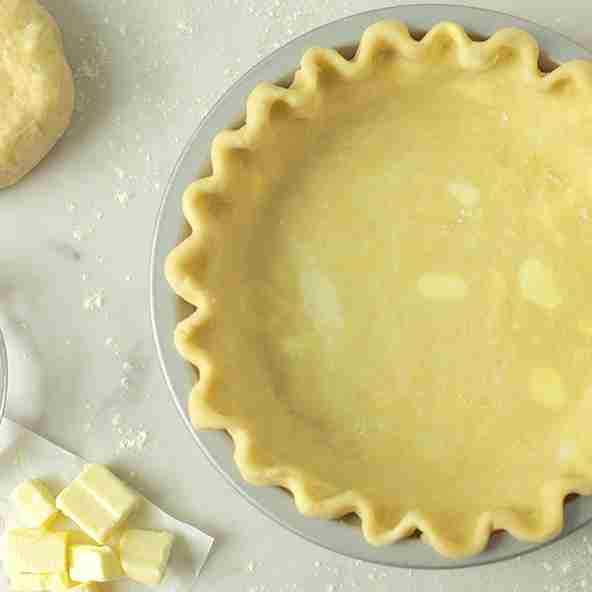
Another trick that I picked up from King Arthur Flour is instead of just cutting your piecrust in half; cut it in 2/3 and 1/3 discs. The bottom of the pie will take more crust because it will hold the entire filling and the top crust only needs to cover all the ingredients. Well, duh…..why we never thought of that before! (See this is probably why I don’t bake much).

If you’d like to pre-make your pie crust you could freeze it two ways; one freeze the disc or roll the crust out, fit it into the pan and freeze, defrost overnight in the refrigerator and then continue with the recipe.

I cut the butter into the dry ingredients in the food processor, it takes less time, and just pulse it a few times until it looks like peas and you’ll be fine. I like to put the flour/butter ingredients into a bowl and incorporate the ice water using my fingers and tossing the dough until it comes together, that way I make sure I’m not adding too much liquid. I turn it out onto a rolling mat while it’s still very crumbly and bring it all together quickly by rolling and kneading lightly. I add only enough flour to the rolling mat as needed to keep the dough from sticking to the mat; I use a bench or dough scraper to actually fold it all together. Once the water hits the dough you begin developing gluten, which can make the dough tough so work it as little as possible at this stage. Press the dough into discs and refrigerate for at least an hour and then roll out and blind bake as described in the recipe. Blind baking helps keep the crust light and flaky, especially with a wet filling. Protect the edges of the crust if they start to brown by using a pie shield or cover with the edges with foil. Bake up some pies today~ Happy Holidays!

Perfectly Flaky Pie Crust Recipe

Talisman Designs Adjustable Pie Crust Shield, BPA-free Silcone, Red, Fits 8.5″ – 11.5″ Rimmed Dish

Leave a comment
Share
  • Pin it
  • Share
  • Tweet
  • Share
  • Email

Potato and Ham Quiche

2 / 22 / 14

Ingredients

Crust

1 1⁄4 cups flour

1 teaspoon salt

1 stick butter, cut into pieces

2 – 3 tablespoons ice water

Filling

1⁄4 cup finely diced ham

2 -3 Yukon Gold potatoes

1 1⁄2 cup shredded cheese, such as Chedderella

4 large eggs

1 1⁄2 cups heavy cream or half and half

1 – 2 tablespoons olive oil

Salt and pepper

Preparation

Crust

Add flour and salt into the bowl of a food processor; pulse a few times to incorporate all the ingredients.

Add the butter and process until the mixture is crumbly and the butter is pea size.

Place the mixture into a wide bowl and add water 1 tablespoon at a time until the mixture comes together. Don’t overwork the dough or it will be tough, not flaky. Once the dough comes together in a ball, divide it into two pieces, flatten into disks, wrap in plastic wrap and refrigerate for 30 minutes. Preheat oven to 400° while the dough is chilling.

Dough can be wrapped well at this point and frozen for up to three months. Let the dough defrost overnight in the refrigerator before using.

Roll one chilled disk out on a floured counter or rolling mat, lifting and moving the dough every few rolls to help prevent sticking. Add only enough flour to the counter to keep the dough from sticking.

Cut a piece of parchment paper to fit the bottom of the tart pan.

Place your pan on top of the dough to make sure it is the correct size, it should be slightly larger than the pan, then roll the dough onto your rolling pin and unroll over your pan. Gently lift and lay the dough to fit the pan, never pull the dough to stretch it.

Lightly press the dough into the pan, roll your rolling pin over the top edge of the tart or pie pan and remove excess pastry. Prick the dough well with a fork.

Cut a piece of foil a little larger than the tart pan, butter the shiny side and place butter side down onto the dough. Press so the foil lays against the dough snugly, add another piece of foil if it doesn’t cover the entire crust.

Bake the crust for 20 minutes, remove beans and foil, bake another 5 minutes. Remove from oven and cool before filling. (Leave oven on).

Filling

Boil potatoes until knife tender (when a knife can slip into the potato effortlessly with a little resistance). Drain and let cool until you’re able to handle them. Slice into disks or chop into a medium dice.

Heat a medium sauté pan, add oil until it covers the bottom of the pan, add potatoes and season with a pinch of salt and grind of pepper. Sauté potatoes until lightly browned, add ham and cook for about 2 minutes or until browned. Add potato mixture to the bottom of the cooled crust. Add cheese on top of the potato mixture.

Whisk together the eggs and cream, add a little seasoning of salt and pepper, pour over potato and cheese mixture, bake for 30 minutes or until puffed and lightly browned.

Let cool before serving.

Related Posts Plugin for WordPress, Blogger...
Leave a comment
Share
  • Pin it
  • Share
  • Tweet
  • Share
  • Email
Deb

Meet Chef Debbi

READ BIO

Join-Us Sign up for our newsletter to receive exclusive tips 'n tricks, and special offers on classes, tours, and more!

Recent Posts

  • New E-Book!
  • From the Pantry
  • Spaghettini at Home
  • Growing Corn
  • Spring IS Coming!

Categories

BookCUT

What's in Your Pantry?

How to stock your pantry to create delicious dishes.

Learn Chef Debbi's pantry essentials and how to substitute ingredients for pantry staples in her basic recipes for quick and easy meals.
BUY BOOK>

FacebookTwitterInstagramGooglepinterest


© 2014, DEB'S KITCHEN
Angie Makes Feminine WordPress Themes