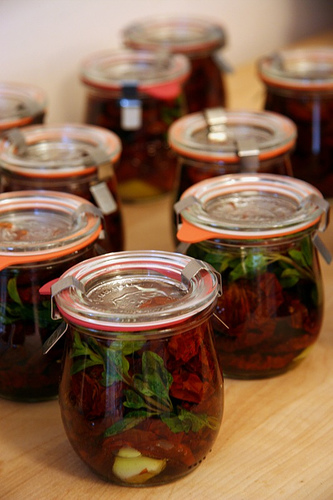
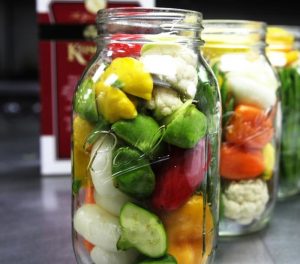
Deb's Kitchen - Farm, Food, Wine & Lifestyle Adventures
  • Facebook
  • Google
  • Twitter
  • Instagram
  • Pinterest
  • Email
Menu
Skip to content
  • Home
  • Blog
  • Events
    • Classes
    • Tours & Adventures
  • Edible Gardening
  • Preserving
  • Recipes
    • Appetizers
    • Soups and Salads
    • Main Dishes
    • Side Dishes
    • Desserts
  • About
    • Whats In Your Pantry
    • Ask Debbi
    • Deb’s Kitchen Botanicals
    • Press
  • Contact

Tag Archives: recipes

Refrigerator Pickled Veggies

8 / 4 / 16

pickling2


Pickled Veggies

Save
Print
  • 1 bunch of radish
  • 3 carrots
  • 4 mini white turnips
  • ¼ # thin green beans
  • 4 small watermelon radish
  • 1 lg. clove garlic, crushed but whole
  • 2 shallots, sliced thin
  • 2 ½ cups pomegranate or red wine vinegar
  • 1 cup apple cider vinegar
  • ½ cup white vinegar
  • 2 cup water
  • 2 tablespoons sugar
  • 4 strips of lemon peel
  • 2 tablespoons pickling or canning salt (do not use any other salt)

Cut up all your veggies into what ever shape you like, making sure they fit into the jar that you will pickle them in.

In a medium sized saucepan add vinegar, sugar, lemon peel and salt; bring to a slow boil, whisk until all the sugar is dissolved,

Wash a quart canning jar and fill with hot water. Let stand while you are bringing the brine to a boil.

Once the sugar has dissolved in the brine, pour the water out of the jar and fill with veggies. Pour the brine over them, let cool, then cap and refrigerate.

Leave a comment
Share
  • Pin it
  • Share
  • Tweet
  • Share
  • Email

September Cooking Demo

8 / 4 / 16

Join us in Seal Beach

Thursday September 15th 6:30 – 8:30

Pork Milanese Michael Symon

Oven Dried Tomato Crostata with Fresh Ricotta

Hearts of Romaine Salad with Fresh Grated Parmigiano-Reggiano

Pork Milanese with Meyer Lemon & Chopped Tomato ‘Salsa’

Cheese Tortellini Alfredo with Broccoli Rabe

Peach Amaretti Crisp

DKB-12

Temecula Olive Oil Tasting Room

Seal Beach

Call Now for reservations
562-296-5421

Sponsored by

Melissas logo small

Leave a comment
Share
  • Pin it
  • Share
  • Tweet
  • Share
  • Email

August Cooking Demo

7 / 20 / 168 / 4 / 16

Hot August Menu!

Thursday, 6:30 – 8:30

August 11th & 25th

flourless choc cake

Goat Cheese Puffs with Honey & Lavender

Fresh Fish Crudo

Zucchini Salad

Chicken, Seafood & Sausage Party Paella

Blood Orange Flourless Chocolate Cake with Lavender

DKB-12

Temecula Olive Oil Tasting Room

Seal Beach

Call Now for reservations
562-296-5421

Sponsored by

Leave a comment
Share
  • Pin it
  • Share
  • Tweet
  • Share
  • Email

Ceviche with Avocado and Tomato Broth

7 / 20 / 167 / 20 / 16


ceviche tomato


Ceviche with Avocado and Tomato Broth

Save
Print
  • 1 pound white fish halibut, red snapper, sole,
  • 2 teaspoons mild or hot pepper
  • 2 tablespoons cilantro, minced
  • 1 tablespoon shallot, minced
  • 1 large rib celery, cut into a small dice
  • 1 medium tomato, cut into the same size as the fish, squeeze out the seeds
  • 1/2 cup freshly squeezed lime juice, or enough to cover ingredients
  • 1 splash olive oil
  • Tomato Broth
  • 1 slice white bread
  • 1 can whole tomatoes, with juice
  • 1 cucumber, peeled, rough chopped
  • 1 small shallot, rough chopped
  • 1 cup tomato juice
  • 1 tablespoon red wine vinegar
  • 1 tablespoon olive oil
  • 1 pinch garlic powder
  • Salt and pepper
  • 1 pinch sugar
  • 2 Haas avocadoes, peeled, cut in half, pit removed
  • 1 lemon or lime zested
  • cilantro sprigs, for garnish

Ceviche:

Chop the white fish into small dice, add to a mixing bowl and set aside.

Clean the pepper of stems, seeds and ribs and mince into a fine dice. You may want to wear glove to do this.

Mix all ingredients together well; making sure it’s all covered by the lime juice and olive oil. Refrigerate for at least 3 hours.

Tomato Broth:

Place the bread into the bowl of a food processor and process until you have coarse crumbs. Add remaining ingredient and process until pureed. Chill for 30 minutes before serving.

Ladle some tomato broth into a cup or bowl. Place avocado into center of bowl, place ceviche into the center and top with lemon zest and a sprig of cilantro.


Leave a comment
Share
  • Pin it
  • Share
  • Tweet
  • Share
  • Email

Grilled Pizza

7 / 6 / 167 / 6 / 16

Pizza on the grill 1

I love pizza on the grill! The first time I cooked pizza on the grill I was worried the dough would slip through the grates but it doesn’t! The grill is a perfect tool for a backyard dinner, the house stays nice and cool and you can relax with a cold drink while your pizza cooks. First you have to heat your grill to it’s hottest! Pizza likes a good 500° – 600° oven to produce a great crust.

Buy or make your crust in the morning so it’s ready to go when you are. Prep your ingredients ahead of time. Grate or slice the cheese, pepperoni or salami, slice the mushrooms (store in a small bowl with a slightly damp paper towel over them), cut or tear your herbs such as basil, thyme and/or make a pesto for your pizza. Be creative and be organized.

Once your grill is at its hottest, roll out your dough on a lightly floured surface (or if you’re into hands on-flour your hands and stretch the dough out into any shape you like). Put your dough on a pizza peel that has been lightly dusted with flour or cornmeal, make sure the dough slides around on the peel so that when you put it on the grill it will slide off easily.

Brush your grill with oil and slide the dough onto that spot. Turn down the burners if you’re using a gas grill.* Grill for 2-3 minutes or until lightly charred. Turn your pizza over, brush the cooked side with a little olive oil if you like, add your sauce and any of the toppings you’ve chosen. Close the grill lid and let the pizza cook until the bottom is nicely charred and your toppings have melted and cooked. Remove from the grill with the pizza peel, let sit for a minute or two before slicing. Enjoy with a cold beer and tossed salad! That’s how to beat the heat at my house. Have a great summer!

*If using a grill with charcoal or wood you’ll want to make a direct heat side and an indirect heat side. You’ll be cooking the pizza on the indirect side.

Here’s the recipe

No Knead Pizza Dough

Save
Print

This is Jim Lahey’s no knead recipe for pizza dough, it’s easy and so much better than store bough pizza dough. The hardest part is to remember to make it ahead of time. You can store the dough up to 3 days in the refrigerator so it’s easy to plan ahead. This recipe makes 4 balls of dough (4 pizza’s). Jim likes to weigh all the ingredients and in reality you do get a much better and more consistent product but if you insist on measuring, I’ve included his instructions for that also.

  • 500 grams all-purpose flour, 17 ½ ounces or 3 ¾ cup, plus a little extra for shaping
  • 1 gram active dry yeast, ¼ teaspoon
  • 16 grams fine sea salt, 2 teaspoons
  • 350 grams water, 1 ½ cups

In a medium bowl, thoroughly blend the flour, yeast, and salt. Add the water and, with a wooden spoon or your hands, mix thoroughly.

Cover the bowl with plastic wrap or a kitchen towel and allow it to rise at room temperature for 18 hours or until more than doubled. It will take longer in a cook room and less time in a warm one.

Flour a work surface and scrape the dough out of the bowl, divide into 4 equal parts and shape them.

For each portion, start with the right side of the dough and pull it toward the center, then do the same with the left, then the top, then the bottom. (The order doesn't actually matter; what you want is four folds.) Shape each portion into a round and turn seam side down. Mold the dough into a neat circular mound. The mounds should not be sticky; if they are, dust with more flour.

If you don't intend to use the dough right away, wrap the balls individually in plastic and refrigerate for up to 3 days. Return to room temperature by leaving them out on the counter, covered in a damp cloth, for 2 to 3 hours before needed.

Leave a comment
Share
  • Pin it
  • Share
  • Tweet
  • Share
  • Email

Hot Weather Dinner

6 / 20 / 166 / 20 / 16

A basket of sweet corn, three ears partially husked

There is nothing like summers sweet corn on the cob. The tables at the farmers market this weekend were loaded with all kinds of corn and great prices make you want to stock up but corns sweetness will turn to starch the longer it’s stored. There’s an old saying that you should start the water boiling for the corn before you pick it. But if you don’t have a corn field in your back yard here are a couple of tips to help maintain that sweetness.

One, don’t peel and husk your corn, leave it in its little corn jacket and store in the refrigerator. This won’t maintain it’s sweetness long but it will stay sweet for about a day.

Two, peel and husk your corn, freeze separately and when frozen wrap in plastic and pop into a freezer bag. Use within a few weeks for best results.

Three, (this is my favorite), peel a few leaves off the outer ear but leave the husk and some leaves still attached. Chop off the very top and the bottom. Here’s another tip for you-usually corn worms are only found in the top of the ear, just lop that part off, the corn is still good to eat and it means that the farmer didn’t dust the corn with insecticide (a good thing). Put the corn into the microwave and cook for 5 minutes, remove carefully it will be hot. Place in a colander in the sink and run some cool water over it. After it cools, refrigerate and it will hold it’s sweetness for a day or two.

Here’s one of my favorite hot weather dinner salads using sweet corn right off the cob!

Shrimp and Avocado Salad

Save
Print
  • Dressing
  • ¼ cup Pomegranate vinegar or good red wine vinegar
  • 1 teaspoon finely diced shallots
  • 1 teaspoon Dijon mustard
  • Dash of dried parsley flakes, crushed
  • ½ cup olive oil, approximately
  • Salad
  • 1 head Bibb lettuce, peel the leaves from the core, rinse with cool water and dry well
  • 1 ear fresh sweet corn, prepare the corn as directed in the notes.
  • 1 small Persian cucumber, cut in half lengthwise and then into half moons
  • 1 medium tomato, chopped into bite-sized pieces
  • 8 large shrimp, (U16), cut into bite-sized pieces
  • 1 Haas avocado cut in half; pit removed and scoop out the whole half
  • 2 rashers (slices) bacon, cooked and crumbled
  • ¼ cup crumbled blue cheese, optional

Dressing

In a jar or small bowl add vinegar, shallots, Dijon mustard and parsley flakes, add a sprinkle of salt and pepper. Slowly whisk in the olive oil to emulsify. As soon as the dressing starts to thicken stop and taste the dressing, if it needs more continue to add the olive oil while whisking. Any extra dressing may be stored in the refrigerator for up to 3 weeks.

Tear the lettuce leaves into large pieces and add to a large bowl and toss with a little of the dressing. Add the corn, cucumber, tomato and shrimp and toss again with a little dressing. Lightly mix in the avocado and place into shallow bowls or large plates, sprinkle with bacon and cheese and serve extra dressing on the side.

Makes 2 entrée salads

Notes:

Pick up fresh corn from the farmers market, not the supermarket. The sugar in corn starts to turn to starch when it’s picked so by the time it gets to the supermarket much of the sweetness will be gone. When you get the corn home here’s an easy trick to help keep the sweetness in for a day or two. Remove some of the outer leaves but not all. Cut the top and bottom off the ear and microwave for 5 minutes. It will be hot when you bring it out of the microwave so run some cool water over it and set it aside to cool completely. This method is similar to blanching and shocking your vegetables. Use right away (peel the remaining leaves and silk then slice off the cob) or store in the refrigerator for a day or two.

In the hot weather buy the shrimp already cooked for an easy meal at the end of the day. If you purchase raw shrimp to cook it simply bring a large pot of water to a boil, add a tablespoon of Old Bay Seasoning and cook at a slow boil (bubbles just break the surface) until the shrimp is done, about 5 minutes. To test the shrimp simply take one out, run cool water over it, peel, devein and eat it!

Pomegranate vinegar can be ordered from Temecula Olive Oil Co.

2 Comments
Share
  • Pin it
  • Share
  • Tweet
  • Share
  • Email

Slow Cooker Carnitas

6 / 14 / 16

For everyone who missed this recipe from class, I thought I’d put it up on the blog for you! A great recipe for easy summer dishes!

carnitas

Save
Print

Adapted slightly from Rick Bayless

  • 2 pounds boneless pork shoulder
  • Salt
  • 1 ½ - 2 cups freshly rendered pork lard (you can buy good-quality lard from a local butcher or Mexican market; I don't recommend the hydrogenated lard that's sold in bricks)

Cut the pork into 2 ½- to 3-inch pieces and sprinkle generously on all sides with salt. Scoop the lard into a 6-quart slow cooker and turn on high. When the lard is melted, fit in the pork in a single layer (there should be few gaps between the pieces and they should be barely covered with the fat). Cover and cook until thoroughly tender, about 3 hours. Turn off, uncover and let cool.

Remove the pork to a cutting board, leaving behind as much fat as possible. (You can refrigerate the lard to use for another round of carnitas, to season beans or fry potatoes or the like.) Shred the carnitas into very large, coarse pieces. Set a heavy skillet over medium heat. When the pan is very hot, spoon in enough carnitas-cooking fat to film the bottom generously. Scoop in the pork, spreading it out evenly over the bottom of the pan. Cook undisturbed for a couple of minutes, until it is richly browned and releases itself from the bottom of the pan. Gently turn the pieces to brown the other side. Remove to a plate lined with paper towels. Sprinkle with salt (coarse salt is welcome here, if you have it).

2 Comments
Share
  • Pin it
  • Share
  • Tweet
  • Share
  • Email

Tomato Confit

6 / 11 / 166 / 12 / 16

Is your garden overflowing with tomatoes? I always grow too many and one of my favorite ways to make them go a little farther is to oven dry them. Much like sun dried, these concentrated gems pack a powerful punch and can be used in any dish where you’d use tomatoes. Especially nice on a cheese plate with some creamy goat cheese nearby.

tomatoconfit-chez pim 2006


To preserve them I turn them into a tomato confit and keep in my ‘pantry’ refrigerator. They can’t be water bath canned because of the oil, but they will keep for about 6 months in the refrigerator, if they last that long. The refrigeration will also help to preserve the oil and keep it from going rancid quicker. Use only fresh organic herbs and make sure you wash and dry them very well, you don’t want any water going into your beautiful confit.

Mangia (Eat!)

Save
Print
  • 1 pound tomatoes, cut in half lengthwise
  • Sea salt and freshly ground black pepper
  • 1/4 cup olive oil, approximately
  • 1 tablespoon basil, chiffonade
  • 2 teaspoon fresh thyme
  • 1 clove garlic -- minced

Preheat the oven to 350°.

Arrange the tomato halves cut side up and close together on a baking sheet, season with salt and pepper.

In a bowl, combine olive oil, garlic, and herbs. Drizzle over tomatoes and bake until the tomatoes are soft and shriveled but still retain some moisture, 1-2 hours or more.

Let cool completely. Tomatoes can be stored in a glass jar, cover tomatoes with olive oil, add a fresh sprig of thyme, seal and refrigerate.

Photo: Chez Pim

Leave a comment
Share
  • Pin it
  • Share
  • Tweet
  • Share
  • Email

May Cooking Class

5 / 5 / 165 / 5 / 16

Join

Chef Debbi

at

Temecula Olive Oil Co., Seal Beach Tasting Room

For a Demo Cooking Class

Thursday May 5th

Second Class Added

Thur, May 19th

6:30 -8:30

cioppino 2

May Menu

Bacon Roasted Chicken Rillette Crostini 

(Similar to Paté) with Olives & Cornichons

Header

Italian Chopped Salad

with Radicchio and Spring Vegetables

Header

Mushroom Florentine Penne

Header

San Francisco Style Cioppino

Header

Meyer Lemon & Blood Orange Cannoli

Call (562) 296-5421 for reservations

Sponsored by

Melissas logo small

Leave a comment
Share
  • Pin it
  • Share
  • Tweet
  • Share
  • Email

March Cooking Class

3 / 15 / 163 / 15 / 16

TOOC LOGO

Demo Cooking Class

We still have some spaces for our March 24th class! Sign up today!

March Menu

Leek, Goat Cheese & Olive Tart-Bill Granger

Leek Tart with Goat Cheese & Olives

Pork Scallopini with Leek Caper Vinaigrette

Olive Oil & Herb Roasted Winter Vegetables

Wild Mushroom Bread Pudding

Sea Salt Caramel Apple Cake in a Jar

Class Dates:

Seal Beach Tasting Room

Thursday, March 10th  SOLD OUT!

Catch the same menu on Thurs. March 24th

6:30-8:30, approximately

Call (562) 296-5421 for reservations

Header

Temecula Tasting Room

Saturday, March 12th 12 – 2, approximately

Call (866) 654-8396 for reservations

Photo: Bill Granger’s Leek Tart

Leave a comment
Share
  • Pin it
  • Share
  • Tweet
  • Share
  • Email

Easy Pizza Margherita

2 / 2 / 162 / 2 / 16

Pasolivo Pizza


Pizza, Flatbread & Calzone

Save
Print

Makes 2 flatbreads

*Stir the flour with a table knife to lighten the flour; it becomes compacted as it rests. Dip your measuring cup into the flour and use the knife to sweep the excess flour off the top of the cup. According to King Arthur Flour it should weigh 4 ¼ ounces.
Dough recipe adapted from ‘Artisan Bread in 5 Minutes a Day’

Sauce recipe will yield 2 cups and hold for several days. Adapted from Sunset Magazine

  • 1 ½ cups lukewarm water
  • 1 packet granulated yeast, 2 ¼ teaspoons
  • ½ teaspoon sea salt
  • 3 ¼ cups King Arthur unbleached white flour, measured with the scoop and sweep method*
  • Sauce:
  • 2 tablespoons olive oil
  • ½ small onion, chopped
  • 2 small cloves garlic, minced
  • 1 pound fresh tomatoes, quartered or 1 lg. can whole or crushed tomatoes
  • 1 small can tomato paste
  • 2 teaspoons dried oregano
  • 1 teaspoon dried thyme
  • 1 granulated sugar or more as needed
  • 2 tablespoons chopped fresh basil
  • Sea Salt and fresh pepper, to taste
  • Pinch crushed red pepper flakes (optional)
  • Pizza Margherita Topping
  • Sauce
  • Mozzarella, torn into pieces
  • Fresh basil, torn into pieces

Dough: (Make at least 1 day up to 5 days ahead of time)

The water should be warm to the touch but not more than 110°, and add the yeast to the water.

Add salt to the flour and whisk to distribute using a large bowl or a plastic food container with lid. Add the water to the flour all at once and mix with a wooden spoon or wet hands, the dough will be sticky. No kneading is necessary.

Loosely cover with lid and let stand at room temperature approximately 2 hrs. The dough can rise longer, up to 5 hours without affecting the results. The dough is easier to handle if you can make it the night before and refrigerate overnight.

Working on a lightly floured surface, pinch off a palm sized piece of dough, shape into a round, rectangular or square shape. Dough is sticky so keep some extra flour nearby, dust your hands as necessary to shape the dough. If the dough starts to snap back you should let it rest for a few minutes and then resume shaping. I use a rolling pin to thin the dough out to my desired style

Place onto parchment paper, a dusted pizza peel or the bottom of a dusted baking sheet. You can use anything you want providing the pizza can slip right off onto the rack.

If you are baking in an oven, preheat your oven to 500° or as high as it will go. Top the dough with anything you like, slid it into the hot oven and bake for 12-14 minutes.

Sauce:

Heat a deep saucepan big enough to hold all the ingredients, add the oil and onions and sauté until translucent. Add the garlic and stir briefly.

Place all the ingredients along with the garlic and onions into a blender, or use an immersion blender and puree.

Ladle or spoon onto pizza dough leaving an clean edge around the outside of the dough. Sprinkle or place the cheese on top and bake on a hot pizza stone for about 6-8 minutes, checking frequently. Sprinkle with fresh basil and let rest for a minute or two before slicing. Mangia!

Leave a comment
Share
  • Pin it
  • Share
  • Tweet
  • Share
  • Email

Temecula Olive Oil Tasting Room, Seal Beach Feb. Cooking Demo

2 / 2 / 161 / 22 / 17

Temecula Olive Oil Tasting Room

Seal Beach

Thur. Feb. 4th  Sold Out!! Repeat class available Thur. Feb 18th, don’t miss out!

6:30 – 8:30, approximately

Also presenting this Valentine Day menu in the

Temecula Olive Oil, Temecula Tasting Room in Old Town

Sat. Feb. 13th, 12-2 Still some spots available

See below for reservations

Beef Wellington Tarts with Mushroom Blue Cheese Sauce 800 2765

Panzanella Salad with Ca. Avocado

            A classic Italian salad with Toasted Bread Cubes

Creamy Ca. Avocado & Blood Orange Olive Oil Vinaigrette

Individual Puff Pastry Filet Mignon Tarts

with Caramelized Onion-Mushroom & Blue Cheese Sauce

Grilled Asparagus with Lemon Gremolata

            Spring asparagus with a Garlic-Lemon Dust

Strawberry Brownie Bites 

For Seal Beach Reservations please call:

562-296-5421

For Temecula Reservations please call:
951-693-0607

Related Posts Plugin for WordPress, Blogger...
Leave a comment
Share
  • Pin it
  • Share
  • Tweet
  • Share
  • Email

Posts navigation

Previous Page 1 2 … 7 8 9 10 11 12 13 Next Page
Deb

Meet Chef Debbi

READ BIO

Join-Us Sign up for our newsletter to receive exclusive tips 'n tricks, and special offers on classes, tours, and more!

Recent Posts

  • New E-Book!
  • From the Pantry
  • Spaghettini at Home
  • Growing Corn
  • Spring IS Coming!

Categories

BookCUT

What's in Your Pantry?

How to stock your pantry to create delicious dishes.

Learn Chef Debbi's pantry essentials and how to substitute ingredients for pantry staples in her basic recipes for quick and easy meals.
BUY BOOK>

FacebookTwitterInstagramGooglepinterest


© 2014, DEB'S KITCHEN
Angie Makes Feminine WordPress Themes