Deb's Kitchen - Farm, Food, Wine & Lifestyle Adventures
  • Facebook
  • Google
  • Twitter
  • Instagram
  • Pinterest
  • Email
Menu
Skip to content
  • Home
  • Blog
  • Events
    • Classes
    • Tours & Adventures
  • Edible Gardening
  • Preserving
  • Recipes
    • Appetizers
    • Soups and Salads
    • Main Dishes
    • Side Dishes
    • Desserts
  • About
    • Whats In Your Pantry
    • Ask Debbi
    • Deb’s Kitchen Botanicals
    • Press
  • Contact

Category Archives: Blog

Flashback BBQ

4 / 24 / 196 / 16 / 19

This cooking class demo is being held at a private home, everyone’s invited! Address will be given upon paid reservation. North Long Beach area

Saturday, June 22
4:00 – 7:00

$60.00
BYOB

Menu

Chef Debbi’s Pickled Vegetables

Grilled Artichokes with Walt’s Wharf Dip

Sweet ‘n Sour Surf and Turf Kabobs

Cold Green Bean, Tomato and Watermelon Radish Salad

Pineapple Upside Down Cake

Register here for Credit Card


If you prefer to pay by check,

Contact Debbi @ 562-243-3926 or [email protected]  

Leave a comment
Share
  • Pin it
  • Share
  • Tweet
  • Share
  • Email

Artichokes!

4 / 10 / 194 / 10 / 19

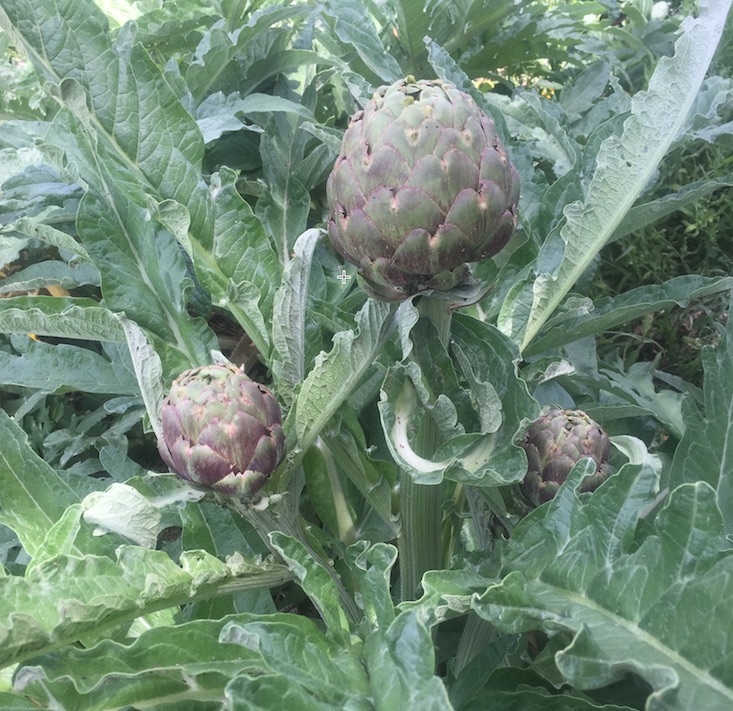
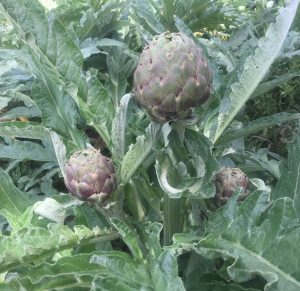
Spring is nearly here and with it comes lovely artichokes. Artichokes are perennial plants in the same family as dandelions and sunflowers, they are a thistle plant and, in most artichokes, there is a center that’s inedible, the ‘choke’. In cooler climates, such as California’s northern coast they can be grown as annual’s. Spring and fall are times when you can find fresh artichokes in the markets. An easy plant to grow, they do require full sun and will take up a large space, 3 feet or more. Be sure to cut the artichoke before the leaves begin to open and it blossoms into a flower.

When you choose your artichoke, you want to make sure that it’s firm when you press the sides and you’ll often hear a squeaky noise, that’s good. The leaves should be tight and closed. If there is a little bit of brown on the leaves that’s ok, it just means there was a little frost during its growing season but that’s not a bad thing. The inside will be perfectly delightful. You also might want to consider only organic artichokes since you’ll be eating parts of the plant that may have been sprayed with pesticides during its growing season. Pesticides cannot be washed off with water or vegetables soaps, they are oil based and you know what happens when oil and water mix! If you can’t find beautiful California Artichokes in the market, here is a great local source where you can order them, Melissa’s Produce, http://www.melissas.com/Organic-Artichokes-p/1375.htm

To store your artichokes, you could place in a plastic bag and store in the produce drawer of your refrigerator or just pop it into the drawer itself. They will last up to 7 days but best eaten within a few.

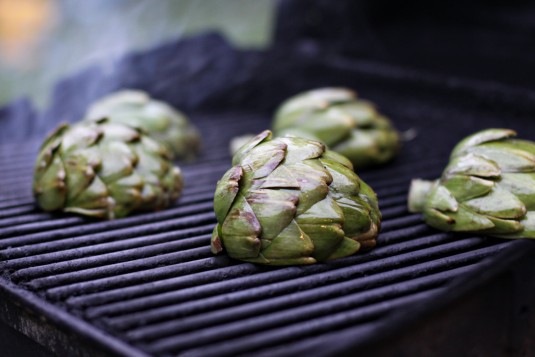
Rinse the artichoke under cool water; pull off the lower, smaller leaves and cut the stem at the base of the choke. If you have a nice long stem, you can cook this separately and eat it like you would the heart, it tastes the same. If desired, with a sharp chef’s knife cut across the top third of the artichoke and snip the sticker off the remaining leaves. Even though there are many ways to prepare a fresh artichoke, most people fall back to either boiling/steaming them, although it takes quite a while, up to half an hour or more. You could put them in a microwave bowl or in an Instant Pot adding a cup of water and cook for 10 minutes, cover the microwave ones, or grill them over hard wood. Anyway is fine with me.

Here’s the traditional method:

Put them into a large pot and cover with cool water, squeeze two lemons into the water and a little sea salt, bring to a boil and simmer until you can run a small knife through the bottom part of the artichoke, 30-45 minutes or longer depending on the size of the vegetable. Remove from the water using tongs and picking up the artichoke with the top facing down so not to spill hot water all over yourself, drain and serve with my favorite sauce from Walt’s Wharf in Seal Beach.

Get the recipe here, 

Leave a comment
Share
  • Pin it
  • Share
  • Tweet
  • Share
  • Email

Rancho Los Alamitos

4 / 8 / 194 / 8 / 19

Chef Debbi returns to the Rancho! We’ve been waiting a long time to bring our classes back to Rancho los Alamitos. We’ve schedule our first class for Sat. June 8th, we’re going to pickle!

Saturday, June 8, 2019
9:30 am – 12:30 pm
$75 Future member/ $65 per RLA member
Advance Reservations Required,  Reservations close 5/27/19


Click here to sign up


Join us at Rancho Los Alamitos for a hands-on class on the basics of pickling and fermenting vegetables from your garden or the farmers’ market. In this class, you will make two kinds of pickled vegetables and a jar of sauerkraut. (If you think that you don’t like sauerkraut, wait until you try your own!) This is a refrigerator-style pickling where no water bath canning is necessary. Chef Debbi will demonstrate techniques, discuss food safety and the basics of canning pickles in brine. Each participant will prepare and take home three jars of their very own preserved produce.

The class is suitable for adults and interested teens. Reservations are required. Parking is limited at Rancho Los Alamitos, so car-pooling is encouraged and appreciated.


Sponsored by

Leave a comment
Share
  • Pin it
  • Share
  • Tweet
  • Share
  • Email

Strawberry Season

4 / 8 / 19


There’s almost nothing better in spring than fresh strawberries (except for maybe asparagus, artichokes and morel mushrooms!

Look for strawberries that are red all the way to the top, those will be tasty, ripe strawberries. Pick organic if possible as strawberries are the number one fruit on the ‘Dirty Dozen’ list to retain pesticides. Pesticides do not wash off, ever. Besides the pesticide residue left on the fruit, the ground is prepared by pumping fumigants into it to sterilize the soil, killing every living creature that lives in the soil. You can read more on EWG’s website.

To prepare your strawberries, do not wash until you are ready to use or eat them. Water is their enemy. I like to slice them up and add a little sugar, macerate or squash them down a little and let them sit for awhile while the flavor develops. I sometimes will add a little Grand Marnier to the mix for an added dose of flavor. Spread them on a biscuit, slice of angel food cake, over ice cream or just eat them out of a bowl. Enjoy your strawberries while the sun is shining. Here’s a little individual cheesecake recipe for you to enjoy.

Mini Strawberry Cheesecake

Save
Print
  • Crust:
  • 1 1/4 cups graham cracker crumbs
  • 3 tablespoons brown sugar
  • 5 tablespoons unsalted butter, melted
  • 8 ounces cream cheese, room temperature
  • 1 large egg, room temperature
  • 1/4 cup granulated sugar
  • 1/4 cup sour cream, room temperature
  • 1 teaspoon vanilla extract

Preheat oven to 350°F. Line a 12-cup muffin pan with cupcake liners or oil the inside of small jam jars.

Make the graham cracker crust:

Stir together graham cracker crumbs, sugar, and melted butter. Press about 2-2 1/2 tablespoons of the mixture into the bottom of each muffin liner and press to compact.

Beat room temperature cream cheese with a hand mixer until fluffy. Beat in room temperature sour cream. Beat in egg, sugar, and vanilla extract. (Room temperature ingredients are a must to avoid lumps!)

Evenly divide (about 2-2 1/2 tablespoons each) cheesecake among crusts. Bake for 18-20 minutes, until they just begin to brown. Cool completely and refrigerate for at least 3 hours or overnight.

Serve plain or topped with whipped cream and berries.

Leave a comment
Share
  • Pin it
  • Share
  • Tweet
  • Share
  • Email

March Demo Cooking Class

3 / 8 / 193 / 8 / 19

We’ve Moved!

Join us in our new home at Chef Tech in Bixby Knolls, Long Beach with owner Chef Teri.

We now have a full kitchen with tables & chairs and lots of room. We look forward to seeing you there soon! See new address at the bottom of the class menu, (you do not need to have a pay-pal account). You can sign up with Chef Debbi (call me, 562-243-3926) or click on the pay-pal button below. There is a small service charge for using pay-pal but you can always mail me a check. Classes are pre-paid reservations and cancellations are 100% refundable up to 3 days prior to class.

March Menu

Wed. March 20th

6:30 – 8:30PM

Spanish Tomato Toast

Romaine Heart Salad with Marinated Olives, Hearts of Palm, Tangerines &

Shaved Manchego

Spring Asparagus, Shrimp & Scallop Paella

Individual Strawberry Cheesecakes

NEW LOCATION!

Chef Tech Cooking School

3842 Atlantic Avenue
Long Beach, CA 90807

See  April class date & menu by clicking on the month.

By Reservation Only, Sign up below

$55.00

(562) 243-3926

Or

Debskitchen.com

[email protected]

Enjoy larger portions, Tables & More

Sponsored by 


Sign Up Here for Classes


Leave a comment
Share
  • Pin it
  • Share
  • Tweet
  • Share
  • Email

A Little Book of Cheese

2 / 17 / 19

The first book in my ‘little’ series is available for pre-sale. Books will be shipped out March 11th! Please use the pre-sale link below to reserve your copy!


2 Comments
Share
  • Pin it
  • Share
  • Tweet
  • Share
  • Email

April Demo Class

2 / 4 / 192 / 10 / 19

We’ve Moved!

Join us in our new home at Chef Tech in Bixby Knolls, Long Beach with owner Chef Teri.

We now have a full kitchen with tables & chairs and lots of room. We look forward to seeing you there soon! See new address at the bottom of the class menu. You can sign up with Chef Debbi (call me, 562-243-3926) or click on the pay-pal button below. There is a small service charge for using pay-pal but you can always mail me a check. Classes are pre-paid reservations and cancellations are 100% refundable up to 3 days prior to class.

April Menu

Wed. April 10th

6:30 – 8:30PM

‘A Little Book of Cheese‘ is here!

Book Signing & Demo Class

How to Prepare a Cheese & Charcuterie Board and Tasting

Smoked Gouda and Red Pepper Grilled Cheese Sandwich Bites

Fried Blue Cheese Stuffed Olives

Italian Stuffed Shells with Broccoli and Pine Nuts

Brie Puff Pastry Pockets

NEW LOCATION!

Chef Tech Cooking School

3842 Atlantic Avenue
Long Beach, CA 90807

See  April class date & menu by clicking on the month.

By Reservation Only, Sign up below

$55.00

(562) 243-3926

Or

Debskitchen.com

[email protected]

Enjoy larger portions, Tables & More

Sponsored by 


Sign Up Here for Classes


Leave a comment
Share
  • Pin it
  • Share
  • Tweet
  • Share
  • Email

Feb Demo Cooking Class

2 / 3 / 192 / 10 / 19

We’ve Moved!

Join us in our new home at Chef Tech in Bixby Knolls, Long Beach with owner Chef Teri.

We now have a full kitchen with tables & chairs and lots of room. We look forward to seeing you there soon! See new address at the bottom of the class menu. You can sign up with Chef Debbi (call me, 562-243-3926) or click on the pay-pal button below, (you do not need to have a pay-pal account). There is a small service charge for using pay-pal but you can always mail me a check. Classes are pre-paid reservations and cancellations are 100% refundable up to 3 days prior to class.

Here are a couple of photo’s of Chef Tech’s Kitchen.

NOTE DATE CHANGE ON FEB CLASS

Wed., Feb. 27th

6:30 – 8:30, approximately

Caesar Dip with Crudités

Shrimp Lettuce Wraps

Glazed Steak Tips with Mushrooms & Blue Cheese

Dijon Roasted Potatoes with Parmesan & Chives

Red Velvet Cheesecake Cupcakes


NEW LOCATION!

Chef Tech Cooking School

3842 Atlantic Avenue
Long Beach, CA 90807

By Reservation Only, Sign up below

$55.00

(562) 243-3926

Or

Debskitchen.com

[email protected]

Enjoy larger portions, Tables & More

See March & April class dates & menu’s by clicking on the month.

Sponsored by 


Sign Up Here for Classes


Leave a comment
Share
  • Pin it
  • Share
  • Tweet
  • Share
  • Email

Special Event

1 / 16 / 19

Get a preview of Chef Debbi’s upcoming NEW book!

A Little Book of Cheese

Cooking Demo at Temecula Olive Oil Co. Seal Beach

Thur. Jan 31, 6:30 – 8:30, approximately

Small Cheese Tasting
Smoked Gouda and Red Pepper Grilled Cheese Sandwich Bites
Fried Blue Cheese Stuffed Olives
Italian Stuffed Shells with Broccoli and Pine Nuts
Brie Puff Pastry Pockets

Taking reservations for all classes & Events

$45.00


By Reservation Only
(562) 296-5421
Temecula Olive Oil Co.
148 Main Street
Seal Beach, CA 90740

Sponsored by

Leave a comment
Share
  • Pin it
  • Share
  • Tweet
  • Share
  • Email

Feb. Cooking Demo

1 / 15 / 19

Feb. Cooking Demo

Thurs. Feb 7th
Tues. Feb 19th
6:30 – 8:30, approximately

Menu

Caesar Dip with Crudités
Shrimp Lettuce Wraps
Glazed Steak Tips with Mushrooms & Blue Cheese
Dijon Roasted Potatoes with Parmesan & Chives
Red Velvet Cheesecake Cupcakes

By Reservation Only
(562) 296-5421
Temecula Olive Oil Co.
148 Main Street
Seal Beach, CA 90740

Events Sponsored by

Leave a comment
Share
  • Pin it
  • Share
  • Tweet
  • Share
  • Email

Quick and Easy Charcuterie Board

12 / 29 / 1812 / 29 / 18


1 cup mixed olives
2 Tablespoons olive oil
1 teaspoon dried Italian herbs, ground
1 wedge triple cream brie
1 small jar of fig jam or fruit spread
8 ounces aged Gouda
8 ounces aged sharp cheddar, thinly sliced
1 baguette, sliced 1-inch thick
1 round of boursin, any flavor
2 packages of interesting looking crackers
1 wedge blue cheese, partially crumbled
1 small jar of honey
1 package mixed Italian meats
1 small bunch red seedless grapes
4 ounces nuts, mixed or single
1 package, 4 oz. of dried apricots
2 apples, cored and sliced tossed with lemon juice to prevent browning

Mix together olives, olive oil and ground Italian herbs, let rest for at least an hour or longer.

Don’t crowd the cheese on the platter, make the board big enough to accommodate all ingredients.

Put the mixed olives in a small bowl and place on the platter.

Place the triple cream brie on the platter and arrange the fig or fruit spread next to the brie.

Place the sharp cheddar and gouda on the board next with the baguette slices nearby.

Then arrange the boursin near the baguette slices with the crackers next.

Add the blue cheese and honey on the board filling out the outer edges of the board. Tuck in the Italian meats all around the board, add the grapes in clumps and spread the nuts throughout the board with little pockets of dried fruit. Place the apples near the cheddar cheese.

Leave a comment
Share
  • Pin it
  • Share
  • Tweet
  • Share
  • Email

Fontina & Gruyere Gougére’s

12 / 29 / 1812 / 29 / 18


Save
Print

Makes 24-30

  • ½ cup water
  • ½ cup whole milk
  • 8 tablespoons unsalted butter, cut into pieces
  • 1 teaspoon salt
  • 1 cup plus 1 Tb. all-purpose flour
  • 4 whole eggs
  • ½ cup grated gruyere cheese
  • ½ cup grated fontina cheese

Preheat oven to 450° and line 2 pans with parchment paper or baking sheet liners.

In a large sauce pan, combine the water, milk, butter and salt and bring the mixture to a full boil over medium-high heat. When the butter has melted add the flour, all at once, and stir vigorously with a wooden spoon until the mixture forms a ball that pulls away from the sides of the pan.

Turn the heat down to medium and cook the dough for another 3 or 4 minutes to dry out and cook the flour taste out of the dough. It will look a little shiny and there will some starch remaining on the bottom of the pan and the dough will be stiff.

Transfer the dough to the bowl of a stand mixer fitted with a paddle attachment. (Alternatively, use an electric hand mixer or beat by hand with a stiff spatula.) Beat the dough on medium-low speed until it stops steaming and is just warm to the touch, about 1 minute.

Continue beating and add the eggs in one at a time. Wait for each egg to be absorbed completely before adding the next. Scrape down the sides of the bowl if needed. Once the dough comes together after the addition of all the eggs, add the cheese and mix until it’s well distributed.

Scoop rounded tablespoons of dough onto the baking sheets, spacing the about 1-inch apart. They can be piped on using a piping bag or a storage bag with the corner snipped off.

Press the top down with a fork or spoon dampened slightly with water, until the tops are smooth. Brush with the egg wash mix and bake for 5 minutes. Turn the heat down to 350° and bake for 20-25 minutes until they are golden brown. Rotate the sheets half way through the baking period. If the inside of the gougere isn’t done, turn off the oven and prop the door open with a wooden spoon for about ½ hour so they can dry out a little.

The gougere’s can be stored in the refrigerator up to a week or frozen for a month. You can fill these with any kind of cheese stuffing or serve them as a stand-alone bite.

Related Posts Plugin for WordPress, Blogger...
Leave a comment
Share
  • Pin it
  • Share
  • Tweet
  • Share
  • Email

Posts navigation

Previous Page 1 2 … 4 5 6 7 8 … 21 22 Next Page
Deb

Meet Chef Debbi

READ BIO

Join-Us Sign up for our newsletter to receive exclusive tips 'n tricks, and special offers on classes, tours, and more!

Recent Posts

  • New E-Book!
  • From the Pantry
  • Spaghettini at Home
  • Growing Corn
  • Spring IS Coming!

Categories

BookCUT

What's in Your Pantry?

How to stock your pantry to create delicious dishes.

Learn Chef Debbi's pantry essentials and how to substitute ingredients for pantry staples in her basic recipes for quick and easy meals.
BUY BOOK>

FacebookTwitterInstagramGooglepinterest


© 2014, DEB'S KITCHEN
Angie Makes Feminine WordPress Themes