Deb's Kitchen - Farm, Food, Wine & Lifestyle Adventures
  • Facebook
  • Google
  • Twitter
  • Instagram
  • Pinterest
  • Email
Menu
Skip to content
  • Home
  • Blog
  • Events
    • Classes
    • Tours & Adventures
  • Edible Gardening
  • Preserving
  • Recipes
    • Appetizers
    • Soups and Salads
    • Main Dishes
    • Side Dishes
    • Desserts
  • About
    • Whats In Your Pantry
    • Ask Debbi
    • Deb’s Kitchen Botanicals
    • Press
  • Contact

Category Archives: Recipes

Cranberry-Apple Salad with Walnuts

9 / 26 / 19

Winter Green Salad with Apples, Cranberries & Walnuts With French Vinaigrette

Save
Print

Fresh Autumn-Winter Salad with seasonal fruit, walnuts and feta cheese.

Serves: 4-6

  • Vinaigrette
  • ¼ cup pomegranate vinegar, any vinegar can be
  • 1 tablespoon Dijon mustard
  • 1 small shallot, minced
  • 1 sprig Italian parsley, chopped
  • 1 teaspoon thyme, chopped
  • ¾ cup vegetable, olive or canola oil, approximately
  • salt and pepper, to taste
  • Salad
  • 6 cups mixed greens
  • 2 organic apples*
  • 1 cup toasted walnuts, roughly chopped
  • ⅓ cup crumbled feta cheese
  • ⅓ cup dried cranberries

In a medium bowl make the vinaigrette by whisking together all the ingredients except the oil. While constantly whisking, drizzle in some of the oil, stopping to taste occasionally. Season to taste with salt and pepper.

Can be made in advance and stored in the refrigerator.

Bring to room temperature before serving.

For a creamier dressing add 1 Tb. mayonnaise

Core and chop apples (thin slices or 1 inch chunks). Toss lettuce, apples, walnuts, feta, and cranberries together in a large bowl. Add a little dressing and toss, taste for seasoning and adjust.

*If conventional apples are used, peel first.

Leave a comment
Share
  • Pin it
  • Share
  • Tweet
  • Share
  • Email

BBQ Grilled Chicken

8 / 9 / 19


BBQ Grilled Chicken

Save
Print
  • 4 pounds organic chicken pieces on the bone with skin
  • 1 tablespoon sea salt or more
  • fresh ground pepper
  • 1 sprig thyme, remove leaves
  • ¼ cup chopped sage
  • 1 lemon zested and juiced

If you can’t find chicken pieces on the bone now is a great time to learn how to cut up a chicken. An organic chicken is likely to be somewhat smaller than a regular supermarket chicken, but it will have more flavor and cook more evenly. Most chicken sold in supermarkets are pumped with saline water to make them look bigger and heavier, but they’ll come out bland even when you brine it.

Brining isn't necessary but I thought I'd include the recipe for you.

I rinse my chicken pieces in some cool water and dry well. Mix together the salt, a little pepper, the herbs, the lemon zest and juice; rub it onto the chicken pieces generously and place the chicken in a shallow pan, cover loosely and brine in the refrigerator for up to 3 days. One day does the job but 3 days will make the skin crispier and the meat more tender.

When ready to grill rub the salt, pepper and herbs off the chicken, you can rinse it off if you like but make sure to dry the chicken well.

Heat a gas or charcoal grill to medium (about 350°F to 450°F), brush the cooking grates clean and rub with a towel dipped in oil.

Grill the chicken pieces, skin side down first, over indirect medium heat, with the lid closed, for about 5-6 minutes. Turn the pieces and grill another 5-6 minutes.

Brush with BBQ sauce, close the lid and cook for about 10 minutes, turn and cook another 10 minutes or until a thermometer reads 165°. The chicken may take longer to cook depending on the size of the piece. When you test the temperature be sure to stay away from the bone for an accurate read. Let the pieces rest off heat for about 5 minutes before serving. The breasts and wing pieces could take 30 to 40 minutes and the whole legs will take 40 to 50 minutes. During the last 5 minutes of grilling time, move the chicken over direct heat and cook until well browned all over, turning once or twice. Serve warm.

Grilling chicken isn’t always the easiest thing to do. Many times the chicken burns long before the inside is done. Here’s a great way to grill that chicken to perfection.


Leave a comment
Share
  • Pin it
  • Share
  • Tweet
  • Share
  • Email

Hatch Chile Time is Here!

8 / 9 / 19

Corn, Cherry Tomato Salad with Hatch Chili Vinaigrette

Save
Print

Serves 4-6

  • 6 ears of corn, husk and silk removed
  • 2 tablespoons melted butter
  • 2 tablespoons freshly squeezed lime juice
  • ½ teaspoon chili powder
  • 1 tablespoon chopped cilantro
  • 2 tablespoons Hatch Chile Vinegar
  • ¼ cup olive oil
  • 1 pint cherry tomatoes, sliced in half
  • ½ cup crumbled queso fresco, (Mexican cheese) or you could use Monterey Jack
  • Sea salt, to taste

Microwave the corn with the husk on for 10 minutes;

Or

Boil the corn for about 3 -4 minutes with a little salt added to the water or grill lightly for a roasted flavor.

Let the corn cool until you can handle them and cut the kernels off the cob into a large bowl.

In a small bowl make the vinaigrette by whisking together butter, lime juice, chili powder, and chopped cilantro. Add the vinegar and whisk in the olive oil until emulsified to taste.

Pour the vinaigrette over the corn and mix to coat.

Add the tomatoes and crumbled queso fresco or grated Jack cheese and stir. Season with salt to taste.

Serve at room temperature. Refrigerate leftovers.

www.debskitchen.com

[email protected]

©Debs Kitchen

Leave a comment
Share
  • Pin it
  • Share
  • Tweet
  • Share
  • Email

Artichokes!

4 / 10 / 194 / 10 / 19

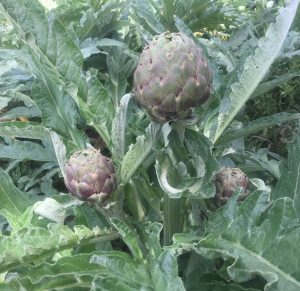
Spring is nearly here and with it comes lovely artichokes. Artichokes are perennial plants in the same family as dandelions and sunflowers, they are a thistle plant and, in most artichokes, there is a center that’s inedible, the ‘choke’. In cooler climates, such as California’s northern coast they can be grown as annual’s. Spring and fall are times when you can find fresh artichokes in the markets. An easy plant to grow, they do require full sun and will take up a large space, 3 feet or more. Be sure to cut the artichoke before the leaves begin to open and it blossoms into a flower.

When you choose your artichoke, you want to make sure that it’s firm when you press the sides and you’ll often hear a squeaky noise, that’s good. The leaves should be tight and closed. If there is a little bit of brown on the leaves that’s ok, it just means there was a little frost during its growing season but that’s not a bad thing. The inside will be perfectly delightful. You also might want to consider only organic artichokes since you’ll be eating parts of the plant that may have been sprayed with pesticides during its growing season. Pesticides cannot be washed off with water or vegetables soaps, they are oil based and you know what happens when oil and water mix! If you can’t find beautiful California Artichokes in the market, here is a great local source where you can order them, Melissa’s Produce, http://www.melissas.com/Organic-Artichokes-p/1375.htm

To store your artichokes, you could place in a plastic bag and store in the produce drawer of your refrigerator or just pop it into the drawer itself. They will last up to 7 days but best eaten within a few.

Rinse the artichoke under cool water; pull off the lower, smaller leaves and cut the stem at the base of the choke. If you have a nice long stem, you can cook this separately and eat it like you would the heart, it tastes the same. If desired, with a sharp chef’s knife cut across the top third of the artichoke and snip the sticker off the remaining leaves. Even though there are many ways to prepare a fresh artichoke, most people fall back to either boiling/steaming them, although it takes quite a while, up to half an hour or more. You could put them in a microwave bowl or in an Instant Pot adding a cup of water and cook for 10 minutes, cover the microwave ones, or grill them over hard wood. Anyway is fine with me.

Here’s the traditional method:

Put them into a large pot and cover with cool water, squeeze two lemons into the water and a little sea salt, bring to a boil and simmer until you can run a small knife through the bottom part of the artichoke, 30-45 minutes or longer depending on the size of the vegetable. Remove from the water using tongs and picking up the artichoke with the top facing down so not to spill hot water all over yourself, drain and serve with my favorite sauce from Walt’s Wharf in Seal Beach.

Get the recipe here, 

Leave a comment
Share
  • Pin it
  • Share
  • Tweet
  • Share
  • Email

Fontina & Gruyere Gougére’s

12 / 29 / 1812 / 29 / 18


Save
Print

Makes 24-30

  • ½ cup water
  • ½ cup whole milk
  • 8 tablespoons unsalted butter, cut into pieces
  • 1 teaspoon salt
  • 1 cup plus 1 Tb. all-purpose flour
  • 4 whole eggs
  • ½ cup grated gruyere cheese
  • ½ cup grated fontina cheese

Preheat oven to 450° and line 2 pans with parchment paper or baking sheet liners.

In a large sauce pan, combine the water, milk, butter and salt and bring the mixture to a full boil over medium-high heat. When the butter has melted add the flour, all at once, and stir vigorously with a wooden spoon until the mixture forms a ball that pulls away from the sides of the pan.

Turn the heat down to medium and cook the dough for another 3 or 4 minutes to dry out and cook the flour taste out of the dough. It will look a little shiny and there will some starch remaining on the bottom of the pan and the dough will be stiff.

Transfer the dough to the bowl of a stand mixer fitted with a paddle attachment. (Alternatively, use an electric hand mixer or beat by hand with a stiff spatula.) Beat the dough on medium-low speed until it stops steaming and is just warm to the touch, about 1 minute.

Continue beating and add the eggs in one at a time. Wait for each egg to be absorbed completely before adding the next. Scrape down the sides of the bowl if needed. Once the dough comes together after the addition of all the eggs, add the cheese and mix until it’s well distributed.

Scoop rounded tablespoons of dough onto the baking sheets, spacing the about 1-inch apart. They can be piped on using a piping bag or a storage bag with the corner snipped off.

Press the top down with a fork or spoon dampened slightly with water, until the tops are smooth. Brush with the egg wash mix and bake for 5 minutes. Turn the heat down to 350° and bake for 20-25 minutes until they are golden brown. Rotate the sheets half way through the baking period. If the inside of the gougere isn’t done, turn off the oven and prop the door open with a wooden spoon for about ½ hour so they can dry out a little.

The gougere’s can be stored in the refrigerator up to a week or frozen for a month. You can fill these with any kind of cheese stuffing or serve them as a stand-alone bite.

Leave a comment
Share
  • Pin it
  • Share
  • Tweet
  • Share
  • Email

Chicken Parmesan Meatballs

11 / 30 / 18


Save
Print
  • 1 # ground chicken
  • ½ cup bread crumbs
  • ¼ cup grated parmesan cheese
  • 2 tablespoons Italian flat leafed parsley, chopped
  • 1 large egg
  • 1 tablespoon fresh ground Italian spices
  • Sea salt and pepper
  • Olive oil
  • 28 oz. can crushed tomatoes
  • 1 ½ cup shredded mozzarella cheese

Combine ground chicken, bread crumbs, parmesan cheese, parsley, egg and season with ground Italian spices and salt and pepper. Heat a large sauté pan, add enough oil to coast the bottom of the pan and brown meatballs on all sides. Remove meatballs and whip out the pan with a towel. Add the crushed tomatoes to the pan and bring to a simmer. Add the meatballs and mozzarella cheese and cook until the cheese is melted, about 10 minutes. Cover with a lid if you like to melt the cheese faster, the meatballs are already cooked.

Serve immediately over pasta.

Meatballs and sauce can be frozen for up to 3 months.

Adapted from Delish

Leave a comment
Share
  • Pin it
  • Share
  • Tweet
  • Share
  • Email

Lettuce Varieties

11 / 29 / 18


Are you hankering for some romaine lettuce? Well, there are tons of alternatives here in So. Cal for you. From the CDC website here’s what they are saying about the current outbreak of e coli on romaine lettuce.

‘Based on new information, CDC is narrowing its warning to consumers. CDC is advising that U.S. consumers not eat and retailers and restaurants not serve or sell any romaine lettuce harvested from the Central Coastal growing regions of northern and central California. If you do not know where the romaine is from, do not eat it.’
Here’s the link for more information, CDC.

Personally, I like a mix of lettuce mostly, a little crunch, a little color and a tangy dressing. My favorite is a good old Italian dressing made with a very good red wine vinegar. I love a little cheese as well, blue, parmesan or goat goes well with a tangy Italian dressing.

Just mix a little Dijon mustard, like Maille, with your red wine vinegar, add a little minced shallot, some fresh ground Italian spices and whisk in a little olive oil, season with salt and pepper and you’re done.
Local lettuce varieties are usually more plentiful during the winter as most lettuce prefers to grow in the cooler weather. Here are some varieties that will offer no only color but flavor to your salad bowl.

Choose lettuce that is bright with no brown edges or spots. Try and get them not too wet, if they are wet, they have a tendency to go bad faster. Pick whole heads of lettuce rather than bagged lettuce. The more lettuce is handled from field to bag the greater chance it can pick up any bacteria. Bagged lettuce can also be washed with chlorinated water and tends to be older than a non-bagged lettuce. Are you tempted to buy the bag that says triple washed and leave it at that? That lettuce may be contaminated with more than just chlorinated water and if it’s wet at all it will likely rot within a couple of days in that bag. Buy un-bagged lettuce, wash and dry well before storing. You might notice that if you purchase your lettuce at a farmers market that it lasts longer than a store bought lettuce, it’s because your farmers market lettuce was probably picked within a couple of days. I’ve had lettuce last up to 2 weeks from my farmers markets. So here are just some of the lettuce types you should be able to pick up anywhere.

Arugula (Rocket)-spicy and peppery, the larger the leaves the more bite it will have

Batavia is a loose-leaf lettuce similar to red or green leaf lettuce with a mild flavor

Belgian Endive-these can be a tad bitter, but they will add crunch to any salad mix

Butter-a very mild lettuce with big cupped leaves, great for serving topped with a crab salad

Frisee (Curly Endive)-Sometimes called chicory, the leaves are thin and curly with a little bit of a bite, aka peppery.

Iceberg-A dense head of lettuce with lots of crunch but little flavor

Leaf Lettuce, Red or Green-Another loose leaf lettuce with mild flavor but both add a lot of color to a salad bowl, great on sandwiches as well.

Little Gem-This lettuce looks like a mini version of romaine but it’s not as crunchy, mild flavor

Oakleaf-Another beautiful bi-colored loose-leaf lettuce that has a mild taste

Radicchio-There are numerous colors of radicchio, most have a little bitterness but a great addition to any salad.

Spring Mix-Usually a variety of small lettuces, some are mild, and some mixes can be spicy.

Watercress – Although probably a little difficult to find it makes a nice addition to a mixed salad or added to a rustic piece of bread slathered with some soft cheese. It has a peppery bit, much like Arugula. Use smaller leaves for less intense flavor.

Leave a comment
Share
  • Pin it
  • Share
  • Tweet
  • Share
  • Email

January 2019 Cooking Demo

11 / 28 / 18


Join us in Seal Beach

NEW DATES/DAYS

Thur. Jan 10th

Tue Jan 22

6:30 – 8:30, approximately

Menu

Pink Grapefruit, Avocado & Watercress Salad with Pomegranate Vinaigrette

Chicken Cordon Bleu

Spaghettini with Vodka Cream Sauce

Winter Roasted Vegetables with Basil Vinaigrette

Lemon Curd Cream Puffs

$45.00
Taking reservations now, call:
Temecula Olive Oil, 148 Main St. Seal Beach
(562) 296-5421

Sponsored by our friends at

Leave a comment
Share
  • Pin it
  • Share
  • Tweet
  • Share
  • Email

Herb Roasted Turkey

11 / 16 / 18

From my book, What’s In Your Pantry. Buy the book here


Herb Roasted Turkey

Save
Print

I no longer stuff my turkey; it takes too long to cook the stuffing to 165°, the recommended temperature to kill any bacteria; by that time the turkey itself is overcooked. I can also make the dressing the day before, bake it and heat it while I’m making the gravy.
Try serving with Duchess Potatoes instead of the traditional mashed.

  • 12-14 lb. free range or organic turkey, room temperature
  • 2 medium onion, quartered with skin on
  • 4 carrots, peeled and rough chopped
  • 3 celery stalks, rough chopped
  • 1 bay leaf
  • 1 bunch Italian flat leaf parsley
  • 1 bunch fresh sage
  • 1 bunch fresh thyme
  • ¼ cup butter, room temperature
  • salt and pepper
  • 1 lemon, Meyer lemon is preferred
  • 1 cup white wine
  • 1 cup turkey stock, see recipe in Basics chapter
  • Gravy
  • ¼ cup dry white wine
  • 8 tablespoons unsalted butter
  • ½ cup flour
  • 7 cups turkey stock, approximately
  • salt and pepper

Preheat oven to 425°.

Wash and dry turkey inside and out; dry well.

Choose a roasting pan that will fit the turkey with no more than 2” of space on any side, otherwise the juices that accumulate in the bottom of the pan may burn.

Place ¾ of the onion, carrots and celery plus bay leaf, ½ of the bunch of parsley, sage and thyme into the bottom of a baking pan that will fit the turkey, don’t let the turkey hang over the edge and make sure there is no more than 2” open on each side of the bird. (The turkey will sit on this bed of vegetables instead of a rack).

Pat the turkey dry and rub the turkey with butter, season with salt and pepper. Squeeze lemon over turkey and tuck rind under the bird. Insert an oven-proof probe thermometer into thick part of the thigh and set for 165°.

Pour wine and turkey stock in the bottom of the pan and place uncovered in hot oven. (The total cooking time will be approximately 1 – 1 ½ hours).

Baste after ½ hour; if you don't have enough juice in pan use some extra stock. Do not cover bird until browned and then loosely place foil over breast. If wings start to brown too early, wrap with foil. Baste every ½ hour until the turkey is done. Remove from the oven, place turkey on a cutting board or platter, and tent lightly with foil, do not remove probe thermometer until you’re ready to carve the turkey. Let the turkey rest for 20 minutes before carving.

Remove the vegetables and herbs from the roasting pan; place the roasting pan on two burners, add the wine, and turn the heat to medium, bring to a boil and scrape the bits (fond) from the bottom of the pan. Strain this liquid into a large measuring cup, through a cheesecloth lined sieve before continuing, add turkey stock to equal 8 cups.

Make a roux for the gravy:

Add ½ cup of butter to the hot roasting pan and, when melted, add flour and whisk until roux is light brown.

Whisk pan the reserved pan drippings and stock into the roux, pouring in a steady stream until desired consistency is reached. Season with salt and pepper, keep warm.

Makes approximately 8 cups.

Turkey will serve 8-10

Leave a comment
Share
  • Pin it
  • Share
  • Tweet
  • Share
  • Email

How to Make Pumpkin or Squash Puree

10 / 2 / 18

You don’t want to use just any kind of pumpkin for puree, most pumpkins have too much water in them and not enough flavor. Use the small pumpkins known as sugar or pie pumpkins. Or better yet use butternut squash, cooked in the same manner as a pumpkin, butternut squash will give a richer, deeper flavor. The cooked pulp can be stored in the refrigerator for up to a week or can be frozen. Use the squash for pumpkin pie, cakes or for a soup, it can be used in any recipe calling for pumpkin puree.

Preheat the oven to 400°. Line a sheet pan with parchment paper or tin foil.

Wash and dry the squash, slice the top off and cut the pumpkin in half, from the top to the bottom.

Do not remove the seeds and pulp, they will be easy to scoop out after the squash has cooked.

Brush the flesh of each half of the pumpkin with olive oil (or any kind of cooking oil) and place face down on the baking sheet.

Roast for about 40 – 50 minutes, until fork-tender or until a paring knife slips right through the flesh. Let cool for about 10 minutes then scoop out the seeds and the pulp, discard, and then scoop out the cooked flesh.

Blend or puree in a food processor until smooth. Store in the refrigerator for up to a week or freeze up to 3 months.

Photo: Davison Orchards Ltd.

Leave a comment
Share
  • Pin it
  • Share
  • Tweet
  • Share
  • Email

Pumpkin Olive Oil Cake

10 / 2 / 1810 / 2 / 18


Pumpkin Olive Oil Cake

Save
Print
  • 3 cups all-purpose flour
  • 2 teaspoons baking soda
  • 1 teaspoon ground cinnamon
  • 1 teaspoon ground nutmeg
  • ½ teaspoon salt
  • ¼ teaspoon ground cloves
  • 1 1/2 cups sugar
  • 1 cup olive oil*
  • 3 eggs
  • 1 can (15 ounces) solid-pack pumpkin (or 2 cups freshly roasted sugar pumpkin)
  • Powdered sugar
  • 1 package cream cheese, room temperature

Preheat oven to 350°.

In a medium-sized bowl, stir together flour, baking soda, cinnamon, nutmeg, salt and cloves.

Combine sugar and oil in a large bowl with a rubber spatula until blended.

Add eggs, one at a time, beating well after each addition.

Add flour mixture to egg mixture alternately with pumpkin in three batches, beating

well after each addition.

Transfer to a greased Bundt cake pan.

Bake 60-65 minutes or until toothpick inserted near the center comes out clean.

Cool for approximately 10-15 minutes before inverting onto a wire rack.

Remove pan carefully from cake and cool completely.

Easy Cream Cheese Frosting

Combine all ingredients in the bowl of a stand mixer fitted with a paddle attachment, and beat at low speed until sugar is incorporated.

Increase speed to medium high and beat until frosting is light and whipped, about 3 to 4 minutes. Use to top cookies, cupcakes, or cakes

I like to use an orange flavored olive oil for this cake.

Leave a comment
Share
  • Pin it
  • Share
  • Tweet
  • Share
  • Email

Oct. Cooking Demo

8 / 26 / 18

Join us in Seal Beach

Thursday,

Oct. 11th & 18th

6:30 – 8:30, approximately

Fall Harvest Celebration Menu

Gazpacho Shooters

Fall Salad with Oranges and Pomegranate Arils

Santa Maria Style Tri Tip

Ranchero Beans

            With Tortillas

Mini Tangerine Olive Oil Cakes

$45.00
For reservations call
Temecula Olive Oil, 148 Main St. Seal Beach
(562) 296-5421
Sponsored by


Photo: Food and Wine Magazine

Related Posts Plugin for WordPress, Blogger...
Leave a comment
Share
  • Pin it
  • Share
  • Tweet
  • Share
  • Email

Posts navigation

Previous Page 1 2 3 4 … 6 7 Next Page
Deb

Meet Chef Debbi

READ BIO

Join-Us Sign up for our newsletter to receive exclusive tips 'n tricks, and special offers on classes, tours, and more!

Recent Posts

  • New E-Book!
  • From the Pantry
  • Spaghettini at Home
  • Growing Corn
  • Spring IS Coming!

Categories

BookCUT

What's in Your Pantry?

How to stock your pantry to create delicious dishes.

Learn Chef Debbi's pantry essentials and how to substitute ingredients for pantry staples in her basic recipes for quick and easy meals.
BUY BOOK>

FacebookTwitterInstagramGooglepinterest


© 2014, DEB'S KITCHEN
Angie Makes Feminine WordPress Themes