Deb's Kitchen - Farm, Food, Wine & Lifestyle Adventures
  • Facebook
  • Google
  • Twitter
  • Instagram
  • Pinterest
  • Email
Menu
Skip to content
  • Home
  • Blog
  • Events
    • Classes
    • Tours & Adventures
  • Edible Gardening
  • Preserving
  • Recipes
    • Appetizers
    • Soups and Salads
    • Main Dishes
    • Side Dishes
    • Desserts
  • About
    • Whats In Your Pantry
    • Ask Debbi
    • Deb’s Kitchen Botanicals
    • Press
  • Contact

Tag Archives: bumper crops

Apple Cake

10 / 5 / 16


apple-cake-in-a-jar

Apple Cake in a Jar

Save
Print

Serves 12

  • 3 1/3 cups all purpose flour
  • 1/2 teaspoon baking powder
  • 11/2 teaspoons salt
  • 1/2 teaspoon nutmeg
  • 1/2 teaspoon allspice
  • 2 teaspoons ground cinnamon
  • 2 teaspoons baking soda
  • 2/3 cups vegetable shortening or olive oil
  • 2 1/3 cups sugar
  • 4 eggs
  • 2 cups applesauce
  • 1 cup chopped walnuts

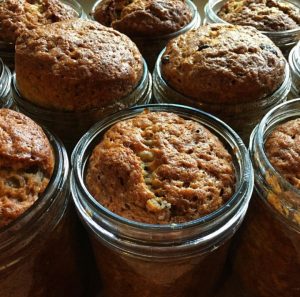
Preheat oven to 350°. Grease 12 (2 1/2-inch) wide-mouth canning jars with a paper towel dipped in oil.

Sift flour, baking powder, salt, nutmeg, allspice, cinnamon, and baking soda into a large bowl.

Using the electric mixer and a medium mixing bowl, cream together the shortening and sugar on low speed, then increase to medium mixing speed to mix well. While the mixer is running, add the eggs, one at a time. Stop the mixer and scrape down the sides.

Remove the bowl from the mixer and stir in the applesauce. With a large spoon, stir in the sifted flour mixture and the walnuts.

Pour the batter into a measuring cup with a spout; pour the batter neatly into greased jars. Fill the jars halfway full. Place the filled jars on the sheet tray and bake on the center rack of the oven for 45 minutes. When done, the top of the cake will spring back when pressed with a finger, and the sides will have come away from the jar.

Remove from oven and let cool 5 minutes. Poke holes in the cake with a toothpick and pour salted caramel over the top. Serve with whipped cream.

Adapted from Riki Senn at Greenbriar

Leave a comment
Share
  • Pin it
  • Share
  • Tweet
  • Share
  • Email

Refrigerator Pickled Veggies

8 / 4 / 16

pickling2


Pickled Veggies

Save
Print
  • 1 bunch of radish
  • 3 carrots
  • 4 mini white turnips
  • ¼ # thin green beans
  • 4 small watermelon radish
  • 1 lg. clove garlic, crushed but whole
  • 2 shallots, sliced thin
  • 2 ½ cups pomegranate or red wine vinegar
  • 1 cup apple cider vinegar
  • ½ cup white vinegar
  • 2 cup water
  • 2 tablespoons sugar
  • 4 strips of lemon peel
  • 2 tablespoons pickling or canning salt (do not use any other salt)

Cut up all your veggies into what ever shape you like, making sure they fit into the jar that you will pickle them in.

In a medium sized saucepan add vinegar, sugar, lemon peel and salt; bring to a slow boil, whisk until all the sugar is dissolved,

Wash a quart canning jar and fill with hot water. Let stand while you are bringing the brine to a boil.

Once the sugar has dissolved in the brine, pour the water out of the jar and fill with veggies. Pour the brine over them, let cool, then cap and refrigerate.

Leave a comment
Share
  • Pin it
  • Share
  • Tweet
  • Share
  • Email

Tomato Confit

6 / 11 / 166 / 12 / 16

Is your garden overflowing with tomatoes? I always grow too many and one of my favorite ways to make them go a little farther is to oven dry them. Much like sun dried, these concentrated gems pack a powerful punch and can be used in any dish where you’d use tomatoes. Especially nice on a cheese plate with some creamy goat cheese nearby.

tomatoconfit-chez pim 2006


To preserve them I turn them into a tomato confit and keep in my ‘pantry’ refrigerator. They can’t be water bath canned because of the oil, but they will keep for about 6 months in the refrigerator, if they last that long. The refrigeration will also help to preserve the oil and keep it from going rancid quicker. Use only fresh organic herbs and make sure you wash and dry them very well, you don’t want any water going into your beautiful confit.

Mangia (Eat!)

Save
Print
  • 1 pound tomatoes, cut in half lengthwise
  • Sea salt and freshly ground black pepper
  • 1/4 cup olive oil, approximately
  • 1 tablespoon basil, chiffonade
  • 2 teaspoon fresh thyme
  • 1 clove garlic -- minced

Preheat the oven to 350°.

Arrange the tomato halves cut side up and close together on a baking sheet, season with salt and pepper.

In a bowl, combine olive oil, garlic, and herbs. Drizzle over tomatoes and bake until the tomatoes are soft and shriveled but still retain some moisture, 1-2 hours or more.

Let cool completely. Tomatoes can be stored in a glass jar, cover tomatoes with olive oil, add a fresh sprig of thyme, seal and refrigerate.

Photo: Chez Pim

Leave a comment
Share
  • Pin it
  • Share
  • Tweet
  • Share
  • Email

Square Foot Gardening

5 / 12 / 16

When I got my first community garden, the city had to run an ad to get people interested in gardening. That was 20 yrs ago, today we have a 3 year waiting list for available plots.

The first thing I did was research, which I love to do, on the best way to grow organic vegetables. The one book I kept going back to was ‘Square Foot Gardening’ by Mel Bartholomew, an engineer who redesigned the backyard garden in order to grow more vegetables in a smaller space. We all learned to garden from books and farmers who grew in large spaces on large farms, we don’t need to use their methods in our little backyards.

Photo:http://simplysquarefootgardening.blogspot.com/

Mel’s design was basic, a 4 x 4’ raised bed with 6” sides (or taller) set upon landscape fabric to prevent weed or grass growth, other materials could also be used, then filled with equal portions of vermiculite, peat moss and compost and then divided into 16 one foot spaces. In each space Mel created a planting guide depending on the recommended space for each seed. Such as corn gets 1’ space to itself and so do tomatoes because they are large plants, smaller veggies can be planted 4, 16 or 18 to a square. We can help you understand that, we’ll be talking about Square Foot Gardening this Sat, May 14 at 10 a.m. at The Plant Stand in Costa Mesa.

You can also check out Mel’s book and website,

http://www.melbartholomew.com/what-is-square-foot-gardening/

Or

http://squarefootgardening.org/square-foot-gardening-method


the plant stand logo

2972-A Century Place
(In the back)
Costa Mesa, Ca

(714) 966-0797

1 Comment
Share
  • Pin it
  • Share
  • Tweet
  • Share
  • Email

Simple Cold Pasta Salad

8 / 18 / 15

On these dog days of summer, even here at the beach, this is one of my favorite go-to recipes. It’s quick and easy, you don’t have to turn on any heat, even to cook the pasta, and you can use bits and pieces of left overs from your refrigerator pantry.

Some of my typical summer refrigerator pantry items are, cheese, olives, tomatoes (home grown, of course), cucumbers, peppers and the like. Most often there will be some lemon chicken left over as well. All are perfect additions to this salad. First the pasta, no need to boil a big pot of water, we’ll use the microwave!

Summer Pasta Salad

Pour your dry pasta, something curly is best to hold all the wonderful dressing in it’s little nooks, into a microwave safe bowl. Cover with cool water by 1″, make sure the container is big enough that the water and pasta won’t boil over. You’ll want to cook your pasta for about 5 minutes longer than the directions guide you on the box. Test the pasta for doneness and cook a little longer if necessary. Drain well and rinse quickly with cool water. Do not add dressing to the warm pasta as it will just soak it all up and be mushy. Stir the pasta occasionally as it cools to keep it from sticking together. You could cook the pasta ahead of time and chill it before you  make the salad. If this is the case, toss the cooled pasta with a little olive oil before refrigerating. Now you’re ready to proceed with the salad.

In actuality, from this point on you could chop and dice almost anything you find in you refrigerator but here’s my stand by recipe.

Summer Pasta Salad

Save
Print
  • 1/4 cup red wine vinegar
  • 1 teaspoon Dijon mustard
  • 1/2 cup olive oil, approximately
  • Salt and pepper
  • 1 teaspoon garlic powder
  • 2 teaspoon fresh basil, torn
  • 1/2 cup diced cucumber
  • 1 pint cherry tomatoes, halved or quartered
  • 1/2 cup diced red bell pepper
  • 1/3 cup thinly sliced green onions
  • 1/4 cup sliced black olives
  • 1/2 cup crumbled or diced cheese, mozzarella, chedderella, goat cheese or any you prefer
  • 1 ½ cup cooked pasta

For dressing, mix together vinegar, Dijon, salt, pepper, and garlic powder and whisk until it comes together. While continually whisking slowly add olive oil to taste. Set aside.

Mix together remaining ingredients and toss with dressing. Serve cold.

Leave a comment
Share
  • Pin it
  • Share
  • Tweet
  • Share
  • Email

Pan-Seared Scallops with Champagne Grapes and Almonds

7 / 28 / 15

Champagne grapes and scallops

Save
Print
  • 16 large sea scallops, side muscles removed
  • 5 Tablespoons unsalted butter, divided
  • 1-1/2 Tablespoons minced shallots
  • 2/3 cup Champagne grapes (4 ounces) or black grapes, halved
  • 1-1/2 Tablespoons fresh lemon juice
  • 1/3 cup slivered or sliced almonds, toasted
  • 1-1/2 Tablespoons chopped fresh Italian (flat-leaf) parsley
  • Salt and pepper

Melt 3 Tablespoons unsalted butter in a large skillet over medium-high heat. Cook the butter until it is browned, about 2 minutes. Salt and pepper your scallops before adding them to the pan. Cook 2 minutes on each side and transfer to a dish, covering to keep warm.

Melt the remaining 2 Tablespoons of unsalted butter in the same skillet over medium-high heat. Add shallots and grapes; sauce until the shallots are golden brown, about one minute. Stir in fresh lemon juice and any accumulated scallop juice from the plate of cooked scallops. Bring to a boil and season with salt and pepper. Stir in almonds and parsley.

Place scallops on individual plates and spoon the sauce over them. Serve immediately

Leave a comment
Share
  • Pin it
  • Share
  • Tweet
  • Share
  • Email

Champagne Grapes

7 / 28 / 15


GRAPES_Melissas


Champagne grapes are not the grapes that vintners make champagne with but are called such because they look like the little bubbles that float in a lovely glass of champagne.

Champagne grapes are rather a grape variety called ‘Corinth’, small, seedless little pops of pure grape juice are also used dried. As a dried grape they can be known as Zante currants or simply currants but are not true currants.

Look for dark grapes which indicates a state of ripeness and sweetness when shopping for Champagne grapes. Grapes that look wrinkled have passed their prime and won’t be as sweet. Store in the refrigerator and wash before use. Champagne grapes look elegant as a garnish to any dish and will sit perfectly well on a fruit and cheese platter but are easily versatile in cooking. Here is a wonderful recipe from our friends at Noble Pig Winery, originally adapted from Bon Appetit magazine.

Can’t find Champagne Grapes? Call click to find our friends at Melissa’s Produce and they will send some out to you right away!

Pan-Seared Scallops with Champagne Grapes and Almonds

Leave a comment
Share
  • Pin it
  • Share
  • Tweet
  • Share
  • Email

Companion Planting

3 / 21 / 153 / 28 / 15

What is Companion Planting


Two or more plant types as to be beneficial to each other. Companion planting will help with pest control, higher yields, healthier soil and to keep weeds away.

Some flowers (marigolds, nasturtiums) can act as trap crops to attract insects away from vegetable crops. Aromatic herbs (basil, rosemary, lavender, sage) repel many insects away from more susceptible plants (tomatoes)

Umbel flowers, dill, fennel, parsley attract beneficial insects to the garden. The large flower heads provide a place where they beneficials can land and rest while they feed. Be sure to plant extra around the garden and let them go to seed. You may get some volunteers the next year (from all the seed flying around) but you can just dig those up and transplant them, free plants!

companion-plants-2Here are some classic combinations.

3 sisters, corn, beans, squash.  Plant corn and beans first, squash a couple of weeks later; beans feed nitrogen into the soil for both corn and squash, the squash leaves will protect the shallow roots of the corn and beans will grow up the corn stalks.

Basil and tomatoes are a classic example of companion planting. Plant carrots around the base of the tomatoes, they’ll be ready for harvest before the tomato plants go wild. No brassicas (cauliflower, broccoli, brussels sprouts) with tomatoes. No peppers or eggplant near or within the last year in the same spot. They are in the same family and can transfer soil born diseases.

Plant some of the umbel plants near tomatoes for help with hornworm which helps attract parasitic wasps and their larvae will feed on the hornworms.

Beans and potatoes.

While these grow together well don’t plant the beans near the corn as we talked about before. Another row of beans never hurt to have around so plant away from the squash and plant with potatoes. Potato doesn’t like squash, cucumbers or sunflowers.

Lettuce and radish

Both with tolerate less sun than 6 hrs. and the radish will be ready to harvest before lettuce starts getting big, neither one likes the heat.

Sunflowers & Pumpkins

A natural combination that get along well

Leave a comment
Share
  • Pin it
  • Share
  • Tweet
  • Share
  • Email

The Plant Stand~Jan

1 / 6 / 151 / 6 / 16

the plant stand logo

Rescheduled due to rain! See us on the 23rd

January 23rd, Sat

10 a.m.

Companion Planting

Spring Garden Planning

&

Companion Planting

Join us for a little talk and a tasty treat!

The Plant Stand
2972-A Century Place
Costa Mesa, California 92626-4324

(714) 966-0797

DKB-12

Leave a comment
Share
  • Pin it
  • Share
  • Tweet
  • Share
  • Email

Fall Tour 2014

12 / 4 / 1412 / 4 / 14

Farm Tour Fall 2014

Farmers Market-0041Farmers Market-0045Finger Lime-0030Halter Ranch-0441Jack Creek Farms-0760Rangeland-0338Windrose Farms Oct 2014-0484Windrose Farms Oct 2014-0549Windrose Farms Oct 2014-0554Windrose Farms Oct 2014-0665Windrose Farms Oct 2014-0726Cambria Tour-4848Cheesecakes-0099fall grapevines Halter Ranch 2011

Leave a comment
Share
  • Pin it
  • Share
  • Tweet
  • Share
  • Email

Oven Roasted Tomatoes

8 / 19 / 1412 / 3 / 14

IMG_0481


Store these tomatoes in a jar covered with olive oil, use a lemon olive oil if desired. For a quick appetizer see below.


1         pound Roma tomatoes, halved lengthwise

Sea salt and freshly ground black pepper

¼       cup olive oil

1         tablespoon basil, chiffonade

1          teaspoon thyme

1         clove garlic, minced

Preheat the oven to 350∫F. Arrange the tomato halves cut side up and close together on a baking sheet. Season with salt and pepper.

In a bowl, combine olive oil, garlic, and herb. Drizzle over tomatoes and bake until the tomatoes are soft and shriveled but still retain some moisture, about one hour.

Let cool completely. Tomatoes can be stored in a glass jar, cover tomatoes with olive oil, seal and refrigerate.

For sauce: Process in a food processor and warm in a large saute pan.


For a quick appetizer, stuff roasted tomato halves with the following.

Mix together 1 log of goat cheese, 2 Tb. fresh chopped herbs and 1 -2 Tb. of heavy cream.

Mix until goat cheese is soft but not runny.

Spoon or pipe herbed goat cheese onto dried tomato, serve with a drizzle of aged balsamic vinegar.

Leave a comment
Share
  • Pin it
  • Share
  • Tweet
  • Share
  • Email

Boysenberry Tart

5 / 30 / 1412 / 3 / 14

berry copy

Pastry:
1 cup all purpose flour
1 Tablespoon Sugar
1 pinch salt
6 Tablespoon Unsalted butter, cold
1 Egg yolk, slightly whisked
1 Tablespoon Lemon juice
Filling:
3 Tablespoon Cornstarch
1 Tablespoon Grand Marnier, or more if needed
3/4 cup Sugar
1 cup boysenberries or more as needed

Pastry:
In large bowl, stir together flour, sugar and salt. With pastry blender or food processor, cut in butter until it resembles tiny peas. Mix together egg yolk, lemon juice and 1 tablespoon water; sprinkle over flour mixture. Stirring with fork, add a little more water if necessary to hold dough together. Using hands, gently shape pastry into ball. Press dough 1/8″ thick into flan pan. Refrigerate while making filling.

Filling:
Preheat oven to 425°.
In small saucepan, stir together Grand Marnier & cornstarch till smooth. Stir in sugar. Add boysenberries and cook, stirring, over medium-low heat for 10-15 minutes or till thickened.

Let cool; spoon into shell, filling no more than 2/3 full. Bake in 425° oven for 10 minutes. Reduce heat to 350° and bake 15 minutes longer or till pastry is golden brown. Let cool 15 minutes before removing to rack.


Related Posts Plugin for WordPress, Blogger...
Leave a comment
Share
  • Pin it
  • Share
  • Tweet
  • Share
  • Email

Posts navigation

Previous Page 1 2 3 Next Page
Deb

Meet Chef Debbi

READ BIO

Join-Us Sign up for our newsletter to receive exclusive tips 'n tricks, and special offers on classes, tours, and more!

Recent Posts

  • New E-Book!
  • From the Pantry
  • Spaghettini at Home
  • Growing Corn
  • Spring IS Coming!

Categories

BookCUT

What's in Your Pantry?

How to stock your pantry to create delicious dishes.

Learn Chef Debbi's pantry essentials and how to substitute ingredients for pantry staples in her basic recipes for quick and easy meals.
BUY BOOK>

FacebookTwitterInstagramGooglepinterest


© 2014, DEB'S KITCHEN
Angie Makes Feminine WordPress Themes