Deb's Kitchen - Farm, Food, Wine & Lifestyle Adventures
  • Facebook
  • Google
  • Twitter
  • Instagram
  • Pinterest
  • Email
Menu
Skip to content
  • Home
  • Blog
  • Events
    • Classes
    • Tours & Adventures
  • Edible Gardening
  • Preserving
  • Recipes
    • Appetizers
    • Soups and Salads
    • Main Dishes
    • Side Dishes
    • Desserts
  • About
    • Whats In Your Pantry
    • Ask Debbi
    • Deb’s Kitchen Botanicals
    • Press
  • Contact

Tag Archives: recipes

Caesar Salad with Spring Asparagus

4 / 23 / 21


Caesar Salad with Spring Asparagus

Save
Print
  • 2 bunches pencil-thin asparagus, trimmed and chopped into 1/2-inch pieces
  • 1 tablespoon mayonnaise
  • 1 ½ tablespoons red wine vinegar
  • 2 tablespoons freshly squeezed lemon juice
  • 1 garlic clove, minced
  • 1 teaspoon Dijon mustard
  • 1 teaspoon Worcestershire sauce
  • 1 teaspoon anchovy paste (or 1 anchovy filet)
  • 6 tablespoons extra virgin olive oil
  • Sea salt and freshly ground black pepper
  • 1/2 cup freshly grated Parmigiano-Reggiano
  • 1 head romaine hearts, chopped

Prepare a large bowl with ice and cold water, set aside to blanch the asparagus.

Bring a saucepan big enough to hold the asparagus to a boil, add a heaping tablespoon of salt and plunge the asparagus into the water, boil for 2 minutes. Drain the asparagus and put into the water bath until cooled, drain and set aside on a baking sheet covered with paper towels.

Combine mayonnaise, vinegar, lemon juice, garlic, Dijon mustard, Worcestershire sauce, and anchovy paste in a medium bowl and whisk until combined. While whisking constantly, add the olive oil in a thin, steady stream until incorporated. Season to taste with salt and pepper.

Toss the romaine with a little of the dressing. Transfer to a serving platter and top with asparagus and the grated Parmigiano-Reggiano. Serve extra dressing on the side.

Leave a comment
Share
  • Pin it
  • Share
  • Tweet
  • Share
  • Email

Naturally Dyed Easter Eggs

4 / 2 / 21

Instant Pot or Stove Top, your choice. Be creative and enjoy this really fun project!

To Make the Dye

 Directions are for each individual dye.  if making more than one color, rinse the pot thoroughly between each batch to prevent mixing colors

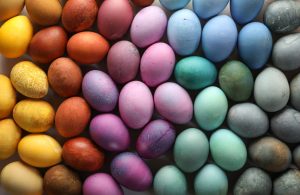
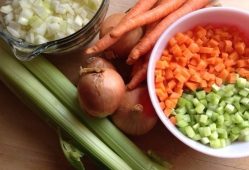
 Purple = 1½ cup shredded red beets

Rust = 7 yellow onion skins

Yellow = 3 tablespoons ground turmeric or cumin

Orange = 3 tablespoons chili powder

Sky Blue = 1½ cups shredded red cabbage

Dark Blue = 2 cups blueberry juice

Green = 2 cups spinach

1 cup red onion skins = lavender or red eggs

1 bag Red Zinger tea = lavender eggs


Stovetop

Bring 2 cups water to a rolling boil.

Add coloring agent.

Reduce heat and simmer for 30 minutes or longer for the deepest color.

Strain liquid into a large mason jar, and allow to cool to room temperature, 2-3 hours.

Stir in 2 tablespoons white vinegar and add 3 or more hard-boiled eggs.

Seal the jar and refrigerate overnight or until the egg is the desired color.

Rub dried eggs with a dab of vegetable oil to give them a shinier finish (optional).

Instant Pot

 Pour 2 cups of water into the Instant pot and add desired dyeing agent.

Secure the lid and turn pressure release knob to a sealed position.  Cook at high pressure for 10 minutes on manual.

When cooking is complete, use a quick release.

Carefully pour through a strainer into a larger bowl, discard dyeing agent.

Pour colored water into a quart size wide mouth mason jar and add 2 tablespoons of vinegar.  Top with a lid and place in fridge.

Let it chill 4 hours or overnight before placing hard boiled eggs in the jar to dye.

Repeat with the other dyeing agents to create more colors.

Dye will keep in the fridge for at least 1 week.

Note: Each jar will hold 4-5 eggs at a time.  The eggs will have white spots where they touch each other, or the jar so lightly rotate the jar a few times while they are in the jar for more even coloring.

 Dye the eggs

Gently place the eggs into the dye and allow them to sit in the dye for at least an hour or overnight in the refrigerator, depending on how dark you want them. I put them in quart jars, they can hold about 4 eggs each.

When they have achieved the color you want, use a slotted spoon to gently lift them from the jar.

While they are wet, the color will come off if you rub on it too hard.  Place on a cooling rack in the fridge to dry completely.  This will set the dye, so it won’t rub off.

Once dry, store in an egg carton or other sealed container.

Repeat with more eggs if desired.


* How to hard boil eggs

Instant Pot

                        Place 1 cup of COLD water in the inner pot of Instant Pot for a 6 quart                                instant pot and 1.5 cups COLD water for an 8-quart Instant pot.

                        Place rack into pot and carefully set as many eggs as desired on the rack.

                        Let the pressure release naturally for 5 minutes. Then do a quick release                                  and remove eggs from Instant Pot and place in ice water bath.

                        Let eggs sit in water bath for 5 minutes.

                        Store in the fridge for up to 7 days unpeeled or peel and use within 3 days.

            Stove Top

Place eggs into a saucepan and cover with cool water. Bring to a boil then                          turn heat off and cover the pan. Set timer for 15 minutes, drain and place                                 eggs in ice bath to cool, then store in refrigerator.

Leave a comment
Share
  • Pin it
  • Share
  • Tweet
  • Share
  • Email

Braised Lamb, Veal or Beef Shanks

4 / 2 / 21

Warm, hearty shanks usually like a long cook in the oven, these are done in an Instant Pot or pressure cooker and take only a few hours. Sauté the shanks and the vegetables and then set the timer, take a nap or have a glass of wine and relax, let the cooker work its magic. A great dish for any special occasion or holiday.


Braised Lamb, Veal or Beef Shanks

Save
Print
  • 5 sprigs of fresh thyme
  • 2 dried bay leaves
  • 4 lamb, veal or beef shanks (make sure they will fit into your pot or have the butcher cut them for
  • you
  • Sea salt and fresh ground pepper
  • 2 - 3 tablespoons sunflower or olive oil
  • 1 medium onion, about the size of your palm cup onion, finely diced
  • 1 garlic clove, minced
  • 3 large stalks celery, finely diced
  • 2 medium carrots finely diced
  • 2 ½ cup dry red wine
  • 2 cups chicken stock
  • 1 large can crushed or peeled and chopped tomatoes
  • 2 tablespoons tomato paste

Place the thyme and bay leaves into a piece of cheesecloth, close by tying the ends of the cheesecloth together. This is your bouquet garni. Set aside.

Set your Instant Pot to sauté and add a little sunflower or olive oil.

Dry the shanks with a cloth or paper towels, season with salt and pepper.

Brown the shanks on all sides, then set aside. Add the onion, garlic, celery and carrots and sauté until the onions start to turn translucent. Add wine, stock tomatoes, tomato paste and bouquet garni. Stir well, snug the shanks into the liquid until they are completely or nearly covered with liquid.

Close and set the vent to seal. Set the Instant Pot to Manual pressure cook high for 50 minutes. Let the pot naturally release pressure, 20 min. or so.

Remove the shanks and set them aside on a plate and keep warm by covering with foil.

Strain the liquid squeezing out as much liquid as possible. Measure liquid and for each cup of liquid, make gravy in the Instant Pot using the following method.

Per 1 cup of liquid:

1 ½ tablespoons of butter or olive oil

1 ½ tablespoons all-purpose flour

Melt butter or oil in the pot on sauté, whisk in flour and let cook, while continuing to whisk until the flour turns slightly browned.

Remove as much fat from the cooking liquid as possible; slowly add the liquid into the flour mixture while whisking. As the liquid begins to thicken add more liquid and whisk until the gravy is thick, taste and season with salt and pepper. If gravy is too thick, add a little stock or water until it’s the consistency you like, it should be on the thinner side for this dish.

Serve atop a good helping of mashed potatoes or polenta.

If you’d like to serve the cooking vegetables, remove bouquet garni and stir the vegetables into the gravy.

Leave a comment
Share
  • Pin it
  • Share
  • Tweet
  • Share
  • Email

Happy Valentines Day

2 / 12 / 21

Here’s a lovely menu for your Valentine~

I saw cool spring asparagus in the market recently and California strawberries are ripe and red and ready to go. This may seem like a daunting menu to make but there are some tricks that can make it a little easier on you as you prepare the menu. Read the recipe all the way through before beginning so that you can lay out your ingredients. The Chocolate-Strawberry Cheesecake Trifle can be made the day ahead. You could lightly steam the asparagus ahead, refrigerate or let it sit at room temperature. While you are searing the steaks, bring a saucepan with a steamer basket to a boil for the crab. Steam the crab and sauté the asparagus while you are making the bearnaise sauce. Everything is hot at the same time and ready to be assembled. Enjoy!


Filet Oscar

Save
Print
  • 2 (2-inch-thick) filets mignons
  • 2 tablespoons olive oil
  • ½ lb. thin fresh asparagus
  • 6 ounces fresh crab meat, room temperature

Preheat the oven to 400°.

Bring steaks to room temperature for about 30 minutes.

Heat a large skillet.

Dry the filets with a paper towel.

Brush the filets lightly all over with the oil. Season both side wells with sea salt and pepper.

When the pan is hot, add the steaks and sear evenly on all sides for about 2 minutes per side or until well browned. If the steaks won’t release from the pan, wait another minute or so and it will release when browned.

Arrange the steaks on a parchment lined baking sheet and place into the oven and cook until 120°, about 10 minutes. Remove from oven and let rest for 5 minutes.

Asparagus and Crab

While the steaks are cooking you can lightly steam the asparagus or cook it in the still hot pan that you cooked the steaks in.

Cut the stems from the asparagus so the spears are all the same length. Lightly toss with a little olive oil and season with salt and pepper. Cook until you can pierce with a knife, about 5 minutes. Let rest until you’re ready to assemble the dish.

Warm the crab in a steamer basket over simmering water for about 5 minutes.

Make the bearnaise sauce at the very last minute.

Assembly:

Place the steaks on two plates, top with asparagus spears, then add the crab and drizzle with sauce.

Bearnaise Sauce

Save
Print

Using an immersion blender and a tall narrow jar to make the sauce rather than in a double boiler makes getting this sauce on your food much easier (and quicker).

  • 3 large egg yolks
  • ¼ teaspoon cayenne pepper
  • ¼ teaspoon sea salt
  • 1 ½ tablespoon lemon juice, plus more to taste
  • 1 ½ tablespoon water
  • 1 ½ sticks unsalted butter
  • 1 tablespoon minced tarragon leaves, preferably fresh

Place egg yolks in a tall narrow container that the blender stick fits in all the way to the base.

Add water, lemon juice, cayenne pepper and salt. Mix to combine.

Melt butter in a small saucepan. Spoon off much of the white as it melts.

With the blender stick on, slowly pour the butter in a thin stream into the eggs over around 45 seconds. Leave any of the white part of the butter that you couldn’t scrape off. (It won’t hurt if some manages to slip in.

Blend for a further 10 seconds, moving the stick up and down.

If too thick, mix in warm tap water 1 teaspoon at a time.

Taste for lemon level, adding a little more if desired, add the tarragon leaves and serve immediately. If you need to reheat do it in a small saucepan and heat slowly, if the sauce starts to separate (break) add a drop of water one at a tie until it comes back together.

Chocolate-Strawberry Cheesecake Trifle

Save
Print
  • 16 ounces cream cheese, softened
  • 2 cups powdered sugar
  • 8 ounces sour cream
  • ½ teaspoon vanilla extract
  • ¼ teaspoon almond extract
  • 1 cup whipped cream + more for garnish
  • 1 angel food cake
  • 2 quarts, fresh strawberries
  • 6 ounces shaved chocolate

In a large bowl, beat cream cheese and powdered sugar until fluffy. Add sour cream, vanilla and almond extract. Fold in whipped cream. Tear the angel food cake into tiny pieces and add to mixture. Set aside. Combine sliced strawberries and sugar until sugar is dissolved. In trifle dish or glass bowl, layer the two mixtures. Finish with fresh strawberries on top. Chill before serving.

Immediately prior to serving, garnish with a dollop of whipped cream and sprinkle with chocolate shavings. Refrigerate for several hours.

Leave a comment
Share
  • Pin it
  • Share
  • Tweet
  • Share
  • Email

Citrus Season!

1 / 19 / 21


Nutritious and healthy we all know that citrus fruits are high in vitamin c which helps your immune system; they are loaded in plant compounds that have various health benefits, including anti-inflammatory and antioxidant effects. They contain B vitamins, potassium, phosphorous, magnesium and copper as well. A versatile fruit they can be made into jams, jellies, drinks and savory or sweet dishes or just eaten out of hand. Try this Roasted Chicken with Lemon and Herbs along with Melissa’s Dutch Yellow Potatoes for a tasty, comforting dinner.

Lemon Herb Roasted Chicken With Dutch Yellow Potatoes®

Save
Print
  • 1 Meyer lemon, zested and juiced
  • 2 tablespoons unsalted butter, softened
  • ½ teaspoon minced fresh thyme
  • Sea Salt and freshly ground pepper
  • 1 large onion, rough chopped
  • 2 small carrots, rough chopped
  • 1 stalk celery, rough chopped
  • 4 sprigs Italian flat leafed parsley
  • 1 bag Melissa’s Dutch Yellow Potatoes®, cut in half
  • ½ cup chicken stock

Preheat the oven to 425° and place the rack in the lower third of the oven.

Mince the lemon zest and mix with the butter and minced thyme.

Rinse and pat the chicken dry. Slide half of the butter mixture under the skin and the rest over the chicken, season with salt and pepper.

Scatter the onion, carrots, celery and parsley over the middle of a roasting pan*. Place the chicken on top of the vegetables and place the potatoes around the chicken.

Roast for approximately 50 minutes, using a probe type or instant read thermometer placed into the thigh and it should read 165° - 175°. Let the chicken rest in the pan for 15 minutes. Remove to a cutting board, remove vegetables from pan and place the pan over a medium high heat. Add the stock and scrape any bits from the bottom of the pan, reduce the liquid to about ½ and serve along with the chicken.

Use a roasting pan with no more than 2” sides

Leave a comment
Share
  • Pin it
  • Share
  • Tweet
  • Share
  • Email

Hello Fall!

10 / 17 / 20

Gordon Skagit Pumpkin Farms

It’s starting to feel like fall, I’m sure hoping all the hot days are behind us, they’re not my favorite!

I still have great looking tomatoes in the garden and some seasonal herbs, my summer lettuce is going to seed so it’s time to get busy with my fall/winter garden. Actually I’m a little late but we decided to drive up the coast just to get a break. Now it’s time to focus before the ground gets too cool.

I’m working on a new Debs Kitchen Garden newsletter which I’ll begin sending out on opposite weeks of the regular newsletter. I have some appointments left if you need a little advice on getting your own winter garden growing. In the meantime here are some pumpkin/squash recipes for you because I know many of you just can’t get enough pumpkin! Mangia!


Pumpkin Risotto

Save
Print

Serves 4

  • 1 qt. homemade or low-sodium chicken or vegetable stock
  • 1 cup pumpkin purée (not pumpkin pie filling)
  • Sea salt and pepper
  • ½ teaspoon ground nutmeg, or 6 to 10 scrapes on a grater from a whole nutmeg
  • 8 tablespoons (4 ounces) unsalted butter
  • 8 ounces shallots (7 to 8), minced
  • 1 ¾ cups carnaroli, vialone nano rice, you could also use an arborio rice
  • 1 ½ cups dry white wine
  • 1 ¼ cups grated Parmesan cheese
  • 6-10 sage leaves, finely chopped (optional)

Place the stock, pumpkin, nutmeg, a sprinkling of salt and pepper in a medium saucepan over high heat, Stir to combine and bring to a gentle boil. Reduce the heat to a simmer.

In a large, deep pan add the butter, and melt over medium heat. Add the shallots and cook, stirring until they are translucent. Add the rice and stir until each grain is coated in fat, 2 to 3 minutes. Reduce the heat to low. Add the wine or vermouth and cook, stirring constantly, until it is absorbed.

Add 1/2 cup of the pumpkin stock mixture and stir constantly until absorbed. Add the remaining stock mixture, 1/2 cup at a time, stirring constantly after each addition and adding the next amount only after the previous one is fully absorbed by the rice.

After you have used about 4 1/2 to 5 cups of the stock mixture taste the rice to determine if it is al dente. Continue to add more stock, if necessary, to reach al dente.

Stir in the cheese and sage if using. Serve immediately.

Instant Pot Pumpkin Purée

Save
Print

Yield about 2 cups

  • 1 ½ cups water
  • 1 (3- to 4-pound) sugar or pie pumpkin*

Wash and dry the pumpkin Remove the top and then cut in half lengthwise. (You can remove the seeds now or wait until the squash is cooked and scoop them out).

Set a wire rack in a 6-quart or larger electric pressure cooker or Instant Pot. Add the water. Place the pumpkin cut-side up on the rack. Lock on the lid and make sure the pressure valve is set to seal. Set the cook time for 15 minutes at high pressure.

When the cook time is up, let the pressure cooker naturally release pressure for 5 minutes. Quick release any remaining pressure. Open the pressure cooker and check the texture of the pumpkin. The pumpkin flesh should be fork tender. If it's not, cook for 5 minutes more at high pressure, repeating the 5 minute natural release. Transfer the pumpkin to a cutting board until cool enough to handle.

Fit a large fine-mesh strainer over a bowl or line a regular colander with cheesecloth first. Cut the pumpkin in half. Remove any remaining seeds. Scrape the pumpkin flesh away from the skin and place in the strainer or colander. Using the back of a spoon, press on the pumpkin firmly to remove excess liquid. Set aside to drain for 1 hour.

Transfer the drained pumpkin to the bowl of a food processor fitted with the blade attachment. Blend until smooth, about 1 minute. Measure into 16-ounce portions, about 2 cups each. If any pumpkin remains, use it in smoothies.

*Pumpkin substitute: If you can't find a sugar pumpkin, use 2 acorn squash instead, 3 to 4 pounds total.

Storage: Keep the purée in the refrigerator for up to 2 days or place the fully cooled purée into a plastic freezer bag. Flatten and freeze for up to 3 months. Thaw in the refrigerator overnight before using.

Maple Roasted Brussels Sprouts with Squash

Save
Print
  • 1 pound butternut squash peeled and diced into 1/2-inch cubes
  • 1 pound Brussels sprouts ends cut off and halved (if they are large, cut in quarters)
  • 4 slices thick-cut bacon diced
  • 2 tablespoons extra virgin olive oil
  • 1 tablespoon fresh thyme
  • 1 tablespoon fresh sage
  • Sea salt and fresh ground pepper to taste
  • 1/2 cup halved pecans, optional
  • FOR THE MAPLE GLAZE
  • 3 tablespoons maple syrup
  • 1 tablespoon balsamic vinegar
  • 2 tablespoons extra virgin olive oil
  • Sea salt and fresh ground pepper to taste

Preheat oven to 425°.

Line a large baking sheet with parchment paper or foil and set aside.

In a large mixing bowl combine diced butternut squash, brussels sprouts, bacon, olive oil, thyme, sage, salt, and pepper; mix until thoroughly incorporated.

Transfer veggies to prepared baking sheet and roast for 30 to 35 minutes, stirring around halfway through cooking.

In the last 7 minutes, add pecans, if using

In a small saucepan whisk together maple syrup, balsamic vinegar, olive oil, salt, and pepper.

Set saucepan over medium heat and bring to a simmer; stirring often, simmer for 3 to 4 minutes or until reduced and syrupy.

Take veggies out of the oven and toss with prepared glaze.

Arrange on a large plate or bowl and serve.

Lemon Roast Chicken with Delicata Squash

Save
Print
  • 1 whole chicken, cut up
  • 3 small Delicata squash (about 1½ pounds), halved lengthwise, seeds removed
  • 1 medium onion, chopped
  • 2 Meyer lemons, zested and juiced
  • 3 tablespoons extra-virgin olive oil
  • Sea salt and pepper
  • 3 sprigs fresh sage
  • Meyer lemon wedges, for serving
  • Fresh thyme and sage sprigs, for serving

Preheat oven to 450°.

Line a baking sheet with parchment paper or foil. Place the chicken and squash on the parchment. Toss the squash and onions with oil and place on the baking sheet with the chicken. Rub the chicken with oil, pour the lemon juice overall, sprinkle with zest and season with sea salt and pepper. Chop half the sage and sprinkle over both chicken and squash-onion mixture. Sprinkle zest over the chicken.

Roast the chicken and squash for 30–40 minutes, or until an instant read thermometer registers 165° at the thickest part of the thighs and the squash is cooked through and fork tender, while the onions are softened and slightly charred around the edges.

Transfer the chicken and squash to a serving platter, garnish with lemon wedges, thyme and sage, serve right away.

Caramel Pumpkin Pots du Crème

Save
Print
  • 2 cups heavy cream
  • 5 large egg yolks
  • 1/4 cup plus sugar
  • Pinch of sea salt
  • 1/2 cup plus two tablespoons of pumpkin puree
  • 1/4 cup caramel sauce
  • 1/2 teaspoon cinnamon
  • 1/4 teaspoon nutmeg
  • 1 teaspoon vanilla

In a medium saucepan, bring heavy cream and sugar to a boil, whisking constantly until the sugar is dissolved. Put aside and let cool for five minutes.

In a medium heatproof bowl, whisk the egg yolks. Add 1/4 cup of heated cream mixture to egg mixture and whisk to combine. Continue adding cream mixture in 1/4 cup increments to eggs until the two are fully combined. Place fully combined mixture back into saucepan and cook over moderate heat, stirring with a wooden spoon, until the custard coats the back of the spoon, about 4 minutes.

Add remaining ingredients and stir to combine. Transfer the mixture to a blender and puree until very smooth, about 1 minute. Pour the finished custard through a strainer.

Refrigerate until chilled about 2 hours.

To serve warm: Let the pots de crème stand at room temperature for 15-20 minutes prior to serving.

Serve with a dollop of whipped cream.


Leave a comment
Share
  • Pin it
  • Share
  • Tweet
  • Share
  • Email

Late Summer/Early Fall Menu’s

9 / 21 / 20

While it’s still pretty hot out in So. California it’s hard to go into the kitchen to cook. Here are some light recipes that are quick and easy to prepare. Mangia!

Spinach Salad, Traditional

Save
Print

Serves 2

  • 6 ounces baby spinach, washed and dried well
  • 1/4 small or medium shallot, minced
  • 2 pieces thick-sliced bacon, finely diced
  • ¼ cup Champagne Vinegar, or Red Wine Vinegar
  • 1/2 teaspoon smooth Dijon mustard
  • Sea salt and freshly ground black pepper, to taste
  • 4 large white mushrooms, thinly sliced
  • 2 large egg, hard-boiled, chilled, peeled and thinly sliced

Remove any stems from the spinach and place in a salad serving bowl.

In a heated sauté pan add bacon and cook until crisp, drain on paper towels. Remove all but 2 Tb. of bacon grease and add vinegar, whisk in Dijon mustard and taste for seasoning. Pour over salad and toss quickly, scatter with mushrooms and eggs.

Serve while still warm.

Roasted Tomato & Goat Cheese Flatbread with Artichoke Pesto

Save
Print
  • 1 jar artichoke hearts, 12 oz., drained
  • 1 cup walnuts, toasted
  • 1/4 cup grated Parmesan cheese
  • 2 cloves garlic, peeled
  • 1/3 cup lemon juice, to taste
  • 1/2 cup olive oil, to taste
  • 1/4 cup minced fresh parsley
  • Salt and pepper, to taste
  • 1 pizza dough
  • 1 large heirloom tomatoes or ½ basket cherry tomatoes, cut in half
  • 4 ounces soft goat cheese

Drain the artichoke hearts. If they are marinated in oil, you can omit draining the hearts and adjust the oil measure downwards appropriately.

Add the artichoke to the food processor with the nuts, cheese, and garlic and pulse until you have a paste. Add in the lemon juice and with the motor running, drizzle in the olive oil. Scrape down the sides of the processor as needed and pulse until you have a uniform paste-like consistency.

Taste and season with salt, pepper, oil, and lemon juice to taste.

Heat oven to 450°. Roll pizza dough out to desired shape, place onto parchment lined baking pan. Brush 1” of the edge of the pizza dough with olive oil, spoon on the artichoke dip to the remaining dough, top with tomatoes, goat cheese and bake for 12 – 15 minutes.

Spinach Bacon Cheese Puffs

Save
Print

Baked pastry puffs stuffed with a cream cheese, feta, bacon and spinach filling. These are great appetizers that you can put together ahead of time and bake off as needed.

Yield: 10 puffs

  • 4 ounces cream cheese, softened
  • 1 large egg
  • 1 tablespoon olive oil
  • 1/2 teaspoon dried dill
  • 2 packed cups chopped fresh spinach
  • 3/4 cup crumbled feta
  • 3 slices crispy cooked bacon, crumbled
  • Sea salt and fresh ground black pepper
  • 1 sheet frozen puff pastry, thawed and cut into 10 squares (cut on a floured board), Keep the pastry cold until ready to use.
  • 1 tablespoon butter, melted

Preheat oven to 400°. Grease round or square muffin pan.

Place the cream cheese into a food processor, add egg, oil and dill and pulse until combined.

In a separate bowl mix the spinach, feta and bacon. Pour the cream cheese mixture over top, season it with salt and pepper and stir until combined.

Line the muffin pan with the pastry squares, stretching them out a little if needed; press them into the bottom of the cups. Divide the spinach among the cups as evenly as possible. Bring the 4 points together over the filling and press them together.

Lightly brush with the melted butter.

Bake about 25 minute until golden brown and puffy. Allow to cool in pan on wire rack 10 minutes then run a knife around the edges to loosen them and help pop them out.

Bird's Nest Pesto With Stuffed Tomatoes

Save
Print
  • Pesto
  • 1/2 cup pine nut -- lightly toasted; plus, some for garnish
  • 1 clove garlic -- peeled
  • 2 cups basil leaf -- loosely packed
  • 1/2 cup Parmesan cheese -- grated
  • Salt and pepper
  • Tomatoes
  • 11 ounces goat cheese -- room temperature
  • 1/4 cup heavy cream
  • Salt and pepper
  • 6 small tomatoes -- plum
  • Olive oil
  • 1 pound spaghetti -- or angel hair pasta

Pesto

In a food processor, rough chop pine nuts and garlic. Add basil and process using pulse until the leaves start to break down. Add the cheese and blend until you have a rough paste. With machine running add olive oil to emulsify. Season with salt and pepper.

Preheat oven to 425° and put a pot of water on to boil for the pasta.

Mix the goat and Boursin cheese with enough cream to make it soft and spreadable. Season with salt and pepper.

Cut the tops off of the tomatoes and scoop out the insides. Lightly salt and place, cut side down, on paper towels to drain for 20 min. Spread a little pesto on the inside of the tomato and fill to the top with the goat cheese mixture. Place in a lightly oiled baking dish. Drizzle a little olive oil over each one and bake until they start to shrivel, and the cheese is lightly browned, about 20 min.

Cook the pasta until al dente, reserving about 1 cup of the cooking water.

Transfer to a large serving bowl and toss with the pesto, adding a bit of the pasta water if necessary, to loosen the pesto. Plate the pasta and add a tomato in the center. Top with a sprinkling of toasted pine nuts.

Sea Bass Provençal

Save
Print
  • Olive oil
  • 1 small leek, cut in half and then into half moons
  • 1 clove garlic
  • 1 small can whole tomatoes, drained and chopped or 2 large fresh garden tomatoes
  • ¼ cup dry white wine
  • 2 teaspoons fresh thyme
  • ¼ cup Greek olives, halved
  • 1 teaspoon capers, drained
  • 4 4 ounce Sea Bass fillets, or any white fish

Heat a medium sauté or saucepan. Add enough oil to coat the bottom of the pan, add onion and sauté until lightly translucent. Add garlic and stir for about a minute. Crush or squish tomatoes and add tomatoes and remaining ingredients except the fish then simmer about 10 minutes. Set aside and keep warm.

Heat a large sauté pan over medium heat; add enough oil to coat the bottom of the pan. When oil is hot carefully place dried fish fillets into oil, it should start to simmer right away. Cook about 3-4 minutes and turn carefully for another 4 minutes.

Serve with sauce.

French Apple Cake

Save
Print
  • 1 cup all-purpose flour, spooned into measuring cup and leveled-off
  • 1 teaspoon baking powder
  • 1/4 teaspoon salt
  • 1 stick (1/2 cup) unsalted butter, at room temperature
  • 2/3 cup granulated sugar, plus more for sprinkling over cake
  • 2 large eggs
  • 1 teaspoon vanilla extract
  • 3 tablespoons dark rum
  • 2 baking apples, peeled, cored and cut into 1/2-inch cubes (I like Honeycrisp, Fuji or Granny Smith)
  • Confectioners' sugar (optional), for decorating cake

Preheat the oven to 350°F. Grease a 9-inch springform or regular cake pan with butter or nonstick cooking spray. If using a regular cake pan, line the bottom of the pan with parchment paper and grease again.

In a small bowl, whisk together the flour, baking powder and salt.

Using a handheld mixer with beaters or a stand mixer with the paddle attachment, cream the butter and granulated sugar until light and fluffy, about 3 minutes. Add the eggs, one at a time, beating well and scraping down the sides of the bowl after each addition. Beat in the vanilla and rum. Don't worry if the batter looks grainy at this point; that's okay. Add the flour mixture and mix on low speed until just combined. Using a rubber spatula, fold in the chopped apples.

Scrape the batter into the prepared pan and even the top. Sprinkle evenly with 1 tablespoon of granulated sugar. Bake for about 40 minutes, or until the cake is golden and a toothpick inserted into the center comes out clean. Allow the cake to cool on a rack. Run a blunt knife around the edges of the cake. If using a springform pan, remove the sides. If using a regular cake pan, carefully invert the cake onto the rack, remove the parchment paper, then gently flip the cake over and place right-side-up on a platter. Using a fine sieve, dust with Confectioners' sugar (if using). Cake can be served warm or room temperature, plain or with lightly sweetened whipped cream or vanilla ice cream.

Freezer Friendly Instructions: The cake can be frozen for up to 3 months. After it is completely cooled, cover it tightly with aluminum foil or freezer wrap. Thaw overnight on the countertop before serving.


Leave a comment
Share
  • Pin it
  • Share
  • Tweet
  • Share
  • Email

Too Hot to Cook

8 / 21 / 20

I’m guessing you all noticed that summer finally arrived and so did the desire NOT to cook anything. Here are a few recipes to help you navigate through this heat wave, some recipes are no cooking at all but there are a couple using an Instant Pot or Pressure Cooker and a Slow Cooker. So, break out those appliances that are probably stashed away somewhere.

Antipasto Salad

Save
Print
  • For vinaigrette
  • 1/4 cup red-wine vinegar
  • 1 teaspoon dry mustard
  • 1 tablespoon basil, chopped
  • salt and pepper, to taste
  • 1/2 cup olive oil, approximately
  • For salad
  • 1 medium red onion, halved lengthwise and thinly sliced
  • 2 hearts romaine lettuce, torn into bite-size pieces
  • 1 jar roasted red peppers, drained and sliced
  • 1 jar marinated artichoke hearts, drained and quartered
  • 1 cup assorted brine-cured olives
  • 1 cup pepperoncini pepper
  • 1 pint cherry tomatoes, halved
  • 1/2 pound assorted Italian cold cuts, sliced or cubed

Make vinaigrette:

In a small bowl whisk together vinegar, mustard, basil, salt and pepper. Slowly add oil while whisking constantly to emulsify. If using right away, let sit at room temperature. Refrigerate after using but let come to room temperature before using.

Spoon dressed romaine onto a large plate and arrange with peppers, artichokes, olives, pepperoncini, tomatoes, onion and cold cuts.

Whisk vinaigrette again and drizzle over salad. Serve with some crusty bread and butter.

Gazpacho

Save
Print

Serves 2-4

  • 1 small red onion
  • 2 small cucumbers
  • 2 ribs celery
  • 1 small jalapeno, optional
  • 1 roasted red bell pepper
  • 6 medium tomatoes
  • 1 cup French bread, cut into cubes and soaked in a little water
  • 1/4 cup red wine vinegar
  • 1/4 cup olive oil
  • Sea salt and freshly ground pepper
  • 1 lemon, zested
  • 1 Tablespoon lemon juice, to taste
  • 1 teaspoon Worcestershire sauce
  • ½ Hass avocado, chopped
  • ½ pound cooked, cold shrimp, optional

Rough chop the vegetables and add to a blender, for a chunkier texture process in a food processor instead of a blender.

Squeeze the water from the French bread cubes and add to a blender along with the vegetables. Add olive oil and vinegar and blend to a puree. Season with salt, pepper (if needed), lemon juice, zest and Worcestershire sauce. Refrigerate over night for best flavor.

To serve, check for seasoning again before pouring into a bowl. Garnish the top of the soup with the chopped avocado and shrimp if using.

Goes very well with a nicely toasted slice of cheesy garlic bread.

Italian Chicken Wrap

Save
Print
  • 1 extra-large tortilla flatbread or lavash bread
  • 2 tablespoons roasted red peppers, sliced
  • 5-6 slices cooked chicken breast about 3 ounces
  • Handful of arugula or spinach
  • 2 slices provolone cheese
  • 3-4 thin slices of tomato
  • 2 tablespoons artichoke bruschetta or marinated artichoke hearts
  • 10 sliced kalamata or black olives
  • Sliced red onion
  • Balsamic glaze

Lay the tortilla or flatbread on a flat surface. Starting on the edge closest to you, layer a stripe of red pepper about 1/2 inch inside the outer edge. Place the chicken slightly overlapping the peppers, add a strip of arugula, provolone cheese and tomato. Top with the artichoke bruschetta then olives, sliced red onion and drizzle lightly with the balsamic glaze.

Starting from the edge closest to you, fold the portion of the tortilla with the red pepper and chicken into itself, and fold the outer edges of the sides inward, then continue to tightly roll and wrap the sandwich. Slice the wrap in half and serve or cut the halves into even portions to serve as pinwheels. Make the day before or refrigerate for 2-3 days.

Cuban Sandwich

Save
Print

Makes 4 Cuban sandwiches

  • 1 loaf Cuban bread
  • 3 tablespoons butter
  • yellow mustard
  • 1 pound ham
  • 1 pound roasted pork
  • 1/2 pound Swiss cheese
  • dill pickles

Preheat a pancake griddle or large fry pan to medium hot.

Cut the bread into sections about 8 inches long. Cut these in half and generously spread butter & mustard on both halves (inside.)

Make each Cuban sandwich (Cubano) with the ingredients in this order: pickles, roasted pork, ham, and cheese. Be generous!

Spread a little butter on the hot griddle or fry pan and place the Cubano sandwich on the pan. Use a heavy skillet, bacon press, or foil-wrapped brick to flatten the sandwich. (You really want to smash the Cubano sandwich, compressing the bread to about 1/3 its original size!)

Grill the sandwiches for two to three minutes then flip them over to toast the other side. Once the cheese is melted and the bread is golden brown on both sides, the Cubano sandwiches are done.

Make sure your griddle or fry pan is not TOO HOT! Otherwise, the crust will burn before the cheese melts.

Slice the sandwich in half diagonally and serve.

Tip: Let your meats and cheese come to room temperature. This way you avoid over toasting the bread and the cheese melts perfectly! This is especially helpful when you have a lot of meat in your Cubano sandwich.

You may substitute French bread if you must, but NOT a baguette! Additional bread options: hoagie roll, Mexican bolillo, or ciabatta bread rolls.

Tuscan Summer Salad

Save
Print
  • Dressing
  • ¼ sherry vinegar (can substitute any vinegar that you like)
  • 1 teaspoon garlic powder
  • 1 tablespoon finely chopped shallots
  • 1 teaspoon Dijon mustard
  • 1 teaspoon Italian herbs, crushed
  • ½ cup oil, approximately use olive
  • Sea salt and pepper, to taste
  • Salad
  • 1 head romaine lettuce
  • 1 head radicchio lettuce
  • 4 ounces green beans, cut into 1 to 2-inch pieces, blanched and cooled*
  • 1 basket cherry tomatoes, cut in half
  • 1 can gigante white beans, drained and rinsed
  • ½ small red onion, cut into slivers
  • ½ cup chopped roasted red peppers
  • 2 small Persian cucumbers, cut in half then into half moons
  • 2 cups chopped cooked chicken, optional

Put vinegar, garlic powder, shallots, mustard and herbs together in a bottle or medium bowl, whisk in enough oil to emulsify dressing. Season to taste with salt and pepper. Set aside.

Toss all salad ingredients together in a large bowl. Add a little dressing and toss again, taste and add more dressing as necessary.

*Blanch and cool green beans: Bring a large pot of water to a boil. Meanwhile prepare an ice water bath, a large bowl filled with ice and water.

When the water boils add the green beans and a good amount of salt, boil for 3 minutes then plunge them into the ice water bath.

Steak Fajitas Crockpot Style

Save
Print
  • 1-2 pounds beef flank steak*
  • 2 tablespoons lime juice
  • 1 tablespoon oil
  • 1 large onion quartered and sliced into thin pieces
  • 1 red pepper, sliced into strips
  • 1 tablespoon or more, seeded and chopped jalapeno pepper
  • 1 tablespoon chopped cilantro
  • 1 clove minced garlic
  • 1 teaspoon chili powder
  • 1/2 teaspoon salt
  • 1 cup diced tomatoes
  • 1 dozen flour tortillas

Serve with optional ingredients sour cream, guacamole, shredded Mexican blend cheese, chopped tomatoes, shredded lettuce, salsa

Cut flank steak into 6 or 8 pieces and marinate in lime juice and oil for about 30 minutes.

Add all the ingredients except tortillas into the crockpot and mix well.

Cook on low for 8 or 9 hours, until the beef is tender and can be shredded easily.

Remove from slow cooker and shred the meat. Return meat to slow cooker and stir.

For the fajitas, spread meat mixture onto warm flour tortillas and add your favorite toppings.

If you can’t find flank steak, you can substitute skirt steak, london broil or flat iron steak

Pulled Pork I Instant Pot

Save
Print
  • 1 boneless pork shoulder, about 4 or 5 pounds
  • Sea salt and ground pepper
  • 1 onion, cut into large pieces
  • 1 rib celery, roughly chopped
  • 1 carrot, roughly chopped
  • 1-2 cups chicken stock

Cut the pork into several pieces so that it fits into the Instant Pot below the fill line. Season the pork with salt and pepper, then brown it on all sides on the searing or frying setting.

Add the onion, celery and carrot around the pork and cover with chicken stock keeping below the fill line. Add the lid to the pot and make sure to turn the steam release vent to the sealing position. Cook on manual for 1 hour. Let the pressure release naturally for 10 to 20 minutes

Remove the pork and slice or shred, add any sauce you like. I use plain shredded or sliced pork for my Cuban Sandwiches.

The meat freezes well for up to 6 months.

Black Forest Mousse Parfait

Save
Print

Serves 4

  • 1 package chocolate instant pudding and pie filling, 4 serving size
  • 2 cups cold milk
  • 1 can cherry pie filling
  • 1 cup whipped cream

Mix together pudding mix and milk according to package directions. Let

thicken slightly and spoon into parfait glasses leaving 2" at the top.

Before serving, whip cream and add a little powdered sugar to your liking. Top

pudding with a layer of pie filling and finish with a spoonful of whipped

cream.

Order your produce today from ….


Leave a comment
Share
  • Pin it
  • Share
  • Tweet
  • Share
  • Email

Summer Recipes with Herbs

8 / 4 / 20

Try these recipes using fresh herbs from your garden! Don’t have an herbs garden? I can teach you, more to come next week!


French Herbed Omelet

Save
Print

A classic French Herb Omelet. If you don’t have all the herbs, use what you have or whatever combination pleases you.

  • 3 large eggs
  • Sea salt and fresh ground pepper
  • 2 teaspoons finely chopped Italian parsley, chives, watercress, plus more to garnish
  • 1½ tablespoons unsalted butter

Whisk eggs in a bowl until the whites are completely mixed in. Add some sea salt and fresh ground pepper. Stir in the herbs.

In a small nonstick skillet (8”), melt the butter over medium heat and immediately add the eggs. Stir the eggs with a heatproof rubber spatula and slightly move the skillet around while stirring. Bring the sides over the middle so the edges don’t overcook and get crispy.

Roll the omelet from one side to the middle and while holding the pan at an angle, slide the bottom part of the omelet onto a plate and fold the rest of the omelet on top on that. You’ll have a nice little 3 fold omelet. Garnish with a few more finely chopped chives and serve.

Tomato and Goat Cheese Tart

Save
Print
  • Tart Dough
  • Makes 1-9” crust or 6 mini crusts
  • 1 ½ cups flour
  • pinch of salt, I use sea salt
  • 10 tablespoons butter cold unsalted
  • 2-4 tablespoons cold water
  • Tart
  • 6 ounces goat cheese
  • 2 tablespoons heavy cream
  • 1 tablespoon snipped fresh chives
  • 1 tablespoon minced basil
  • 3 large heirloom tomatoes or a large handful of cherry tomatoes

Combine the flour and salt in a food processor and pulse several times. Add butter and pulse until the mixture begins to look like little peas.

Transfer the mixture to a lightly floured surface and gather it into a ball with your hands. Gently flatten the ball into a smooth disk about 1-1/2 inches thick and wrap it in plastic. Refrigerate until firm enough to roll, at least 1 hour.

Heat the oven to 350°.

Roll the dough on a lightly floured surface into a round, about 1/8 inch thick. Roll the dough over your rolling pin and lift it over the tart pan. Unroll it loosely over the tart pan and gently press the dough into the pan without stretching it. Fold a bit of the excess dough inward to form a lip. Roll the rolling pin back and forth over the pan.

Dock the bottom of the dough by pricking with fork tines. Butter the dull side of a piece of foil and place butter side down over the dough. Fill with pie weights or dried beans.

Bake for 25 minutes until golden brown, rotate the tart pan halfway through the baking time.

Remove the crust from the oven, remove the foil and let the crust cool completely.

Preheat oven to 425°.

Mix goat cheese with just enough cream to make it spreadable. Mix in herbs and spread over the bottom of the cooled pie crust. Top with sliced tomatoes and bake until the tarts begin to bubble, and the crusts are golden brown, about 45-50 minutes. If the edges of the crust are getting too brown, cover with pieces of foil. Let cool on a rack for 15 minutes before serving.

*Can also be made into individual tart pans makes 6.

Filet of Sole with Fresh Herbs in Butter Sauce (Beurre Blanc)

Save
Print

Serves 4

  • 3 pounds sole or other white fish
  • Sea salt and fresh ground pepper
  • Old Bay seasoning, optional
  • 6 tablespoons Wondra flour approximately, white flour will do
  • Olive oil, or sunflower, safflower or peanut
  • Lemon wedges, for serving, optional
  • Beurre Blanc
  • 1/2 cup dry white wine
  • ¼ cup white wine vinegar
  • ½ tablespoon shallot (finely chopped)
  • ½ pound unsalted butter (cold)
  • Sea salt
  • ½ tablespoon finely chopped parsley
  • 1 teaspoon minced chives
  • 1 teaspoon minced thyme

Heat oven to 200°.

Dry the fish with paper towels, season lightly with salt, pepper and Old Bay if using. Dredge lightly with Wondra flour.

Add enough oil to coat the bottom of the pan and brown on both sides. Remove to an oven proof plate, place in the oven while you make the sauce.

Sauce:

Cut the butter into medium (1/2-inch) cubes and return the butter cubes to the refrigerator to keep them cold, which is very important.

Heat the wine, vinegar, and shallots in a saucepan until the liquid boils, then lower the heat a bit and continue simmering until the liquid has reduced down to about 2 tablespoons.

Once the wine-vinegar mixture has reduced to 2 tablespoons, reduce the heat to low, take the cubes of butter out of the fridge and start adding the cubes, one or two at a time, to the reduction, while you whisk rapidly with a whisk.

As the butter melts and incorporates, add more butter and keep whisking. Continue until you only have 2 to 3 cubes remaining. Remove from heat while whisking in the last few cubes and whisk for a moment or two more. The finished sauce should be thick and smooth.

Season to taste with sea salt, add herbs and serve over fish with lemon wedges, if using.

Focaccia with Fresh Herbs

Save
Print
  • 1 1/8 teaspoons active dry yeast
  • 1 cup warm water, not hot
  • Pinch of sugar
  • 2 cups all-purpose flour
  • 1 teaspoons sea salt
  • 2 tablespoons fresh herbs, thyme, sage, basil, rosemary-your choice
  • 2 tablespoons olive oil

Add yeast to the warm water then stir in sugar with a wooden spoon. Let stand until foamy.

Add flour, salt and herbs and stir well. Add the warm water and mix until the flour is well incorporated. Cover the bowl with plastic wrap and let rise for 2 hours or refrigerate for at least 7 hours and up to 24 hours.

Lightly coat one 9” pan with olive oil or butter then line the pan with parchment paper. Pour one tablespoon olive oil into the center of the pan. Roll the dough into a tight ball and place in the middle of the pan. Cover with plastic wrap and let rise another 2 hours. The dough should fill most of the pan when properly risen.

Preheat oven to 450°. Drizzle a little olive oil over the dough. Using your fingers press dimples all around the dough. Sprinkle with herbs and salt.

Place the pan into the oven and turn the temperature down to 425°. Bake for 30 minutes or until golden. Remove to a cooling rack.

Leave a comment
Share
  • Pin it
  • Share
  • Tweet
  • Share
  • Email

Mushroom Risotto with Chicken

7 / 6 / 20


Here’s a ‘pantry’ style dish, use leftover or rotisserie chicken, frozen (defrosted) shrimp, lobster or leave all protein out and just enjoy.

The best rice to use is Arborio  or  Carnaroli rice from Italy. This short grain rice will release its starch into the dish as you add stock and stir making the risotto nice and creamy.

Another pantry ingredient is dried mushrooms, keep them around all year to add deep flavor to any dish. You could add some sliced fresh mushrooms as well if you like. I also keep lots of chicken stock in my pantry/freezer, organic and low sodium if I don’t make it myself. Be sure to soak the dried mushrooms in chicken stock for at least 20 minutes to rehydrate. Drain the mushrooms, strain the liquid and use as part of the stock  in the recipe, the liquid gives a rich deep flavor to the dish. Use a drinkable dry white wine, unsalted butter and freshly grated parmesan cheese, which you should also have in your pantry.

Optional ingredients are chopped garlic (you all know I’m allergic so it’s a no-no for me), a teaspoon of saffron threads.

That’s it, all you need to make a great risotto with items from your pantry. Need to stock your pantry? Check out my first book, ‘What’s In Your Pantry’.


Mushroom Risotto with Chicken

Save
Print

Serves 4

  • 1 small package dried mushrooms, such as porcini or mixed mushrooms
  • 1 quart chicken broth
  • 1 tablespoon olive oil
  • 1 tablespoon chopped shallot
  • Sea salt and fresh ground pepper
  • 1 cup arborio rice
  • ½ cup dry white wine
  • 1 cup cooked chicken, room temperature
  • ½ cup grated Parmesan cheese, plus more for serving

Place the mushrooms in a bowl and cover with chicken broth. Let stand at least 20 minutes to soften. Drain and place the stock into a saucepan with the rest of the 1 qt. of stock. Heat and keep warm. Chop the mushrooms and set aside.

In a large sauté pan heat the oil over moderate heat. Add the shallot and cook, stirring occasionally, until translucent. Add the rice and stir until it begins to turn opaque, about 2 minutes.

Add the wine and cook until all of the wine has been absorbed.

Add about 1/2 cup of the simmering broth and cook, stirring frequently, until it has been absorbed.

Continue to cook the rice, adding broth 1/2 cup at a time and allowing the rice to absorb it before adding the next 1/2 cup. Cook the rice in this way for about 20 -25 minutes in. If you use all the broth but the rice isn’t cooked through you can add water and cook until it’s done.

Add the chicken, mushrooms, Parmesan cheese and heat through. Taste for seasoning and add salt and pepper as needed.

Serve the risotto with additional Parmesan.


Leave a comment
Share
  • Pin it
  • Share
  • Tweet
  • Share
  • Email

Cast Iron Skillet Rib Eye

6 / 20 / 206 / 21 / 20


Cast Iron Skillet Rib Eye

Save
Print
  • 1 16- ounce ribeye steak, 1 1/2 inch thick
  • 2 tablespoons unsalted butter
  • 1 tablespoon peanut or sunflower oil

Preheat oven to 500°.

Season the steak on both sides with sea salt and fresh ground pepper.

Heat a cast iron skillet large enough to fit the steak snugly.

Add the butter and oil to skillet and when butter is melted add the seasoned steak and sear on each side, about 1 minute each.

Slide the pan into the oven for approximately 5 minutes, be sure to use a probe type thermometer. Cook the steak to 130° for medium rare and let rest for about 4 minutes before serving. Slice on the bias, against the grain and serve.

Leave a comment
Share
  • Pin it
  • Share
  • Tweet
  • Share
  • Email

Summer Pantry

5 / 20 / 20

Summer Pantry

 25 Must Haves for Your Summer Pantry

  1. Anchovies or anchovy paste
  2. BBQ sauce
  3. Canned lump crab meat
  4. Canned Tomatoes, Plum, chopped and Sun Dried
  5. Capers
  6. Chickpeas
  7. Corn and pickle relish
  8. Crackers
  9. Dried or canned beans
  10. A variety of Italian Cured Meats, Prosciutto, Salami etc. (for Sandwiches, Salads, Pizza)
  11. Italian Tuna in olive oil
  12. Marinated Artichoke hearts
  13. Nuts, sunflower seeds (keep in refrigerator-they’ll last longer
  14. Extra Virgin Olive Oil
  15. Oil, Safflower, Sunflower or Peanut
  16. A variety of olives, pitted & not
  17. Pasta and Pizza sauce
  18. Pasta, spaghetti, shells, noodles, orzo
  19. Pickles and Pickled Vegetables
  20. Real Parmigiano Reggiano (wedge)
  21. Roasted Peppers in a jar
  22. Rice, Jasmine, Arborio, Bomba or Iberia (both Spanish rice for Paella)
  23. Salsa
  24. Sardines, in olive oil, mustard or tomato sauce
  25. Variety of vinegars, Rice, Apple Cider (for pickling), balsamic, red wine

It’s hard to narrow down a list to 25 items you must have (or at least these are must’s for me). You can find a full list of pantry must haves including herbs, spices and more in my book ‘What’s In Your Pantry’ available on my site, Debs Kitchen.

Here’s a gift basket that I designed with Melissa’s Produce full of dried pantry items, fruit, seasonings, mushrooms and more. It also comes with a signed copy of my book, What’s In Your Pantry! Get it here, click on Melissas’s.


Summer Menu

Crab Cakes
(Serve with Roasted Red Pepper Dip
or Tomato Bacon Jam)

Summer Greens with Goat Cheese & Pickled Beets

Orzo Salad with Shrimp

BBQ Chicken Thighs

Mini Crab Cakes

Save
Print

Makes 24 small crab cakes

  • 1 pound lump crab meat 

  • 4 green onions, thinly sliced 

  • 2/3 cup whole wheat bread crumbs 

  • 1 1/2 teaspoons Old Bay seafood seasoning 

  • 1/4 teaspoon ground black pepper 

  • 1 tablespoon Dijon mustard 

  • 1 egg 

  • 2 tablespoons mayonnaise, divided 

  • 1 ½ teaspoons lemon zest
  • 1/4 cup chopped jarred roasted red bell pepper 

  • 2 teaspoons hot sauce 

  • 1 1/2 teaspoons grated lemon zest 

  • 1 tablespoon oil, more if needed

Place crab meat in a large bowl and use your fingers to gently feel for and remove any pieces of shell or cartilage. Add green onions, bread crumbs, seafood seasoning and pepper and toss to combine.

In a small bowl, whisk together mustard, eggs, mayonnaise and lemon zest, pour over the crab mixture. Toss until combined, cover and refrigerate 30 minutes. 


Form the crab mixture into 24 small cakes, each about 1 1/2 inches in diameter. Heat oil in a large nonstick skillet over medium heat. Working in batches, fry cakes until nicely browned and cooked through, about 3 minutes per side. Drain briefly on a paper-towel lined plate and serve.

These freeze well also, freeze in a single layer on a sheet pan and when frozen toss into a freezer bag.


Tomato and Bacon Jam

Save
Print
  • ½ pound bacon
  • 2 pounds tomatoes, chopped
  • 1 yellow sweet onion, diced
  • 1 cup sugar
  • 2 ½ tablespoons apple cider vinegar
  • 1 ½ teaspoon kosher salt
  • ¼ teaspoon pepper
  • 1 dash hot pepper sauce

Render the bacon until browned, place on paper towel lined paper plate.

In a medium saucepan bring to a boil the tomatoes, onion, sugar, vinegar, salt, pepper and splash of hot sauce. Stir occasionally until the sugar dissolved. Using a stick blender, crush the tomato ingredients until chunky. Chop the bacon and add to the tomato mixture, cook over medium heat until thick, about an hour. Taste and adjust seasoning.

Cool before storing in a 1 pint jar. Refrigerate up to a week or freeze up to 2 months.


Roasted Red Bell Pepper Sauce

Save
Print

An easy roasted red pepper dip for any occasion. Quick and easy to prepare; serve with pita bread, cocktail bread or any cracker. Also a great dip for crab cakes

Serving Size: 6

Pomegranate Molasses can be found at Middle Eastern markets. You can omit it if you like, the flavor will be good, just not as rounded.

  • 1 cup walnuts -- toasted
  • 1 slice Italian bread -- torn into pieces
  • 1 cup red peppers -- roasted
  • 2 tablespoons extra virgin olive oil
  • 2 tablespoons pomegranate molasses
  • 1 tablespoon tomato paste
  • 1 teaspoon kosher salt
  • 1 teaspoon ground cumin
  • 1/2 teaspoon Aleppo pepper -- ground or Hungarian paprika
  • 1/2 teaspoon sugar -- optional
  • pita bread -- sliced into wedges

Place all ingredients into a food processor or blender and puree into a

smooth paste, stopping occasionally to scrape down the sides. Refrigerate

if not serving immediately. Let come to room temperature before serving.

Serve with pita wedges.


Pickled Beet, Walnut & Goat Cheese Salad

Save
Print

Servings: 4

  • 4 cups mixed summer greens
  • ½ cup goat cheese, crumbled
  • 1 cup toasted walnuts, broken in pieces
  • 1 recipe Apple Vinaigrette
  • Pickled Beet slices

Toss summer greens with a little of the dressing, just enough to coat. Place onto individual plates and lay beets onto greens, sprinkle the beets with a little dressing and top with crumbled goat cheese and toasted nuts.


Pickled Beets

Save
Print

Makes 1 qt. jar

  • 1 pounds bunched small beets, tops removed*
  • 1 teaspoon whole mustard seeds, divided
  • 1 medium orange slice
  • 1 cup apple vinegar
  • 1 cup water
  • 1 tablespoon kosher salt
  • 1 qt jar with lid, washed and dried

Preheat oven to 400°. Rinse and dry the beets, place in a piece of foil and drizzle with oil. Wrap up and place on a baking sheet. Cook for 30 min. to an hour depending on the size of the beets, or until you can easily pierce them with a paring knife. * Steamed and peeled beets are available usually at Trader Joe’s or always at Melissas.com

Put mustard seeds into the bottom of the jar and add an orange.

Let the beets cool after roasting until you can handle them in your hand. Rub the skin off the beets with a paper towel, remove root and cut the top off.

You can cut the beets however you like, into wedges, slices or half slices, then place into the jar.

Place the vinegar, water, and salt in a large measuring cup or bowl and stir to dissolve the salt. Pour over the beets, leaving a 1/2” space at the top. Slide a table knife down the side of the beets to release any trapped air. Refrigerate for 24 to 48 hours

Storage: Since these beets are not canned, they must be stored in the refrigerator. Refrigerate pickled beets for up to 2 months, but if any off flavors or aromas develop or if fermentation begins, it is best to discard the remaining beets.


Apple Cider Vinaigrette

Save
Print

Serves 6

  • ¼ cup apple cider vinegar
  • 1 tablespoon shallot, finely minced
  • 1 teaspoon Dijon mustard
  • ½ cup olive oil, approximately
  • 1 pinch sugar
  • salt and pepper, to taste

In a medium bowl, whisk together vinegar, shallot and Dijon mustard. Slowly whisk in olive oil and season as needed with sugar, salt and pepper.


Orzo Pasta Salad

Save
Print

Serves 2

  • 1/4 cup vinegar, red wine, white wine or other flavor
  • 1 teaspoon Dijon mustard
  • 1/2 cup olive oil, approximately
  • Salt and pepper
  • 1 teaspoon garlic powder
  • 1/2 cup diced cucumber
  • 1 pint cherry tomatoes, halved or quartered
  • 1/4 cup sliced black olives
  • 1/2 cup crumbled feta, optional
  • 1 1/2cup cooked orzo pasta
  • 1 pound medium cooked shrimp, chilled

For dressing, mix together vinegar, Dijon, salt, pepper, and garlic powder and whisk until it comes together. While continually whisking slowly add olive oil to taste. Set aside.

Mix together remaining ingredients and toss with dressing. Serve cold.


BBQ Chicken Thighs

Save
Print
  • 4-10 small or medium chicken thighs, bone-in, skin-on
  • 2 Tb. oil or as needed
  • 1/2 – 1 cup barbecue sauce

Preheat your gas grill to 400° with the lid closed. When you’re ready to grill, turn grill down to 350°.

Rub the chicken lightly with oil and place skin side down on the grates. Close the lid and cook for about 5 minutes. If the thighs are on the larger side, grill for 7-8 minutes. Do not crowd the chicken on the grate. If you try to turn the chicken and the skin is sticking to the grate, let the chicken cook until it releases. Turn and cook the other side for the same amount of time.

Once preheated, lower the temperature to 350°F. Place

chicken on the grates and close the lid. Grill on one side

for about 7 minutes or until the chicken naturally

releases from the grill.

Move all the pieces to one side of the grill and turn off the burner under the chicken. Brush the skin lightly with BBQ sauce and let cook a further 7-10 minutes with the lid closed. Check with a meat thermometer, you want to cook the chicken until it reaches 165°. Brush chicken with BBQ sauce several times and you can turn the chicken to add BBQ sauce to the other side.

Related Posts Plugin for WordPress, Blogger...
Leave a comment
Share
  • Pin it
  • Share
  • Tweet
  • Share
  • Email

Posts navigation

Previous Page 1 2 3 4 … 12 13 Next Page
Deb

Meet Chef Debbi

READ BIO

Join-Us Sign up for our newsletter to receive exclusive tips 'n tricks, and special offers on classes, tours, and more!

Recent Posts

  • New E-Book!
  • From the Pantry
  • Spaghettini at Home
  • Growing Corn
  • Spring IS Coming!

Categories

BookCUT

What's in Your Pantry?

How to stock your pantry to create delicious dishes.

Learn Chef Debbi's pantry essentials and how to substitute ingredients for pantry staples in her basic recipes for quick and easy meals.
BUY BOOK>

FacebookTwitterInstagramGooglepinterest


© 2014, DEB'S KITCHEN
Angie Makes Feminine WordPress Themes