Deb's Kitchen - Farm, Food, Wine & Lifestyle Adventures
  • Facebook
  • Google
  • Twitter
  • Instagram
  • Pinterest
  • Email
Menu
Skip to content
  • Home
  • Blog
  • Events
    • Classes
    • Tours & Adventures
  • Edible Gardening
  • Preserving
  • Recipes
    • Appetizers
    • Soups and Salads
    • Main Dishes
    • Side Dishes
    • Desserts
  • About
    • Whats In Your Pantry
    • Ask Debbi
    • Deb’s Kitchen Botanicals
    • Press
  • Contact

Author: Chef Debbi Dubbs

A Simple Meal

7 / 9 / 19

Grilled Prime Ribeye Steak

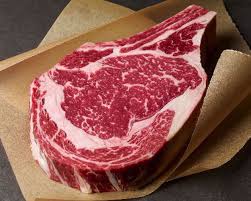
Last week we had friends over and grilled a Prime Ribeye steak that I had cut off a bone in prime rib roast, the steak was about 3 lbs. and 4″ thick. I had just attended a book signing/demo at Melissa’s Produce with Jamie Purviance and his new book, Weber’s Ultimate Grilling and was eager to try some of his fabulous recipes.

When I brought this book home my husband, Frank,  promptly stole it and put it on his side of the table. After several readings he was excited to try some new ideas that he picked up from the book. He decided to set up our Weber with a ‘hot’ side and a ‘cool’ side and he also wanted to get a little smoke on the steak so to get the ‘smoke’ he placed a chunk of hardwood into a pan, filled it with water and let it soak for an hour or so. Then he placed it on the hot side of the bbq, closed the lid and let it heat up to a smoke point.

I made sure the meat was nice and dry, seasoned it with Himalayan Pink Sea Salt and freshly ground pepper. We grilled it on the hot side of the bbq for about 3 minutes, turning it a quarter turn before flipping it over to the other side and repeating the process. Frank then moved the steak to the cool side and covered the Weber with the lid; we let it smoke until the steak was about 125°, removed it and let it rest for about 10 minutes before slicing it. This ensures the meat will be rare to medium rare when we do cut it; the steak will continue to cook after it’s removed from the heat and it needs the off heat time to let the juices settle back into the meat.

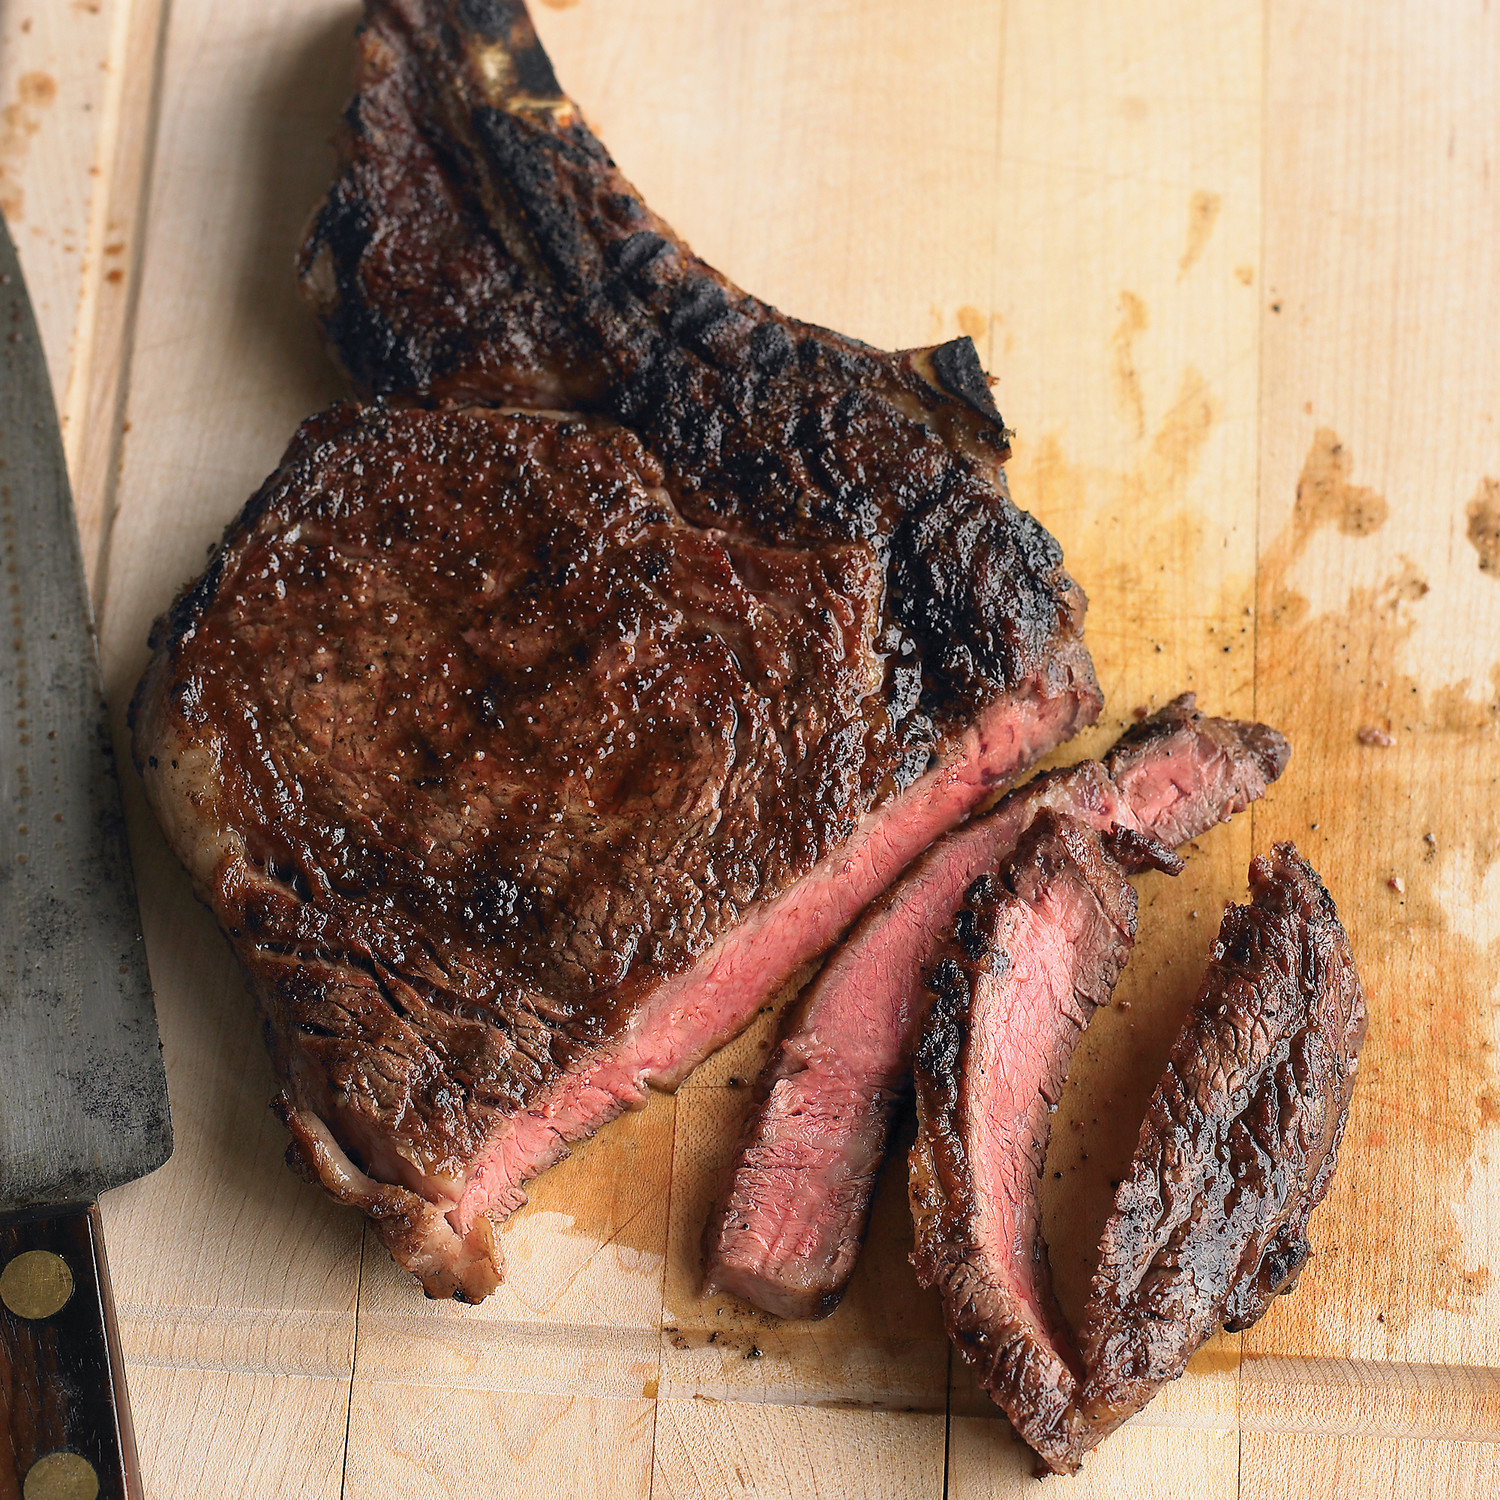
We added some grilled corn and a garden fresh salad with just picked tomatoes, cucumbers & mixed greens. The prime rib was tender, juicy with just a little hint of smoke, a success all around. We’ll definitely be using this method in the future for all cuts of meat and poultry. Thanks for the informative and thoughtful book Jamie!

Leave a comment
Share
  • Pin it
  • Share
  • Tweet
  • Share
  • Email

Memorial Day 2019

5 / 23 / 19

Summer is almost here! Not that you would know that by the weather we’re having. The rain is nice and it makes the garden grow but my other half is craving those warm summer days. Even though here in Southern California we grill all year long, Memorial Day is the official start of grilling season. Whether you grill on gas, charcoal or wood these recipes are easy do ahead recipes for cooking outdoors and picnics. So clean up that grill and set the table because dinner is served! Check out this simple cheese platter, get A Little Book of Cheese to learn all about cheese and how to make a platter!

Summer Pasta Salad

Save
Print

Make this light summer pasta salad recipe a day ahead of time so that it can soak up all the bright, tangy dressing.

  • 1/4 cup red wine vinegar
  • 1 teaspoon Dijon mustard
  • 1/2 cup olive oil, approximately
  • Salt and pepper
  • 1 teaspoon garlic powder
  • 2 teaspoon fresh basil, torn
  • 1/2 cup diced cucumber
  • 1 pint cherry tomatoes, halved or quartered
  • 1/2 cup diced red bell pepper
  • 1/3 cup thinly sliced green onions
  • 1/4 cup sliced black olives
  • 1/2 cup crumbled or diced cheese, mozzarella, chedderella, goat cheese or any you prefer
  • 1 ½ cup cooked pasta, cooked and chilled*

For dressing, mix together vinegar, Dijon, salt, pepper, and garlic powder and whisk until it comes together. While continually whisking slowly add olive oil to taste. Set aside.

Mix together remaining ingredients and toss with dressing. Serve cold.

*Boil the pasta according to package directions, drain and rinse with cold water. When pasta has cooled down a bit, shake off excess water (dry with a towel, if necessary) and toss lightly with olive oil to keep from it sticking together. Refrigerate until ready to toss with dressing. Be sure to cool your pasta before adding the dressing otherwise the pasta will soak it all up.


BBQ Baby Back Ribs

Save
Print

This is quick and easy do ahead baby back ribs. By using your Instant Pot or pressure cooker your ribs will come out nice and tender. Finish off on the grill with your favorite BBQ sauce.

  • 1 slab Baby Back Pork Ribs
  • Sea salt and pepper
  • 1 small yellow onion, roughly chopped
  • 1 celery stalk, large diced, roughly chopped
  • 1 carrot, roughly chopped
  • 1 cup beer (or water)
  • 1 cup BBQ sauce or more

Cut the racks of ribs in to sections that will fit in the pressure cooker and rub with salt and pepper.

Place onion, celery, carrot and beer in the pressure cooking pot. If you’re going to make sauce from the juices in the pressure cooker you can place the ribs directly in the liquid or put the ribs on the rack if you’re going to finish the ribs on the grill or under the broiler with another sauce.

Close and lock the lid of the pressure cooker. Select High Pressure and set the timer for 12 minutes. Press start.

When beep sounds, turn off pressure cooker and use a natural pressure release for 10 minutes and then do a quick pressure release to release any remaining pressure. When valve drops carefully remove lid.

Remove the ribs and cool to room temperature. Once cool, refrigerate until ready to serve.

To finish the ribs:

Preheat the BBQ grill to a medium high heat. Coat one side of the ribs with BBQ sauce and grill 3 minutes. Coat the other side with BBQ sauce flip and grill an additional 3 minutes. Slather on additional BBQ sauce and grill each side for an additional 3 minutes.

You could do the same as above by broiling them until just how you like them.

Serve immediately.

Stuffed Baked Potatoes

Save
Print

The perfect BBQ side dish as they can be made in advance, wrapped in foil and heated on the grill before serving.

  • 2 medium to large russet potatoes, rinsed, dried
  • 1/4 cup sour cream
  • 1/4 cup cheddar cheese, grated
  • 1/4 cup butter, (1/2 stick) room temperature
  • 2 green onions or chives, chopped
  • Sea salt and pepper, to taste
  • 4 tablespoons cooked bacon, crumbled, optional

Preheat oven to 450°. Pierce potatoes with fork. Lightly oil potatoes and

place on oven rack. Bake until cooked through, about 1 hour. If potatoes

starts to crisp and brown up, turn the oven down to 400. Transfer to baking

sheet; cool 5 minutes. Cut potato in half lengthwise. Carefully scoop meat

from the shell and mix with remaining ingredients, mashing lightly as you go. Season and taste before scooping mixture into potato shell.

Can be prepared 1 day ahead, covered and refrigerated. Bring to room temperature before the final cooking stage.

Preheat oven to 400°. Bake potatoes on baking sheet until heated through

and beginning to brown, about 25 minutes. For the grill, wrap each ½ in heavy duty foil, heat on the indirect side of the grill for about 20 minutes or until hot. Garnish with finely minced green onions, chives or crumbled bacon.

Leave a comment
Share
  • Pin it
  • Share
  • Tweet
  • Share
  • Email

Salad Lyonnaise

5 / 8 / 19

A fresh and light French Salad for spring and summer.

Look for a trick to cook perfect poached eggs!

Salad Lyonnaise

Save
Print
  • 4 cups friseé lettuce (about 4 ounces), torn into large bite-size pieces
  • 2 pieces regular sliced bacon, sliced into strips
  • 1 tablespoon white vinegar
  • 2 large eggs
  • 1 medium shallot, finely minced
  • ¼ cup red wine vinegar
  • ½ teaspoon Dijon mustard
  • ½ cup grapeseed oil, or less to taste
  • Sea Salt and pepper, to taste

Place the friseé into a large mixing bowl.

Cook the bacon over medium heat until crisp, place on paper towels to drain.

Keep the pan and it's rendered fat.

To poach the eggs, fill a saucepan with 4 inches of water and add the white vinegar. Bring the mixture to a gentle simmer. Break each egg into small bowl, With the egg still in the strainer, carefully lower it into the hot water so that the egg is completely submerged. Gently shake and swirl the strainer and use a slotted spoon to shape the egg. When the edges of the egg white start to turn opaque (30 to 60 seconds), use the slotted spoon to carefully release it from the strainer into the water.

Cook the egg, flipping it occasionally with the spoon, until the white is opaque, and firm and the yolk is plump and jiggles slightly to the touch, 3 to 3 1/2 minutes. As the first egg is cooking, repeat steps to cook additional eggs, but keep an eye on which egg went in first. Use a timer to avoid overcooking.

When the egg is done, use the slotted spoon to carefully remove it from the hot water. To serve immediately, place a paper towel under the spoon and shake gently to remove some of the excess water.

Reheat the skillet with the rendered bacon fat over medium heat. Add the shallots and cook, stirring, for 30 seconds. Drain on paper towels briefly and set aside. In a medium bowl add the red wine vinegar and mustard and whisk to combine. Add the bacon pieces and shallots, slowly whisk in the oil and season with sea salt and pepper. Toss the friseé with the dressing and divide the salad on two plates topping with one egg, Don’t forget to season with sea salt and pepper to the top of the egg as well.


Leave a comment
Share
  • Pin it
  • Share
  • Tweet
  • Share
  • Email

Flashback BBQ

4 / 24 / 196 / 16 / 19

This cooking class demo is being held at a private home, everyone’s invited! Address will be given upon paid reservation. North Long Beach area

Saturday, June 22
4:00 – 7:00

$60.00
BYOB

Menu

Chef Debbi’s Pickled Vegetables

Grilled Artichokes with Walt’s Wharf Dip

Sweet ‘n Sour Surf and Turf Kabobs

Cold Green Bean, Tomato and Watermelon Radish Salad

Pineapple Upside Down Cake

Register here for Credit Card


If you prefer to pay by check,

Contact Debbi @ 562-243-3926 or [email protected]  

Leave a comment
Share
  • Pin it
  • Share
  • Tweet
  • Share
  • Email

Artichokes!

4 / 10 / 194 / 10 / 19

Spring is nearly here and with it comes lovely artichokes. Artichokes are perennial plants in the same family as dandelions and sunflowers, they are a thistle plant and, in most artichokes, there is a center that’s inedible, the ‘choke’. In cooler climates, such as California’s northern coast they can be grown as annual’s. Spring and fall are times when you can find fresh artichokes in the markets. An easy plant to grow, they do require full sun and will take up a large space, 3 feet or more. Be sure to cut the artichoke before the leaves begin to open and it blossoms into a flower.

When you choose your artichoke, you want to make sure that it’s firm when you press the sides and you’ll often hear a squeaky noise, that’s good. The leaves should be tight and closed. If there is a little bit of brown on the leaves that’s ok, it just means there was a little frost during its growing season but that’s not a bad thing. The inside will be perfectly delightful. You also might want to consider only organic artichokes since you’ll be eating parts of the plant that may have been sprayed with pesticides during its growing season. Pesticides cannot be washed off with water or vegetables soaps, they are oil based and you know what happens when oil and water mix! If you can’t find beautiful California Artichokes in the market, here is a great local source where you can order them, Melissa’s Produce, http://www.melissas.com/Organic-Artichokes-p/1375.htm

To store your artichokes, you could place in a plastic bag and store in the produce drawer of your refrigerator or just pop it into the drawer itself. They will last up to 7 days but best eaten within a few.

Rinse the artichoke under cool water; pull off the lower, smaller leaves and cut the stem at the base of the choke. If you have a nice long stem, you can cook this separately and eat it like you would the heart, it tastes the same. If desired, with a sharp chef’s knife cut across the top third of the artichoke and snip the sticker off the remaining leaves. Even though there are many ways to prepare a fresh artichoke, most people fall back to either boiling/steaming them, although it takes quite a while, up to half an hour or more. You could put them in a microwave bowl or in an Instant Pot adding a cup of water and cook for 10 minutes, cover the microwave ones, or grill them over hard wood. Anyway is fine with me.

Here’s the traditional method:

Put them into a large pot and cover with cool water, squeeze two lemons into the water and a little sea salt, bring to a boil and simmer until you can run a small knife through the bottom part of the artichoke, 30-45 minutes or longer depending on the size of the vegetable. Remove from the water using tongs and picking up the artichoke with the top facing down so not to spill hot water all over yourself, drain and serve with my favorite sauce from Walt’s Wharf in Seal Beach.

Get the recipe here, 

Leave a comment
Share
  • Pin it
  • Share
  • Tweet
  • Share
  • Email

Rancho Los Alamitos

4 / 8 / 194 / 8 / 19

Chef Debbi returns to the Rancho! We’ve been waiting a long time to bring our classes back to Rancho los Alamitos. We’ve schedule our first class for Sat. June 8th, we’re going to pickle!

Saturday, June 8, 2019
9:30 am – 12:30 pm
$75 Future member/ $65 per RLA member
Advance Reservations Required,  Reservations close 5/27/19


Click here to sign up


Join us at Rancho Los Alamitos for a hands-on class on the basics of pickling and fermenting vegetables from your garden or the farmers’ market. In this class, you will make two kinds of pickled vegetables and a jar of sauerkraut. (If you think that you don’t like sauerkraut, wait until you try your own!) This is a refrigerator-style pickling where no water bath canning is necessary. Chef Debbi will demonstrate techniques, discuss food safety and the basics of canning pickles in brine. Each participant will prepare and take home three jars of their very own preserved produce.

The class is suitable for adults and interested teens. Reservations are required. Parking is limited at Rancho Los Alamitos, so car-pooling is encouraged and appreciated.


Sponsored by

Leave a comment
Share
  • Pin it
  • Share
  • Tweet
  • Share
  • Email

Strawberry Season

4 / 8 / 19


There’s almost nothing better in spring than fresh strawberries (except for maybe asparagus, artichokes and morel mushrooms!

Look for strawberries that are red all the way to the top, those will be tasty, ripe strawberries. Pick organic if possible as strawberries are the number one fruit on the ‘Dirty Dozen’ list to retain pesticides. Pesticides do not wash off, ever. Besides the pesticide residue left on the fruit, the ground is prepared by pumping fumigants into it to sterilize the soil, killing every living creature that lives in the soil. You can read more on EWG’s website.

To prepare your strawberries, do not wash until you are ready to use or eat them. Water is their enemy. I like to slice them up and add a little sugar, macerate or squash them down a little and let them sit for awhile while the flavor develops. I sometimes will add a little Grand Marnier to the mix for an added dose of flavor. Spread them on a biscuit, slice of angel food cake, over ice cream or just eat them out of a bowl. Enjoy your strawberries while the sun is shining. Here’s a little individual cheesecake recipe for you to enjoy.

Mini Strawberry Cheesecake

Save
Print
  • Crust:
  • 1 1/4 cups graham cracker crumbs
  • 3 tablespoons brown sugar
  • 5 tablespoons unsalted butter, melted
  • 8 ounces cream cheese, room temperature
  • 1 large egg, room temperature
  • 1/4 cup granulated sugar
  • 1/4 cup sour cream, room temperature
  • 1 teaspoon vanilla extract

Preheat oven to 350°F. Line a 12-cup muffin pan with cupcake liners or oil the inside of small jam jars.

Make the graham cracker crust:

Stir together graham cracker crumbs, sugar, and melted butter. Press about 2-2 1/2 tablespoons of the mixture into the bottom of each muffin liner and press to compact.

Beat room temperature cream cheese with a hand mixer until fluffy. Beat in room temperature sour cream. Beat in egg, sugar, and vanilla extract. (Room temperature ingredients are a must to avoid lumps!)

Evenly divide (about 2-2 1/2 tablespoons each) cheesecake among crusts. Bake for 18-20 minutes, until they just begin to brown. Cool completely and refrigerate for at least 3 hours or overnight.

Serve plain or topped with whipped cream and berries.

Leave a comment
Share
  • Pin it
  • Share
  • Tweet
  • Share
  • Email

March Demo Cooking Class

3 / 8 / 193 / 8 / 19

We’ve Moved!

Join us in our new home at Chef Tech in Bixby Knolls, Long Beach with owner Chef Teri.

We now have a full kitchen with tables & chairs and lots of room. We look forward to seeing you there soon! See new address at the bottom of the class menu, (you do not need to have a pay-pal account). You can sign up with Chef Debbi (call me, 562-243-3926) or click on the pay-pal button below. There is a small service charge for using pay-pal but you can always mail me a check. Classes are pre-paid reservations and cancellations are 100% refundable up to 3 days prior to class.

March Menu

Wed. March 20th

6:30 – 8:30PM

Spanish Tomato Toast

Romaine Heart Salad with Marinated Olives, Hearts of Palm, Tangerines &

Shaved Manchego

Spring Asparagus, Shrimp & Scallop Paella

Individual Strawberry Cheesecakes

NEW LOCATION!

Chef Tech Cooking School

3842 Atlantic Avenue
Long Beach, CA 90807

See  April class date & menu by clicking on the month.

By Reservation Only, Sign up below

$55.00

(562) 243-3926

Or

Debskitchen.com

[email protected]

Enjoy larger portions, Tables & More

Sponsored by 


Sign Up Here for Classes


Leave a comment
Share
  • Pin it
  • Share
  • Tweet
  • Share
  • Email

A Little Book of Cheese

2 / 17 / 19

The first book in my ‘little’ series is available for pre-sale. Books will be shipped out March 11th! Please use the pre-sale link below to reserve your copy!


2 Comments
Share
  • Pin it
  • Share
  • Tweet
  • Share
  • Email

April Demo Class

2 / 4 / 192 / 10 / 19

We’ve Moved!

Join us in our new home at Chef Tech in Bixby Knolls, Long Beach with owner Chef Teri.

We now have a full kitchen with tables & chairs and lots of room. We look forward to seeing you there soon! See new address at the bottom of the class menu. You can sign up with Chef Debbi (call me, 562-243-3926) or click on the pay-pal button below. There is a small service charge for using pay-pal but you can always mail me a check. Classes are pre-paid reservations and cancellations are 100% refundable up to 3 days prior to class.

April Menu

Wed. April 10th

6:30 – 8:30PM

‘A Little Book of Cheese‘ is here!

Book Signing & Demo Class

How to Prepare a Cheese & Charcuterie Board and Tasting

Smoked Gouda and Red Pepper Grilled Cheese Sandwich Bites

Fried Blue Cheese Stuffed Olives

Italian Stuffed Shells with Broccoli and Pine Nuts

Brie Puff Pastry Pockets

NEW LOCATION!

Chef Tech Cooking School

3842 Atlantic Avenue
Long Beach, CA 90807

See  April class date & menu by clicking on the month.

By Reservation Only, Sign up below

$55.00

(562) 243-3926

Or

Debskitchen.com

[email protected]

Enjoy larger portions, Tables & More

Sponsored by 


Sign Up Here for Classes


Leave a comment
Share
  • Pin it
  • Share
  • Tweet
  • Share
  • Email

Feb Demo Cooking Class

2 / 3 / 192 / 10 / 19

We’ve Moved!

Join us in our new home at Chef Tech in Bixby Knolls, Long Beach with owner Chef Teri.

We now have a full kitchen with tables & chairs and lots of room. We look forward to seeing you there soon! See new address at the bottom of the class menu. You can sign up with Chef Debbi (call me, 562-243-3926) or click on the pay-pal button below, (you do not need to have a pay-pal account). There is a small service charge for using pay-pal but you can always mail me a check. Classes are pre-paid reservations and cancellations are 100% refundable up to 3 days prior to class.

Here are a couple of photo’s of Chef Tech’s Kitchen.

NOTE DATE CHANGE ON FEB CLASS

Wed., Feb. 27th

6:30 – 8:30, approximately

Caesar Dip with Crudités

Shrimp Lettuce Wraps

Glazed Steak Tips with Mushrooms & Blue Cheese

Dijon Roasted Potatoes with Parmesan & Chives

Red Velvet Cheesecake Cupcakes


NEW LOCATION!

Chef Tech Cooking School

3842 Atlantic Avenue
Long Beach, CA 90807

By Reservation Only, Sign up below

$55.00

(562) 243-3926

Or

Debskitchen.com

[email protected]

Enjoy larger portions, Tables & More

See March & April class dates & menu’s by clicking on the month.

Sponsored by 


Sign Up Here for Classes


Leave a comment
Share
  • Pin it
  • Share
  • Tweet
  • Share
  • Email

Special Event

1 / 16 / 19

Get a preview of Chef Debbi’s upcoming NEW book!

A Little Book of Cheese

Cooking Demo at Temecula Olive Oil Co. Seal Beach

Thur. Jan 31, 6:30 – 8:30, approximately

Small Cheese Tasting
Smoked Gouda and Red Pepper Grilled Cheese Sandwich Bites
Fried Blue Cheese Stuffed Olives
Italian Stuffed Shells with Broccoli and Pine Nuts
Brie Puff Pastry Pockets

Taking reservations for all classes & Events

$45.00


By Reservation Only
(562) 296-5421
Temecula Olive Oil Co.
148 Main Street
Seal Beach, CA 90740

Sponsored by

Related Posts Plugin for WordPress, Blogger...
Leave a comment
Share
  • Pin it
  • Share
  • Tweet
  • Share
  • Email

Posts navigation

Previous Page 1 2 … 4 5 6 7 8 … 25 26 Next Page
Deb

Meet Chef Debbi

READ BIO

Join-Us Sign up for our newsletter to receive exclusive tips 'n tricks, and special offers on classes, tours, and more!

Recent Posts

  • New E-Book!
  • From the Pantry
  • Spaghettini at Home
  • Growing Corn
  • Spring IS Coming!

Categories

BookCUT

What's in Your Pantry?

How to stock your pantry to create delicious dishes.

Learn Chef Debbi's pantry essentials and how to substitute ingredients for pantry staples in her basic recipes for quick and easy meals.
BUY BOOK>

FacebookTwitterInstagramGooglepinterest


© 2014, DEB'S KITCHEN
Angie Makes Feminine WordPress Themes