Deb's Kitchen - Farm, Food, Wine & Lifestyle Adventures
  • Facebook
  • Google
  • Twitter
  • Instagram
  • Pinterest
  • Email
Menu
Skip to content
  • Home
  • Blog
  • Events
    • Classes
    • Tours & Adventures
  • Edible Gardening
  • Preserving
  • Recipes
    • Appetizers
    • Soups and Salads
    • Main Dishes
    • Side Dishes
    • Desserts
  • About
    • Whats In Your Pantry
    • Ask Debbi
    • Deb’s Kitchen Botanicals
    • Press
  • Contact

Tag Archives: holidays

How to Make Pumpkin or Squash Puree

10 / 2 / 18

You don’t want to use just any kind of pumpkin for puree, most pumpkins have too much water in them and not enough flavor. Use the small pumpkins known as sugar or pie pumpkins. Or better yet use butternut squash, cooked in the same manner as a pumpkin, butternut squash will give a richer, deeper flavor. The cooked pulp can be stored in the refrigerator for up to a week or can be frozen. Use the squash for pumpkin pie, cakes or for a soup, it can be used in any recipe calling for pumpkin puree.

Preheat the oven to 400°. Line a sheet pan with parchment paper or tin foil.

Wash and dry the squash, slice the top off and cut the pumpkin in half, from the top to the bottom.

Do not remove the seeds and pulp, they will be easy to scoop out after the squash has cooked.

Brush the flesh of each half of the pumpkin with olive oil (or any kind of cooking oil) and place face down on the baking sheet.

Roast for about 40 – 50 minutes, until fork-tender or until a paring knife slips right through the flesh. Let cool for about 10 minutes then scoop out the seeds and the pulp, discard, and then scoop out the cooked flesh.

Blend or puree in a food processor until smooth. Store in the refrigerator for up to a week or freeze up to 3 months.

Photo: Davison Orchards Ltd.

Leave a comment
Share
  • Pin it
  • Share
  • Tweet
  • Share
  • Email

Pumpkin Olive Oil Cake

10 / 2 / 1810 / 2 / 18


Pumpkin Olive Oil Cake

Save
Print
  • 3 cups all-purpose flour
  • 2 teaspoons baking soda
  • 1 teaspoon ground cinnamon
  • 1 teaspoon ground nutmeg
  • ½ teaspoon salt
  • ¼ teaspoon ground cloves
  • 1 1/2 cups sugar
  • 1 cup olive oil*
  • 3 eggs
  • 1 can (15 ounces) solid-pack pumpkin (or 2 cups freshly roasted sugar pumpkin)
  • Powdered sugar
  • 1 package cream cheese, room temperature

Preheat oven to 350°.

In a medium-sized bowl, stir together flour, baking soda, cinnamon, nutmeg, salt and cloves.

Combine sugar and oil in a large bowl with a rubber spatula until blended.

Add eggs, one at a time, beating well after each addition.

Add flour mixture to egg mixture alternately with pumpkin in three batches, beating

well after each addition.

Transfer to a greased Bundt cake pan.

Bake 60-65 minutes or until toothpick inserted near the center comes out clean.

Cool for approximately 10-15 minutes before inverting onto a wire rack.

Remove pan carefully from cake and cool completely.

Easy Cream Cheese Frosting

Combine all ingredients in the bowl of a stand mixer fitted with a paddle attachment, and beat at low speed until sugar is incorporated.

Increase speed to medium high and beat until frosting is light and whipped, about 3 to 4 minutes. Use to top cookies, cupcakes, or cakes

I like to use an orange flavored olive oil for this cake.

Leave a comment
Share
  • Pin it
  • Share
  • Tweet
  • Share
  • Email

Holiday Roast

12 / 21 / 17

Prime Rib actually refers to the grade of the beef that you are using, prime grade is the best you can buy and you will pay dearly for it but it’s a true holiday treat. You could purchase a Choice grade standing rib roast and still have a very lovely dinner for a lot less money. If you don’t like meat rare to medium then you’ll be better off serving another cut of meat for a special dinner as the roast can be dry and tough if overcooked.

Prime Rib

Save
Print

The easiest holiday roast you can make. Add some scalloped potatoes, a great salad or side vegetable and you’re done in the kitchen.

  • Serves 2 – 4
  • 1 Bone in standing rib roast, prime or choice grade, about 2 ½ - 3 lbs.
  • Sea salt and fresh ground pepper, I like Himalayan Pink Sea Salt
  • Mild flavored olive or vegetable oil
  • Butcher twine, optional
  • Probe meat thermometer (not optional)

Preheat your oven to 400°. Line a baking or sheet pan with parchment paper and set aside.

*If you’d like to make the roast easier to carve when hot, cut the bone off the meat before cooking. Use a boning knife and slice as close as possible to the bone between the bone and the meat. Now tie the bone back on to the meat with butcher twine, when the roast is ready to slice just cut the twine and remove the bone, saving to make stock or soup, and slice the meat as desired. Remember to always cut across the grain of the meat.

Remove the meat from the refrigerator at least 1 hour before cooking. Dry the meat well then rub it with a little of the oil and season generously with sea salt and pepper. Heat a sauté pan that’s just a little larger than the roast over medium high heat, when hot add roast and brown all sides of the meat. Do not add oil to the pan, sear the roast quickly and remove to the prepared sheet pan. If you can stand the roast to rest on the bone then do so, otherwise place on the sheet pan on one side. Insert a probe meat thermometer into the thickest part of the meat without touching any part of the bone.

Cook the roast for 10 minutes and then turn down the oven temperature to 350°. Continue to roast until temperature reaches 130°, about 10 minutes. Remove from the oven and loosely cover with foil and let rest for about 10 minutes. The temperature will rise, this is called carry over cooking time and the roast will be rare to medium rare when sliced. If you’d like the roast closer to medium, cook until the temperature reaches 135°; do not overcook.

Leave a comment
Share
  • Pin it
  • Share
  • Tweet
  • Share
  • Email

Fudgy Peppermint Brownies

12 / 21 / 17

If you google how to bake brownies in a skillet you will find recipes that actually cook in the oven in a skillet rather than a recipe you can cook in a skillet on the stove top. Why bother unless you’re going to serve the brownies to your guests in the pan? I’m talking about actually BAKING them in a skillet on the stove top. This makes them super fudgy but a little difficult to get out of the pan so be sure to use a good nonstick skillet. Here are two recipes, one traditional and one cooked in a skillet (a cheater recipe as I used a box mix-yes a box!) You decide which one works for you!

Fudgy Peppermint Skillet Brownies

Save
Print

This recipe yields 2 pans of yummy, fudgy brownies using an 11″ skillet (w/lid) or sauté pan.

  • 1 box brownie mix, plus ingredients on box
  • ¼- ½ teaspoon peppermint extract
  • peppermint candies, crushed

Mix brownies according to package directions, adding peppermint extract.

Add ½ of the batter to skillet and stir it around over low to medium heat while it ‘bakes’ and solidifies. Cover and cook over low heat for approximately 10 minutes or until the sides start to crisp. Add candies to the top of the brownies, turn off heat and let the pan sit for about 5 minutes before cutting.

Fudgy Brownies

Save
Print
  • 1 cup flour
  • ¾ cup Dutch cocoa powder
  • 2 cups sugar
  • ¼ teaspoon salt
  • ¼ teaspoon baking powder
  • 3 lg. eggs
  • ½ cup butter, melted (8 Tb)
  • ¼ cup oil, vegetable, olive or flavored olive oil
  • 2 teaspoons vanilla, substitute any flavored extract
  • ¼ cup chopped nuts, chocolate chips, peppermint pieces etc.

Preheat the oven to 375° and lightly grease a 9x13 pan.

Add all the ingredients to a large bowl in the order they are listed. Stir together and beat until the mixture is smooth. Mix in nuts, chips etc. that you’d like to use.

Spoon into the prepared pan and bake 25-30 minutes, or until just barely beginning to pull away from the sides of the pan, remove from oven and let cool.

Leave a comment
Share
  • Pin it
  • Share
  • Tweet
  • Share
  • Email

Cranberry, Apple & Pear Relish

12 / 13 / 17

Cranberry, Apple and Pear Relish

Save
Print

A perfect relish or conserve for fall and winter use. Serve it with chicken, beef, duck or other game meat; it also makes a great spread or dip mixed with cream cheese.

  • 2 cups peeled and chopped apples
  • 2 cups peeled and chopped pears
  • 12 oz. fresh cranberries
  • 2 1/2 cups sugar
  • 1 1/2 cups water
  • 2 orange, zested and juiced
  • 1/4 teaspoon nutmeg
  • 6 - 8 whole cinnamon sticks
  • 1 cup chopped walnuts

Makes 6 pints, approximately

In a large pot combine apples, pears, cranberries, sugar, water and orange juice.

Simmer, stirring frequently, for 15 minutes.

Stir in the nutmeg and walnuts, and then cook for 5 more minutes.

Use fresh or can for future use. To process follow these instructions.

Place a whole cinnamon stick in each sterilized jar, then ladle the hot relish into jars leaving 1/4″ headspace.

Process for 15 minutes in a boiling water canner.

Adapted from Farmers Daughter

Leave a comment
Share
  • Pin it
  • Share
  • Tweet
  • Share
  • Email

Nov. Cooking Demo

10 / 18 / 17

Join us for our next cooking demo

Entertaining Menu’s

Thursday, 6:30-8:30, approximately

Nov 9th & 16th


Menu

Smoked Trout Canapés

Spinach Bacon Salad with Pine Nuts & Croutons

Roast Duck Breast with Blackberry-Orange Sauce

Pumpkin Risotto with Pomegranate Arils & Shaved Parmesan

Haricot Vert (French style Green Beans) with Bacon & Pearl Onions

Mini Pumpkin Cheesecakes

$45.00

For reservations call  Temecula Olive Oil, Seal Beach

(562) 296-5421

Sponsored by

Leave a comment
Share
  • Pin it
  • Share
  • Tweet
  • Share
  • Email

Lemon Roasted Chicken

6 / 12 / 17

This is by far my favorite dish with hints of Meyer lemon and sea salt and I like to add some roasted baby potatoes to the pan to soak up some of the juices. I use ‘Mary’s Organic Chicken‘ always for the best meat, always tender & juicy, it costs a little more but I think it’s worth the extra few bucks. (And they didn’t pay me to say that). And I love to tuck into the pan the ‘Baby Dutch Yellow Potatoes’ from Melissa’s Produce!

You can dress this up by making the ‘pan’ sauce listed in the recipe of you can by pass it. I’ve also made brioche dressing for the side and it makes a great holiday dish without the hassle of cooking a whole turkey dinner. Add a beautiful green vegetable and you’ll find an easy weeknight dinner. It pairs well with my Spring Asparagus recipe. Prep all the ingredients the night before & you can walk in the door, pop the chicken in a preheated oven and within the hour you’ll have the best meal in town, no drive through chicken can EVER take the place of a chicken roasted at home.

Lemon Roasted Chicken

Save
Print
  • Serves 4
  • 1 whole chicken -- rinsed, drained and dried
  • 1 medium onion -- peeled and chopped
  • 3 baby carrots -- peeled and chopped
  • 3 celery stalks -- cut into chunks
  • 1 lemon -- zested and juiced; preferably Meyer lemon
  • 1 bunch Italian flat leaf parsley -- minced
  • 1 bunch fresh sage -- minced
  • 1/2 bunch fresh thyme -- minced
  • 2 tablespoons butter -- room temperature
  • 1 tablespoon lemon olive oil, butter or regular olive oil
  • Salt and pepper
  • 1 cup white wine
  • 1 cup chicken stock
  • 2 tablespoons chicken demi glace -- optional for sauce

Preheat oven to 400°.

Wash and dry chicken inside and out then dry well. Fit chicken into a roasting pan (you want no more than 1" of space on any side of the chicken otherwise the juices will burn).

Mix together onion, carrot, celery, lemon zest, and 1/2 of the minced herbs. Loosely stuff cavity with some of the ingredients, place the remainder on the bottom of the roasting pan and place chicken on top of the aromatic vegetables.

Mix remaining minced herbs with butter. Gently separate the chicken skin from the breast meat and carefully rub herb butter on breast under the skin.

Rub the chicken with lemon olive oil and season with salt and pepper. Squeeze lemon over chicken and place rind into cavity. Insert probe thermometer into thigh and set for 165 degrees. Pour half of the wine and chicken stock in the bottom of the pan and place, uncovered in hot oven.

Baste after 1/2 hour, if you don't have enough juice in pan use some chicken stock. Do not cover bird until browned and then loosely place foil over breast. If wings start to brown to early wrap with foil.

Remove chicken to a warm plate and loosely cover with foil. Let rest for 10 minutes before carving.

Remove some of the fat in the pan by using a paper towel or ice cubes. (Dredge the paper towel through the juices to pull out some of the fat or pour off the juices into a heat proof measuring cup. Add a few ice cubes; the fat will stick to the cold cube, discard cube. You may have to do this several times).

Put the roasting pan on top of the stove over medium-high heat and bring a boil, add remaining wine and stock scraping the fond (the yummy pieces stuck to the pan) from the bottom of the pan. Reduce by half, add demi-glace if using and serve with chicken.

Leave a comment
Share
  • Pin it
  • Share
  • Tweet
  • Share
  • Email

Buffet Party Dishes

5 / 10 / 17

Demo Cooking Class

May 18th & June 1st

6:30 – 8:30 p.m., approximately

By reservation only, see below

Smoked Salmon Cream Cheese Tart With Fresh Lemon Olives

Marinated Vegetable Salad California

Nicoise Style Sandwich

Candied Bacon Deviled Eggs

Mixed Berry Cheesecake 

For reservations call

Temecula Olive Oil

(562) 296-5421

Sponsored by

Leave a comment
Share
  • Pin it
  • Share
  • Tweet
  • Share
  • Email

Puff Pastry Tart

4 / 11 / 17

This recipe is great as a side dish, an appetizer or a light lunch with a salad. It’s easy to make, most of it can be done ahead of time and assembled just before baking. Be sure to use a quality puff pastry dough such as Dufour’s which is made with 100% butter and no preservatives. It’s a little more expensive but if you want real puff pastry, this is it. Be sure to keep the dough refrigerated and if it warms up a little while you are rolling it out, pop it back in the refrigerator until cold. It won’t puff correctly unless the dough is as cold as possible into a hot oven. Be creative and add some chopped (blanched) asparagus to this, it’s a perfect spring time recipe. Enjoy!

Leek and Goat Cheese Puff Pastry Tart

Save
Print
  • 1 cup baby leeks, sliced thin
  • 1 tablespoon unsalted butter
  • 2 tablespoons extra-virgin olive oil
  • Sea salt
  • 1 teaspoon finely chopped fresh thyme
  • 1 box (14 ounces) frozen puff pastry, such as Dufour, thawed
  • 1 large egg beaten with 1 tablespoon water
  • 1/4 cup Nicoise olives, pitted
  • 6 ounces goat cheese, room temperature

Rinse leeks well, and drain; set aside.

Melt butter with oil in a medium sauté pan over medium heat. Add leeks and sprinkle with salt; cook, stirring occasionally, 5 minutes, cook until translucent and soft, add thyme. Leeks can be refrigerated in an airtight container up to 1 day; bring to room temperature before assembling tart.

Cut or roll out pastry to a 6-by-14-inch rectangle; place on a parchment-lined baking sheet (reserve remaining pastry for another use). Score a 3/4-inch border. Brush with egg wash; sprinkle with Parmesan. Refrigerate 30 minutes.

Preheat oven to 375°. Bake pastry until light brown; remove from oven, and press center area with spatula. Using an offset spatula or a spoon, smear the pastry with the cheese within the border, add leeks and olives, and bake until crust is golden brown, about 10 minutes. If bottom is soft, bake 3 to 5 minutes more.

Remove tart from oven place tart onto a wire rack; let cool slightly. Cut into pieces; serve warm or at room temperature (tart can stand at room temperature up to 1 hour).

Olive Magazine Photo

Leave a comment
Share
  • Pin it
  • Share
  • Tweet
  • Share
  • Email

Temecula Olive Oil Cooking Class March 2017

2 / 8 / 17

Celebrate the Irish with us in downtown Seal Beach !

Thur. March 2

(Additional class March 16th  if March 2nd sells out,) BYOB

6:30 – 8:30, approximately

See below for reservations

Guinness-Beef-Stew-Recipe-wonkywonderful

Kerrygold Aged Cheddar Cheese Sandwich Fingers with Sun Dried Tomatoes

Irish Pub Salad

 Beef & Guinness Stew

Potato Torte with Bacon & Cabbage

Guinness Chocolate Cake 

For Seal Beach Reservations please call:

562-296-5421

Sponsored by

Melissas logo small

Photo: Wonky Wonderful
Leave a comment
Share
  • Pin it
  • Share
  • Tweet
  • Share
  • Email

Christmas Roast

12 / 6 / 16

A Christmas Roast, Dec. 2016

rib-roast

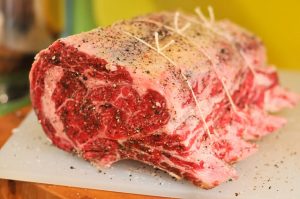
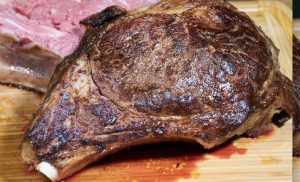
After the huge cooking spree for Thanksgiving I’m happy to create a simple elegant meal for Christmas and I always turn to a rib roast. Most people refer to them as a ‘prime rib’ yet that really refers to the grade of meat. While USDA Prime Grade is the best, it can also be on the expensive side, while a good ‘Choice’ grade is nearly as good as the prime, it can be purchased for much less. Both roasts are considered ‘standing rib roast’ and you treat them equally in cooking.

Costco has the absolute best deal on both Choice and Prime Grade roasts, choose bone in for the best flavor and juiciness. Either roast will need to cook a little longer with the bone in but the flavor is superior. A trick you can do is cut the bones off the roast and tie them back onto the roast, you’ll still get juicy flavor but won’t need to roast quite as long.

The roast will take some time to come to room temperature so remove from the refrigerator 3 house before roasting. Pre heat your oven for 30 minutes and roast for approximately 15 – 20 minutes per pound, start with a high heat, 450°, for 15 minutes, then turn the oven down to 325° and continue cooking. Use a digital probe thermometer for best results, it’s worth spending $15 or $20 on a digital thermometer for a $75.00 roast.

For rare roast remove from the oven when the thermometer reaches 120°, for medium rare, 125° or 130° for medium, the meat will continue to cook (called carry over cooking time) while it rests. I like to serve the roast with a Red Wine Sauce or Bordelaise Sauce but remember that your sauce will only be as good as the beef stock you use so use the best. Homemade is tops but if you must purchase a stock try More Than Gourmet Glace de Veau (veal stock). Standing rib roasts are great on the grill also but that’s another story.


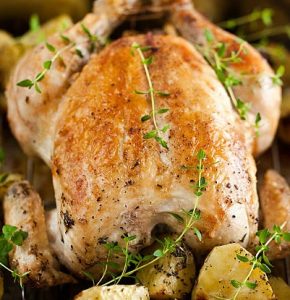
Photo: Josh, The Meatwave

Prime Rib or Standing Rib Roast

Save
Print

Serves 8
Total preparation time: 1 hr. 30 min. – 2 hr.

  • 1 (7 lb.) Rib Roast, Bone-In or Boned & Tied
  • 2 tablespoons unsalted butter
  • 1 clove garlic, minced – optional use 1 teaspoon ground garlic (NOT garlic salt)
  • Sea Salt and ground pepper

Place roast in a shallow baking pan bone down, melt butter in small saucepan and add garlic and salt and pepper. Mix well, brush over roast, and let stand at room temperature for 2 hours.

Preheat oven to 450°F. Use a probe meat thermometer*, placed into the center of the roast but not touching bone. Roast for 10 minutes in uncovered pan, then reduce heat to 350°F and continue for 1 hour and 20 minutes for rare. Baste with pan drippings from time to time. Thermometer should read 120° - 125° for rare, 130° - 135° for medium rare. Do not cook beyond 140°, medium. Let the roast stand for 15 minutes, with the probe in the meat, before slicing. Slice either between the bones or cut off all the bones at once and the slice the meat into serving pieces.

Roast 15 minutes more if you want a medium roast, another 15 minutes for well done.

Remove from oven when done, and allow the meat to rest for a few minutes before carving. Transfer to a warmed serving platter.

• A digital probe meat thermometer – the probe remains in the meat while in the oven and the control sits outside on the stove or counter. See link below

Bordelaise Sauce

Save
Print
  • 3 tablespoons butter
  • 1 onion, chopped
  • 2 carrots, sliced in rounds
  • 2 cloves garlic, cut in half
  • 4 peppercorns
  • 1 bay leaf
  • 11/4 cups beef broth*
  • 1 sprig thyme
  • Sea Salt
  • 2 tablespoons flour
  • 1/2 cup dry red wine
  • 1 tablespoon Italian flat leaf parsley, chopped

Melt the butter in a heavy skillet and sauté the onion until transparent. Add the carrots and cook until soft.

Place garlic, peppercorns, and bay leaf in cheesecloth bag. Add to pan along with 1 cup of beef broth. Boil until broth has been slightly reduced, about 10 minutes, then season with thyme and salt.

Remove cheesecloth bag and put mixture through a coarse strainer. Return to pan.

Meanwhile, dissolve flour in the other 1/4 cup of broth and add gradually to sauce. Stir constantly until sauce thickens, then add the wine. Reduce heat and allow to simmer until ready to serve, and then sprinkle chopped parsley on top.

Use a quality beef broth if not making your own such as More Than Gourmet Glace de Veau (veal stock).

Leave a comment
Share
  • Pin it
  • Share
  • Tweet
  • Share
  • Email

Easy Thanksgiving Shortcuts

11 / 16 / 16

How to Make Stock & Gravy for the Holidays

These are two great project to make this weekend and freeze for your holiday next week. You don’t need to wait until the turkey is cooked before making your gravy. You can make the stock in a slow cooker, much hands off and you don’t need to precisely cut the vegetables since you will discard them after the stock is made. 
This time of year all grocery stores, especially the high end ones, Whole Foods, Gelsons, Lazy Acres, Bristol Farms will carry turkey and chicken pieces for your stock. You can mix chicken parts with the turkey and you won’t notice a difference.

Even if you say you don’t want ‘pre-made’ gravy and want to wait until your bird is done, make the roux (flour and fat which thickens the gravy) ahead of time and refrigerate. Cut up the vegetables for the stock, put them in a freezer bag and pop in the freezer until you make the actual stock. There’s enough to do at the last minute! I know many of you will balk at not stuffing your bird but it’s very dangerous and takes so much longer to cook that the turkey is usually overdone. If you insist that the dressing tastes better there are a couple of ways you can accomplish more ‘turkey’ flavor in the dressing. One, use turkey stock to make the dressing/stuffing and mince some turkey parts to mix in with the dressing. You can buy gizzards, hearts etc. and use them to make stock then mince and add to the dressing. Here’s a really great trick to cut down on time in the kitchen….Cut your turkey into pieces instead of cooking a huge unwieldy bird. Add the dressing to the pan with the turkey 30 minutes before it’s due to come out of the oven and you’ll have that ‘cooked in turkey’ taste. The turkey not only cooks faster, it’s easier to serve, easier to carve and the clean up is next to nothing. You won’t have that carcass that you try and cover and stick in the overcrowded refrigerator and you will have a perfectly cooked bird as you can now remove the breast pieces from the oven when they are done rather than take the chance the breast will be overdone before the legs/thighs are cooked. 

So those are my simple tricks to make Thanksgiving an easier meal to cook. Get started with these two short video’s and get cookin’ this weekend! 

Happy Thanksgiving to you all!

Here are a couple of video’s that I made with my friend, Christina Peters from
Food Photography Blog


Related Posts Plugin for WordPress, Blogger...
Leave a comment
Share
  • Pin it
  • Share
  • Tweet
  • Share
  • Email

Posts navigation

Previous Page 1 2 3 4 Next Page
Deb

Meet Chef Debbi

READ BIO

Join-Us Sign up for our newsletter to receive exclusive tips 'n tricks, and special offers on classes, tours, and more!

Recent Posts

  • New E-Book!
  • From the Pantry
  • Spaghettini at Home
  • Growing Corn
  • Spring IS Coming!

Categories

BookCUT

What's in Your Pantry?

How to stock your pantry to create delicious dishes.

Learn Chef Debbi's pantry essentials and how to substitute ingredients for pantry staples in her basic recipes for quick and easy meals.
BUY BOOK>

FacebookTwitterInstagramGooglepinterest


© 2014, DEB'S KITCHEN
Angie Makes Feminine WordPress Themes