Highlights from our annual Farm, Food & Wine Tour from 2017. Thanks everyone for joining us! We’re sold out for this year but save the date for Oct 23-25, 2020.
Tag Archives: party food
Memorial Day 2019
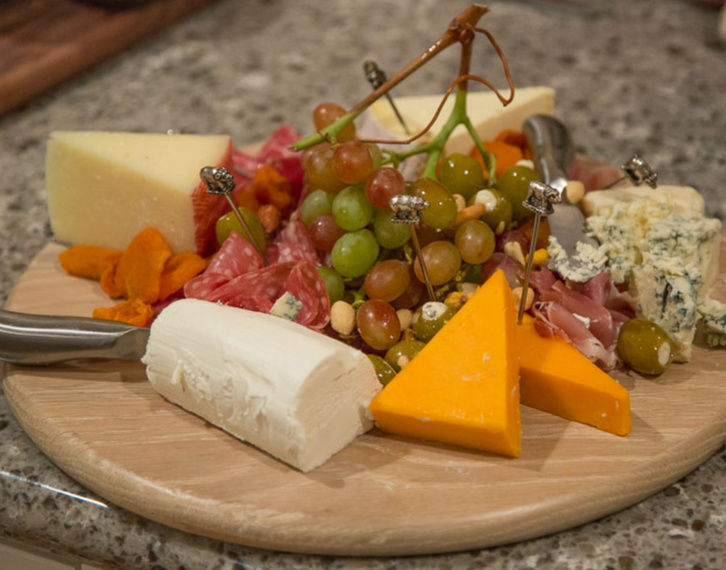
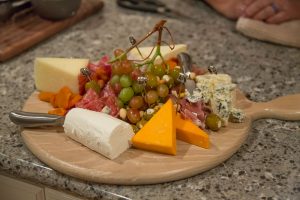
Summer is almost here! Not that you would know that by the weather we’re having. The rain is nice and it makes the garden grow but my other half is craving those warm summer days. Even though here in Southern California we grill all year long, Memorial Day is the official start of grilling season. Whether you grill on gas, charcoal or wood these recipes are easy do ahead recipes for cooking outdoors and picnics. So clean up that grill and set the table because dinner is served! Check out this simple cheese platter, get A Little Book of Cheese to learn all about cheese and how to make a platter!

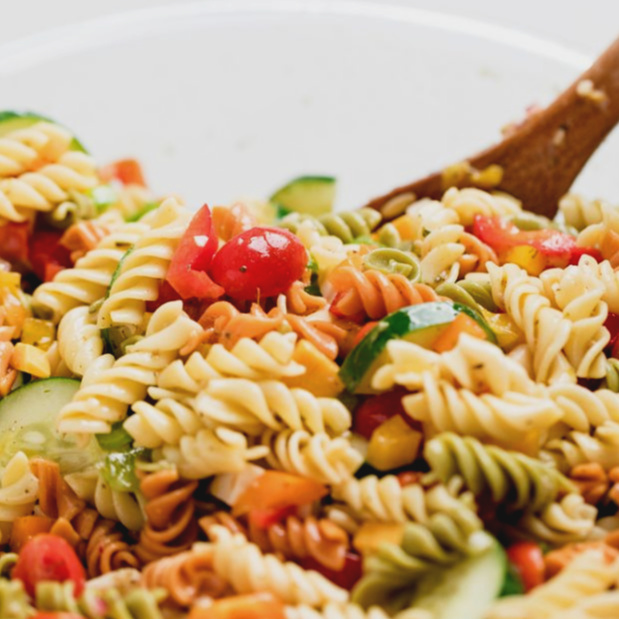
Summer Pasta Salad
Make this light summer pasta salad recipe a day ahead of time so that it can soak up all the bright, tangy dressing.
- 1/4 cup red wine vinegar
- 1 teaspoon Dijon mustard
- 1/2 cup olive oil, approximately
- Salt and pepper
- 1 teaspoon garlic powder
- 2 teaspoon fresh basil, torn
- 1/2 cup diced cucumber
- 1 pint cherry tomatoes, halved or quartered
- 1/2 cup diced red bell pepper
- 1/3 cup thinly sliced green onions
- 1/4 cup sliced black olives
- 1/2 cup crumbled or diced cheese, mozzarella, chedderella, goat cheese or any you prefer
- 1 ½ cup cooked pasta, cooked and chilled*
For dressing, mix together vinegar, Dijon, salt, pepper, and garlic powder and whisk until it comes together. While continually whisking slowly add olive oil to taste. Set aside.
Mix together remaining ingredients and toss with dressing. Serve cold.
*Boil the pasta according to package directions, drain and rinse with cold water. When pasta has cooled down a bit, shake off excess water (dry with a towel, if necessary) and toss lightly with olive oil to keep from it sticking together. Refrigerate until ready to toss with dressing. Be sure to cool your pasta before adding the dressing otherwise the pasta will soak it all up.
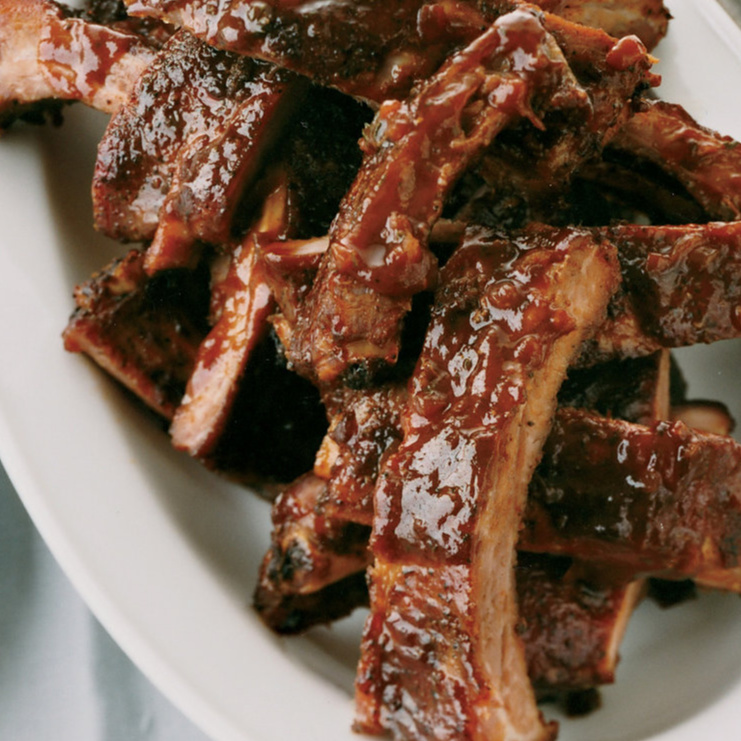
BBQ Baby Back Ribs
This is quick and easy do ahead baby back ribs. By using your Instant Pot or pressure cooker your ribs will come out nice and tender. Finish off on the grill with your favorite BBQ sauce.
- 1 slab Baby Back Pork Ribs
- Sea salt and pepper
- 1 small yellow onion, roughly chopped
- 1 celery stalk, large diced, roughly chopped
- 1 carrot, roughly chopped
- 1 cup beer (or water)
- 1 cup BBQ sauce or more
Cut the racks of ribs in to sections that will fit in the pressure cooker and rub with salt and pepper.
Place onion, celery, carrot and beer in the pressure cooking pot. If you’re going to make sauce from the juices in the pressure cooker you can place the ribs directly in the liquid or put the ribs on the rack if you’re going to finish the ribs on the grill or under the broiler with another sauce.
Close and lock the lid of the pressure cooker. Select High Pressure and set the timer for 12 minutes. Press start.
When beep sounds, turn off pressure cooker and use a natural pressure release for 10 minutes and then do a quick pressure release to release any remaining pressure. When valve drops carefully remove lid.
Remove the ribs and cool to room temperature. Once cool, refrigerate until ready to serve.
To finish the ribs:
Preheat the BBQ grill to a medium high heat. Coat one side of the ribs with BBQ sauce and grill 3 minutes. Coat the other side with BBQ sauce flip and grill an additional 3 minutes. Slather on additional BBQ sauce and grill each side for an additional 3 minutes.
You could do the same as above by broiling them until just how you like them.
Serve immediately.
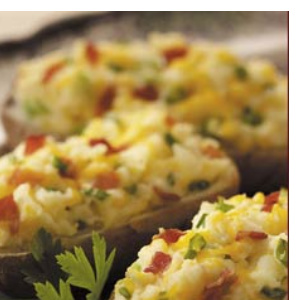
Stuffed Baked Potatoes
The perfect BBQ side dish as they can be made in advance, wrapped in foil and heated on the grill before serving.
- 2 medium to large russet potatoes, rinsed, dried
- 1/4 cup sour cream
- 1/4 cup cheddar cheese, grated
- 1/4 cup butter, (1/2 stick) room temperature
- 2 green onions or chives, chopped
- Sea salt and pepper, to taste
- 4 tablespoons cooked bacon, crumbled, optional
Preheat oven to 450°. Pierce potatoes with fork. Lightly oil potatoes and
place on oven rack. Bake until cooked through, about 1 hour. If potatoes
starts to crisp and brown up, turn the oven down to 400. Transfer to baking
sheet; cool 5 minutes. Cut potato in half lengthwise. Carefully scoop meat
from the shell and mix with remaining ingredients, mashing lightly as you go. Season and taste before scooping mixture into potato shell.
Can be prepared 1 day ahead, covered and refrigerated. Bring to room temperature before the final cooking stage.
Preheat oven to 400°. Bake potatoes on baking sheet until heated through
and beginning to brown, about 25 minutes. For the grill, wrap each ½ in heavy duty foil, heat on the indirect side of the grill for about 20 minutes or until hot. Garnish with finely minced green onions, chives or crumbled bacon.
April Demo Class
We’ve Moved!
Join us in our new home at Chef Tech in Bixby Knolls, Long Beach with owner Chef Teri.
We now have a full kitchen with tables & chairs and lots of room. We look forward to seeing you there soon! See new address at the bottom of the class menu. You can sign up with Chef Debbi (call me, 562-243-3926) or click on the pay-pal button below. There is a small service charge for using pay-pal but you can always mail me a check. Classes are pre-paid reservations and cancellations are 100% refundable up to 3 days prior to class.

April Menu
Wed. April 10th
6:30 – 8:30PM
‘A Little Book of Cheese‘ is here!
Book Signing & Demo Class
How to Prepare a Cheese & Charcuterie Board and Tasting
Smoked Gouda and Red Pepper Grilled Cheese Sandwich Bites
Fried Blue Cheese Stuffed Olives
Italian Stuffed Shells with Broccoli and Pine Nuts
Brie Puff Pastry Pockets
NEW LOCATION!
Chef Tech Cooking School
3842 Atlantic Avenue
Long Beach, CA 90807
See April class date & menu by clicking on the month.
By Reservation Only, Sign up below
$55.00
(562) 243-3926
Or
Debskitchen.com
Enjoy larger portions, Tables & More
Sponsored by
![]()
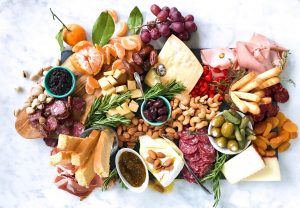
Quick and Easy Charcuterie Board
1 cup mixed olives
2 Tablespoons olive oil
1 teaspoon dried Italian herbs, ground
1 wedge triple cream brie
1 small jar of fig jam or fruit spread
8 ounces aged Gouda
8 ounces aged sharp cheddar, thinly sliced
1 baguette, sliced 1-inch thick
1 round of boursin, any flavor
2 packages of interesting looking crackers
1 wedge blue cheese, partially crumbled
1 small jar of honey
1 package mixed Italian meats
1 small bunch red seedless grapes
4 ounces nuts, mixed or single
1 package, 4 oz. of dried apricots
2 apples, cored and sliced tossed with lemon juice to prevent browning
Mix together olives, olive oil and ground Italian herbs, let rest for at least an hour or longer.
Don’t crowd the cheese on the platter, make the board big enough to accommodate all ingredients.
Put the mixed olives in a small bowl and place on the platter.
Place the triple cream brie on the platter and arrange the fig or fruit spread next to the brie.
Place the sharp cheddar and gouda on the board next with the baguette slices nearby.
Then arrange the boursin near the baguette slices with the crackers next.
Add the blue cheese and honey on the board filling out the outer edges of the board. Tuck in the Italian meats all around the board, add the grapes in clumps and spread the nuts throughout the board with little pockets of dried fruit. Place the apples near the cheddar cheese.
December Cooking Demo
![]()
Join us in Seal Beach
Thursday,
Dec. 6th Only!
6:30 – 8:30, approximately
Camembert & Cranberry Pastries
Mini Spanakopita
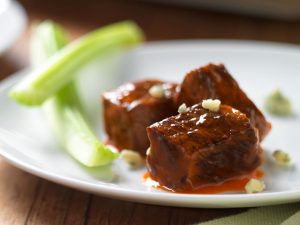
Cabernet Braised Short Rib Bites
Warm Potato Salad with Bacon
Chocolate Peppermint Cake
$45.00
For reservations call
Temecula Olive Oil, 148 Main St. Seal Beach
(562) 296-5421
![]()
Sponsored by
![]()
What’s coming up in 2019?
We will continue to host 2 cooking demo’s a month but we will host them on Thursdays and Tuesdays. Here are the dates for Jan – Mar. Menu’s tbd
Jan
Thur. 10th & Tues. 22nd
Feb.
Thur 7th & Tues 19th
Mar.
Thur 7th & Tues 19th
Happy Holidays!
Pumpkin Olive Oil Cake
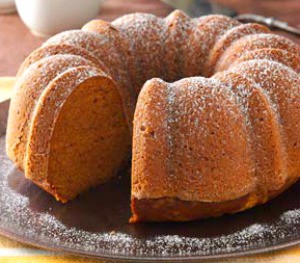
Pumpkin Olive Oil Cake
- 3 cups all-purpose flour
- 2 teaspoons baking soda
- 1 teaspoon ground cinnamon
- 1 teaspoon ground nutmeg
- ½ teaspoon salt
- ¼ teaspoon ground cloves
- 1 1/2 cups sugar
- 1 cup olive oil*
- 3 eggs
- 1 can (15 ounces) solid-pack pumpkin (or 2 cups freshly roasted sugar pumpkin)
- Powdered sugar
- 1 package cream cheese, room temperature
Preheat oven to 350°.
In a medium-sized bowl, stir together flour, baking soda, cinnamon, nutmeg, salt and cloves.
Combine sugar and oil in a large bowl with a rubber spatula until blended.
Add eggs, one at a time, beating well after each addition.
Add flour mixture to egg mixture alternately with pumpkin in three batches, beating
well after each addition.
Transfer to a greased Bundt cake pan.
Bake 60-65 minutes or until toothpick inserted near the center comes out clean.
Cool for approximately 10-15 minutes before inverting onto a wire rack.
Remove pan carefully from cake and cool completely.
Easy Cream Cheese Frosting
Combine all ingredients in the bowl of a stand mixer fitted with a paddle attachment, and beat at low speed until sugar is incorporated.
Increase speed to medium high and beat until frosting is light and whipped, about 3 to 4 minutes. Use to top cookies, cupcakes, or cakes
I like to use an orange flavored olive oil for this cake.
April Demo Cooking Class
![]()
Join us on
Thur. April 12 or 26
6:30 – 8:30, approximately
Endive Spears with Blue Cheese, Pear, Candied Pepitas and Orange-Shallot Vinaigrette
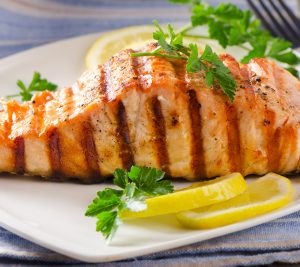
Grilled Salmon with Citrus Salsa & Spring Micro Greens
Roasted Asparagus with Lemon Gremolata and Parmesan
Balsamic Strawberries in Meringue Nests with Crème Fraiche
![]()
$45.00
For reservations call
Temecula Olive Oil, 148 Main St. Seal Beach
(562) 296-5421
Sponsored by
![]()
Bacon Wrapped Dates
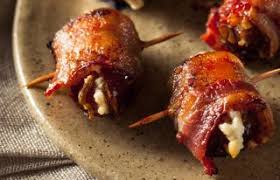
Bacon Wrapped Stuffed Dates with Maple Glazed Walnuts and Boursin Cheese
Easy to make ahead of time and bake off at the last minute, make extra they go fast!
- Maple Glazed Walnuts
- ½ cup maple syrup
- 1/8 teaspoon sea salt
- 2 cups walnut halves
- For the Dates
- 1 package of dried Medjool Dates, 16 oz.
- 1 12 oz. package of bacon, slices cut in half widthwise
- 4 oz. package of Boursin cheese
Preheat the oven to 350° and line a baking sheet with parchment paper.
Mix the maple syrup and salt together, add the walnuts and stir until coated.
Spread the nuts on the baking sheet and bake for 12 - 15 minutes or until the glaze is bubbly and coats the walnuts well. Remove from oven and let cool.
Turn the oven up to 425° and line a baking sheet with a new piece of parchment paper.
Slice dates lengthwise and remove pits.
Scoop a small amount of Boursin cheese with a spoon and fill the date with the cheese, press a glazed nut into the cheese.
Wrap dates with a slice of bacon, and secure with a toothpick to hold bacon onto date. Place the dates on the parchment on their side and bake for about 7-8 minutes or until browned on the bottom and turn to the other side continue to cook for another 7-8 minutes or until the bacon is cooked and a little crispy, and the cheese is slightly melted.
Let cool and serve warm or at room temperature.
Photo: La Tienda
Holiday Roast
Prime Rib actually refers to the grade of the beef that you are using, prime grade is the best you can buy and you will pay dearly for it but it’s a true holiday treat. You could purchase a Choice grade standing rib roast and still have a very lovely dinner for a lot less money. If you don’t like meat rare to medium then you’ll be better off serving another cut of meat for a special dinner as the roast can be dry and tough if overcooked.
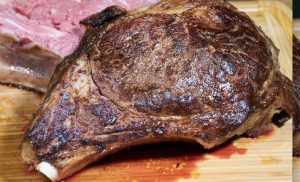
Prime Rib
The easiest holiday roast you can make. Add some scalloped potatoes, a great salad or side vegetable and you’re done in the kitchen.
- Serves 2 – 4
- 1 Bone in standing rib roast, prime or choice grade, about 2 ½ - 3 lbs.
- Sea salt and fresh ground pepper, I like Himalayan Pink Sea Salt
- Mild flavored olive or vegetable oil
- Butcher twine, optional
- Probe meat thermometer (not optional)
Preheat your oven to 400°. Line a baking or sheet pan with parchment paper and set aside.
*If you’d like to make the roast easier to carve when hot, cut the bone off the meat before cooking. Use a boning knife and slice as close as possible to the bone between the bone and the meat. Now tie the bone back on to the meat with butcher twine, when the roast is ready to slice just cut the twine and remove the bone, saving to make stock or soup, and slice the meat as desired. Remember to always cut across the grain of the meat.
Remove the meat from the refrigerator at least 1 hour before cooking. Dry the meat well then rub it with a little of the oil and season generously with sea salt and pepper. Heat a sauté pan that’s just a little larger than the roast over medium high heat, when hot add roast and brown all sides of the meat. Do not add oil to the pan, sear the roast quickly and remove to the prepared sheet pan. If you can stand the roast to rest on the bone then do so, otherwise place on the sheet pan on one side. Insert a probe meat thermometer into the thickest part of the meat without touching any part of the bone.
Cook the roast for 10 minutes and then turn down the oven temperature to 350°. Continue to roast until temperature reaches 130°, about 10 minutes. Remove from the oven and loosely cover with foil and let rest for about 10 minutes. The temperature will rise, this is called carry over cooking time and the roast will be rare to medium rare when sliced. If you’d like the roast closer to medium, cook until the temperature reaches 135°; do not overcook.
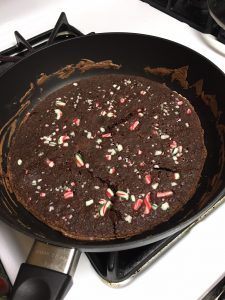
Fudgy Peppermint Brownies
If you google how to bake brownies in a skillet you will find recipes that actually cook in the oven in a skillet rather than a recipe you can cook in a skillet on the stove top. Why bother unless you’re going to serve the brownies to your guests in the pan? I’m talking about actually BAKING them in a skillet on the stove top. This makes them super fudgy but a little difficult to get out of the pan so be sure to use a good nonstick skillet. Here are two recipes, one traditional and one cooked in a skillet (a cheater recipe as I used a box mix-yes a box!) You decide which one works for you!
Fudgy Peppermint Skillet Brownies
This recipe yields 2 pans of yummy, fudgy brownies using an 11″ skillet (w/lid) or sauté pan.
- 1 box brownie mix, plus ingredients on box
- ¼- ½ teaspoon peppermint extract
- peppermint candies, crushed
Mix brownies according to package directions, adding peppermint extract.
Add ½ of the batter to skillet and stir it around over low to medium heat while it ‘bakes’ and solidifies. Cover and cook over low heat for approximately 10 minutes or until the sides start to crisp. Add candies to the top of the brownies, turn off heat and let the pan sit for about 5 minutes before cutting.

Fudgy Brownies
- 1 cup flour
- ¾ cup Dutch cocoa powder
- 2 cups sugar
- ¼ teaspoon salt
- ¼ teaspoon baking powder
- 3 lg. eggs
- ½ cup butter, melted (8 Tb)
- ¼ cup oil, vegetable, olive or flavored olive oil
- 2 teaspoons vanilla, substitute any flavored extract
- ¼ cup chopped nuts, chocolate chips, peppermint pieces etc.
Preheat the oven to 375° and lightly grease a 9x13 pan.
Add all the ingredients to a large bowl in the order they are listed. Stir together and beat until the mixture is smooth. Mix in nuts, chips etc. that you’d like to use.
Spoon into the prepared pan and bake 25-30 minutes, or until just barely beginning to pull away from the sides of the pan, remove from oven and let cool.
Roasted Red Pepper Dip
Cooking from the Pantry
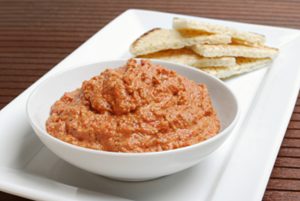
An easy roasted red pepper dip for any occasion. Quick and easy to prepare; serve with pita bread, cocktail bread or any cracker.
- 1 cup walnuts -- toasted
- 1 slice Italian bread -- torn into pieces
- 1 cup red peppers -- roasted
- 2 tablespoons extra virgin olive oil
- 2 tablespoons pomegranate molasses
- 1 tablespoon tomato paste
- 1 teaspoon kosher salt
- 1 teaspoon ground cumin, or to taste
- 1/2 teaspoon Aleppo pepper -- ground or Hungarian paprika
- 1/2 teaspoon sugar -- optional
- pita bread -- sliced into wedges
Place all ingredients into a food processor or blender and puree into a
smooth paste, stopping occasionally to scrape down the sides. Refrigerate
if not serving immediately. Let come to room temperature before serving.
Serve with pita wedges.
December Cooking Demo
![]()
Last Class of the Year
Festive Family Dinner
Thursday December 7th
6:30 – 8:30, approximately
Menu
Artichoke Bruschetta
Tomato Bisque with Gruyere & French Ham Croutons
Italian Roasted Beef in Barolo Wine Sauce
Balsamic Butternut Squash, Brussels Sprouts & Pecans
Stuffed Shells with Homemade Ricotta
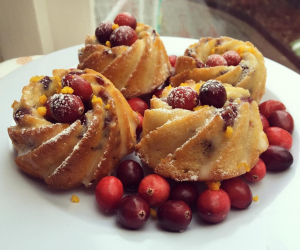
Cranberry-Orange Olive Oil Cake
![]()
$45.00
For reservations call Temecula Olive Oil, Seal Beach
(562) 296-5421
Sponsored by
![]()