Deb's Kitchen - Farm, Food, Wine & Lifestyle Adventures
  • Facebook
  • Google
  • Twitter
  • Instagram
  • Pinterest
  • Email
Menu
Skip to content
  • Home
  • Blog
  • Events
    • Classes
    • Tours & Adventures
  • Edible Gardening
  • Preserving
  • Recipes
    • Appetizers
    • Soups and Salads
    • Main Dishes
    • Side Dishes
    • Desserts
  • About
    • Whats In Your Pantry
    • Ask Debbi
    • Deb’s Kitchen Botanicals
    • Press
  • Contact

Tag Archives: pie

Pie Crust

11 / 17 / 1511 / 17 / 15

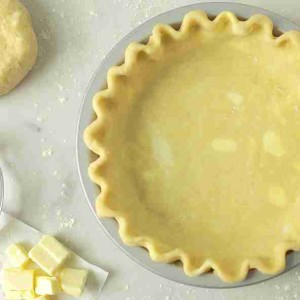
Nothing beats a great pie, perfectly balanced filling and a tender, flaky piecrust. Piecrusts are easy to do, don’t let them intimidate you! My Grandmother taught me her secrets to a good crust, use good butter (unsalted), keep all of your ingredients very cold and work quickly. So there’s a little more to it than that but remember those three things and you’ll be fine.

pie-crust-guide

This recipe calls for shortening which creates a tender, flaky crust, my Grandmother used lard and if it’s available to you it may be a better choice than shortening (which is another discussion). If you’d rather not use lard or shortening you could use all butter and the pie will be just as delicious.

Another trick that I picked up from King Arthur Flour is instead of just cutting your piecrust in half; cut it in 2/3 and 1/3 discs. The bottom of the pie will take more crust because it will hold the entire filling and the top crust only needs to cover all the ingredients. Well, duh…..why we never thought of that before! (See this is probably why I don’t bake much).

If you’d like to pre-make your pie crust you could freeze it two ways; one freeze the disc or roll the crust out, fit it into the pan and freeze, defrost overnight in the refrigerator and then continue with the recipe.

I cut the butter into the dry ingredients in the food processor, it takes less time, and just pulse it a few times until it looks like peas and you’ll be fine. I like to put the flour/butter ingredients into a bowl and incorporate the ice water using my fingers and tossing the dough until it comes together, that way I make sure I’m not adding too much liquid. I turn it out onto a rolling mat while it’s still very crumbly and bring it all together quickly by rolling and kneading lightly. I add only enough flour to the rolling mat as needed to keep the dough from sticking to the mat; I use a bench or dough scraper to actually fold it all together. Once the water hits the dough you begin developing gluten, which can make the dough tough so work it as little as possible at this stage. Press the dough into discs and refrigerate for at least an hour and then roll out and blind bake as described in the recipe. Blind baking helps keep the crust light and flaky, especially with a wet filling. Protect the edges of the crust if they start to brown by using a pie shield or cover with the edges with foil. Bake up some pies today~ Happy Holidays!

Perfectly Flaky Pie Crust Recipe

Talisman Designs Adjustable Pie Crust Shield, BPA-free Silcone, Red, Fits 8.5″ – 11.5″ Rimmed Dish

Leave a comment
Share
  • Pin it
  • Share
  • Tweet
  • Share
  • Email

Citrus Olive Oil Cake

12 / 28 / 1412 / 29 / 14

citrus


Citrus Olive Oil Cake

Save
Print

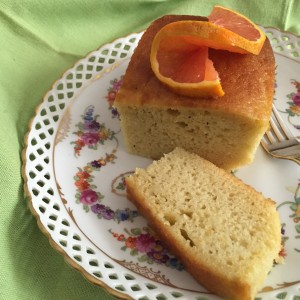
You can make this cake with any flavored or un-flavored olive oil that you like. Instead of poppy seeds try adding some dried cranberries or cherries. For serving dust with powdered sugar or make a citrus glaze with orange or lemon juice mixed with some powdered sugar and drizzle over the top of the cake, I like serving this with fresh raspberries on the side and a dollop of freshly whipped cream wouldn’t hurt either!
I’ve used cake pans, bundt cake pans and small Mason jars for this cake, just be aware of your baking time, test by inserting a clean toothpick into the center of the cake and it comes out dry.

  • 2 cups flour
  • 1 ¼ cups sugar
  • 1 teaspoon baking powder
  • 1 teaspoon baking soda
  • ¼ teaspoon salt
  • 3 large eggs, beaten
  • 1 ½ cups whole milk
  • ½ cup Orange olive oil, or any flavored olive oil
  • 1 orange, zested
  • 1 teaspoon vanilla
  • ½ cup sliced almonds
  • 1 tablespoon poppy seeds, optional

Preheat the oven to 350°.

Sift together the flour, sugar, salt, baking powder and baking soda Make a well in the center of the dry ingredients and whisk in the eggs, milk, olive oil, zest and vanilla. 


Add the almonds and poppyseeds to the batter, and mix with a spatula or wooden spoon. 


Pour the batter into a greased Bundt cake pan. Bake for 55 to 60 minutes, until the cake is golden on top. Cool the cake, invert on a plate and dust with confectioners sugar if you like.

If using Mason jars, spray the inside of the jar with oil spray and fill only 2/3 of the jar with batter. Place jar on a baking sheet and when all jars are done place the sheetpan into the oven and bake accordingly. Check the cakes at 30 minutes and then every 5 minutes until a toothpick comes out clean.

2 Comments
Share
  • Pin it
  • Share
  • Tweet
  • Share
  • Email

Apple Crisp

12 / 5 / 1412 / 5 / 14

Apple Crisp

Save
Print

Such a quick, easy recipe for a seasonal dessert; can be a great breakfast treat for those with a sweet tooth! Use an apple that is best for baking such as:

Jonathans and Jonagolds, Honeycrisp, Granny Smith, Melrose, Winesap, Braeburn, Rome Beauty.

  • Serves: 8
  • 4 cups sliced or diced apples
  • 1 tablespoon flour
  • ½ cup sugar
  • ¾ cup brown sugar
  • ⅓ cup butter
  • ¾ cup oatmeal
  • ¼ teaspoon baking soda
  • ½ teaspoon salt

Preheat oven to 350°. Combine the first three ingredients and place in a greased 8×8 baking dish.

Combine the remaining ingredients and sprinkle over the top of the apple mixture.

Bake 30 minutes. Serve warm

apple crisp


Photo: All Recipes

Leave a comment
Share
  • Pin it
  • Share
  • Tweet
  • Share
  • Email

What To Do with all those Luscious Summer Peaches!

7 / 30 / 1412 / 4 / 14

IMAG0215

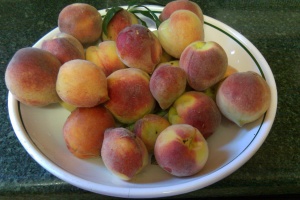
Oh all those beautiful rosy peaches from the farmers market! They smell like summer and I don’t know about you but I wait all year for them to show up!
I have a peach tree but that in no way yields enough peaches to satisfy my sweet tooth. Seasonal peaches are available in California from June to Sept.. Peaches from other parts of the world are usually picked hard and mostly premature and will never develop that sweet summer flavor.

The following is part of the prologue to David Mas Masumoto’s book ‘Epitaph for a Peach’, he is talking about the Sun Crest peach but I think it reflects all good peaches. “Sun Crest is one of the last remaining truly juicy peaches. When you wash that treasure under a stream of cooling water, your fingertips instinctively search for the gushy side of the fruit. Your mouth waters in anticipation. You lean over the sink to make sure you don’t drip on yourself. Then you sink your teeth into the flesh and the juices trickle down your cheeks and dangle on your chin. This is a real bite, a primal act, a magical sensory celebration announcing that summer has arrived. “ That sounds like a juicy summer peach to me, what about you?

Choose peaches that yield slightly to pressure, hard fruit isn’t ripe and though it will get softer, it won’t get tastier. Peaches need to develop flavor and sweetness while still hanging on the tree, color will vary with peach varieties but avoid peaches that show any sign of green. Smell the peach for sweetness and you’ll be fine.

Peaches should be kept at room temperature until soft and then refrigerated but don’t wait too long to eat them or they’ll over ripen.

I find it pretty easy to peel a ripe peach with a sharp paring knife or you can blanch in boiling water for a few seconds, don’t over do or you’ll start to cook the fruit flesh.

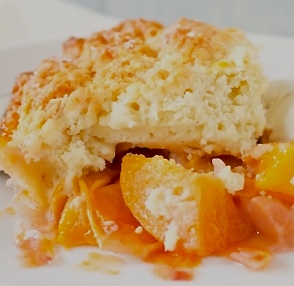
Here’s my favorite cobbler recipe that I pieced together from two different recipes that I love. One from my favorite boysenberry pie and the cobbler batter from Marcy Masumoto’s ‘French Peach Cobbler’ recipe in the Masumoto Families new book,  The Perfect Peach: Recipes and Stories from The Masumoto Family Farm.


Peach Cobbler

peach-cobbler-2

Filling

4          cups peeled, chopped fresh peaches
1           cup sugar, approximately
¼        cup cornstarch
pinch sea salt
1          teaspoon cinnamon
1/3      cup Grand Marnier
1          tablespoon fresh lemon juice

Batter

½        cup unbleached all-purpose flour
1/3      cup sugar
½        teaspoon baking powder
¼        teaspoon sea salt
2          tablespoons unsalted butter, room temperature
1          egg, lightly beaten


Preheat the oven to 375°. Butter a 9” square baking pan and set aside.

Filling:

Add peaches to a medium sized bowl and toss gently with sugar. Depending on how sweet the peaches are, add more or less sugar.

In a small bowl, mix together the cornstarch, sea salt, cinnamon and Grand Marnier. Toss the peaches with the cornstarch mixture and lemon juice.

Add the filling to the prepared pan.

Batter:

Combine the flour, sugar, baking powder and sea salt, mix well. Add the butter and egg, stir together until the batter is smooth.

Drop the batter by spoonfuls onto the fruit mixture and bake 40 – 45 minutes or until bubbly and golden.

Remove from oven and cool before serving.


Leave a comment
Share
  • Pin it
  • Share
  • Tweet
  • Share
  • Email

Boysenberry Tart

5 / 30 / 1412 / 3 / 14

berry copy

Pastry:
1 cup all purpose flour
1 Tablespoon Sugar
1 pinch salt
6 Tablespoon Unsalted butter, cold
1 Egg yolk, slightly whisked
1 Tablespoon Lemon juice
Filling:
3 Tablespoon Cornstarch
1 Tablespoon Grand Marnier, or more if needed
3/4 cup Sugar
1 cup boysenberries or more as needed

Pastry:
In large bowl, stir together flour, sugar and salt. With pastry blender or food processor, cut in butter until it resembles tiny peas. Mix together egg yolk, lemon juice and 1 tablespoon water; sprinkle over flour mixture. Stirring with fork, add a little more water if necessary to hold dough together. Using hands, gently shape pastry into ball. Press dough 1/8″ thick into flan pan. Refrigerate while making filling.

Filling:
Preheat oven to 425°.
In small saucepan, stir together Grand Marnier & cornstarch till smooth. Stir in sugar. Add boysenberries and cook, stirring, over medium-low heat for 10-15 minutes or till thickened.

Let cool; spoon into shell, filling no more than 2/3 full. Bake in 425° oven for 10 minutes. Reduce heat to 350° and bake 15 minutes longer or till pastry is golden brown. Let cool 15 minutes before removing to rack.


Related Posts Plugin for WordPress, Blogger...
Leave a comment
Share
  • Pin it
  • Share
  • Tweet
  • Share
  • Email
Deb

Meet Chef Debbi

READ BIO

Join-Us Sign up for our newsletter to receive exclusive tips 'n tricks, and special offers on classes, tours, and more!

Recent Posts

  • New E-Book!
  • From the Pantry
  • Spaghettini at Home
  • Growing Corn
  • Spring IS Coming!

Categories

BookCUT

What's in Your Pantry?

How to stock your pantry to create delicious dishes.

Learn Chef Debbi's pantry essentials and how to substitute ingredients for pantry staples in her basic recipes for quick and easy meals.
BUY BOOK>

FacebookTwitterInstagramGooglepinterest


© 2014, DEB'S KITCHEN
Angie Makes Feminine WordPress Themes