Deb's Kitchen - Farm, Food, Wine & Lifestyle Adventures
  • Facebook
  • Google
  • Twitter
  • Instagram
  • Pinterest
  • Email
Menu
Skip to content
  • Home
  • Blog
  • Events
    • Classes
    • Tours & Adventures
  • Edible Gardening
  • Preserving
  • Recipes
    • Appetizers
    • Soups and Salads
    • Main Dishes
    • Side Dishes
    • Desserts
  • About
    • Whats In Your Pantry
    • Ask Debbi
    • Deb’s Kitchen Botanicals
    • Press
  • Contact

Author: Chef Debbi Dubbs

Easter Menu

3 / 16 / 17

April cooking demo at Temecula Olive Oil tasting room, Seal Beach

April 6th, Thursday

6:30 – 8:30, approximately

See below for reservations

Menu

Roasted Asparagus Caesar Salad

Pan Seared Lamb Chops with Meyer Lemon & Mint Gremolata

Honey Glazed Baby Carrots with Cippolini Onions

Fontina & Gruyere Potatoes Au Gratin

Blood Orange Carrot Cupcakes with Cream Cheese Frosting

For Seal Beach Reservations please call:

562-296-5421

Sponsored by

Leave a comment
Share
  • Pin it
  • Share
  • Tweet
  • Share
  • Email

Fettuccine with Fresh Spring Peas & Pancetta

2 / 24 / 172 / 24 / 17


Fettuccine with Fresh Spring Peas & Pancetta

Save
Print
  • 1 pound fettuccine pasta
  • 1 tablespoon olive oil
  • 8 oz. pancetta, diced
  • 1 small shallot, minced
  • 2 tablespoons dry white wine
  • 2 tablespoons chicken stock
  • 1 cup fresh peas
  • 1 sprinkle of sea salt
  • ¼ cup heavy cream
  • 1/2 cup grated Parmesan cheese, reserving some for garnish.
  • Fresh ground pepper

Cook the pasta according to directions, adding a good tablespoon of salt to the water, and while that is cooking continue with the recipe.

Heat a large saucepan over medium high heat and add a little olive oil to cover the bottom of the pan, add the diced pancetta and cook until lightly browned.

Add the shallots and sauté until translucent. Add the wine and chicken stock, bring to a boil and add the peas with a generous sprinkle of sea salt, cover and cook until most of the liquid has been absorbed and the peas are a bright green color.

When the liquid is reduced to about a tablespoon, add the cream and cook for about 3 minutes then add the cheese and the pasta. Toss well and add a little of the pasta water if the sauce is too thick. Serve with a grind of fresh pepper.

Serves 4


Leave a comment
Share
  • Pin it
  • Share
  • Tweet
  • Share
  • Email

Growing Spring & Fall Peas

2 / 24 / 17

Growing Spring and Fall Peas

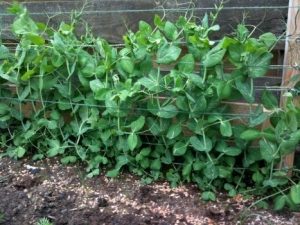
There are several types of peas that you can grow in the spring or late fall garden. Tall vining types or short bush ones that don’t need trellising.

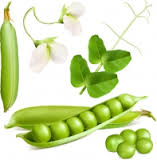
Then you need to decide if you want fresh shelling peas, pea pods or snow peas.

All peas grow in pods but not all pods are edible. Shelling peas, also called ‘English’ peas have tough outer pods and so must be ‘shelled’. Snap peas can be eaten whole and are good blanched or eaten raw. They plump up a little more in the pod than a snow pea, which has a flat, pod and are very tender. Grow them all, the shell peas are great for freezing to use in soups, stews or just about any dish. The snap or snow peas add a great crunch to salads and many times most of them are eaten right off the vine in the garden.

Plant peas in spring or late summer (in warmer climates), loosen the soil and add some compost, mixing it well. If using a trellis, place the trellis in the soil and plant peas on both sides of the trellis. Plant the seeds about 1” deep and 2” apart. Water well and wait for them to grow. That’s it!

Harvest when the pods are fully mature, the shelling peas will be plump and fat while the snap peas are just beginning to swell inside the pod and the snow peas are full size and sort of waxy looking. Some of the flowers may be still attached to the bottom of the pod but they will be looking rather dried out.

Refrigerate peas just after picking so they stay sweet and crunchy for up to 3 days. Blanch peas right away if you’re planning on freezing some. Cook in boiling, salted water for 2 minutes, drain and lay flat on a baking sheet. Dry them well and freeze on the sheet pan then you can toss them into a freezer bag and pull out only what you want to work with later.

Pick peas in the morning and use care not to pull the plant out of the ground while you pull off the pea pod. You can also use the leafy pea shoots from the tops of the plants as they get taller, plan on using these right away.

Leave a comment
Share
  • Pin it
  • Share
  • Tweet
  • Share
  • Email

It’s Easy to Grow Potatoes!

2 / 8 / 17

potato growing

Choose organic seed potatoes, don’t plant potatoes that you’ve purchased from the market even if they have sprouts. They won’t perform well in the garden and you’ll be disappointed. Buy certified organic see potatoes from a reputable nursery. In LA check out Two Dog Nursery, http://www.twodognursery.com/ or by mail, Peaceful Valley Farm, https://www.groworganic.com/

Pre-spouted potatoes will grow faster and you’ll be able to pick potatoes about a month earlier. Growing potatoes is SO easy! You can grow in Smart Pots, the easiest in my opinion, or in the ground.

To pre-sprout the potatoes, put them in a paper bag or lay them out singly in a warm room. If they are larger than a couple of inches I cut them into pieces with each piece having 2 or more ‘eyes’ and let them dry out of the sun for a couple of days. Potatoes like sandy, loose soil so if that’s not the kind of soil you find in your garden a Smart Pot is the way to go, it also makes harvesting easier. If you are planting right in the ground, make a furrow about 3” deep and plant the seed potato eyes up, cover with soil and plant the next potato seed about 2’ away. As the potatoes sprout and grow keep covering the plant with loose soil or straw leaving about 3” exposed. The new potatoes grow on top of the seed potato, keep the soil moist but not wet and keep ‘hilling’ the plant until it’s about 10 – 12” tall. Fertilize with a general organic gardening fertilizer such as EB Stone Tomato & Vegetable Food, 4-5-3.

Harvest potatoes in about 60 days after the blooms start to die back. Stop watering and leave the potatoes in the ground, covered with soil or straw to prevent greening (don’t eat a green potato), to set the skin. Fresh potatoes have a very thin, delicate skin so if you’re planning on storing any of them you’ll want it to ‘toughen’ up a little. If you’re growing in a Smart Pot after you’ve toughened up the skin, just dump the pot out in the garden and collect all your potato gems! Start each season with fresh new seed potatoes. In California you can grow potatoes in spring and in fall, yippee for California!


potato smart pots

Get Smart Pots here


Leave a comment
Share
  • Pin it
  • Share
  • Tweet
  • Share
  • Email

Temecula Olive Oil Cooking Class March 2017

2 / 8 / 17

Celebrate the Irish with us in downtown Seal Beach !

Thur. March 2

(Additional class March 16th  if March 2nd sells out,) BYOB

6:30 – 8:30, approximately

See below for reservations

Guinness-Beef-Stew-Recipe-wonkywonderful

Kerrygold Aged Cheddar Cheese Sandwich Fingers with Sun Dried Tomatoes

Irish Pub Salad

 Beef & Guinness Stew

Potato Torte with Bacon & Cabbage

Guinness Chocolate Cake 

For Seal Beach Reservations please call:

562-296-5421

Sponsored by

Melissas logo small

Photo: Wonky Wonderful
Leave a comment
Share
  • Pin it
  • Share
  • Tweet
  • Share
  • Email

Fullerton Arboretum Demo Cooking Class with Chef Louise

1 / 22 / 17

Fullerton Arboretum Cooking Demo

I’ll be pairing up with my friend, Louise Mellor for monthly cooking demo’s and foodie tastings, tips on how to stock your pantry, cooking with seasonality and celebrations at the table with design and style

Sat. Feb 11th

11 – 2, approximately

See below for reservations

Cupid in the kitchen…

Chocolate Tasting

Beef Wellington Tarts with Mushroom Blue Cheese Sauce 800 2765

Roasted Spring Asparagus salad with Meyer Lemon vinaigrette

Elegant Beef Wellington Puff Pastry Tarts with Caramelized Onions, Maytag Blue Cheese, Sautéed Mushrooms

Dark chocolate hazelnut flourless cake with vanilla bean ice cream and fresh berries

Wine will be available in class

Sponsored by

Melissas logo small

For a full 6 month class schedule and to register for a class click

Fullerton Arboretum

Leave a comment
Share
  • Pin it
  • Share
  • Tweet
  • Share
  • Email

Temecula Olive Oil Tasting Room, Seal Beach Cooking Demo

1 / 22 / 17

Temecula Olive Oil Tasting Room

Seal Beach

Thur. Feb. 2nd  (Additional class  Feb. 16th  if Feb. 2nd sells out,)

6:30 – 8:30, approximately

See below for reservations

salmon blood orange

Pear, Pecan & Feta Salad

Farro & Balsamic Roasted Butternut Squash

Blood Orange Butter Broiled Salmon

Raspberry Dark Chocolate Mousse

For Seal Beach Reservations please call:

562-296-5421

Sponsored by

Melissas logo small

Leave a comment
Share
  • Pin it
  • Share
  • Tweet
  • Share
  • Email

Extra January Class!

1 / 16 / 171 / 16 / 17

Cooking at Temecula Olive Oil, Seal Beach

Jan 19th

6:30 – 8:30, approximately

pork-braciole

Minestrone Soup with Italian Meatballs

Pork Braciola Porchetta Style

     (Stuffed pork cutlets stuffed with Italian herbs & cheese)

     Served with Mushroom Ragu

Saffron Risotto

Tangerine Panna Cotta

By Reservation Only
(562) 296-5421
148 Main Street
Seal Beach, CA 90740

SPONSORED BY

Leave a comment
Share
  • Pin it
  • Share
  • Tweet
  • Share
  • Email

New Cooking Class Venue

1 / 11 / 17

Cooking at Fullerton Arboretum

New Events!

outdoor-table-setting 

Celebrating the seasons around the table with demonstration style cooking class and a specialty food tasting each month.

Join my friend Chef Louise Mellor and I in the beautiful gardens at Cal State Fullerton’s Arboretum for a meal as we celebrate the seasons.  Learn how to stock your pantry and together we’ll use garden fresh, seasonal ingredients with classic French techniques to create simple, exciting dishes for special occasions and everyday meals.

We will also be sharing how to entertain with simplicity and style.  Most importantly, we hope you will be inspired to get into the kitchen at home and share life around the table.

Full lunch servings will be offered and wine will be available if desired. Here are upcoming classes for Jan, Feb and March, take a look here for class registration and the schedule through summer! Hope to see you there~

Saturday, Jan. 21, 11 – 2
Book Signing and Demo

Soup from the pantry

Join us for a demonstration on soup basics and enjoy a hearty bowl of minestrone soup with puff pastry ‘rolls’.


February 11th, Saturday, 11 – 2
Cupid in the kitchen…
Chocolate Tasting

Roasted Spring Asparagus salad with Meyer Lemon vinaigrette

Elegant Beef Wellington Puff Pastry Tarts with Caramelized Onions, Maytag Blue Cheese, Sautéed Mushrooms

Dark chocolate hazelnut flourless cake with vanilla bean ice cream and fresh berries

March 25th Saturday, 11 – 2
I left my heart in San Francisco…
Olive oil tasting

Homemade herbed ricotta with lemon, Parmesan & blistered tomatoes served on sourdough crostini

San Franciscan style Cioppino with fresh seafood in a rich tomato white wine broth.

Blood orange olive oil cake with whipped Grand Manier marscapone


Leave a comment
Share
  • Pin it
  • Share
  • Tweet
  • Share
  • Email

Chicken Marsala for a Quick, Easy Weeknight Dinner

1 / 10 / 171 / 11 / 17

chicken-marsala


Chicken Marsala

Save
Print

There is a simple trick that you can do ahead of time to make life a little easier cooking during the week. Buy chicken cutlets*, place them between 2 sheets of plastic or parchment paper and pound to ¼” thickness. Stack them with parchment paper between each breast, freeze on a sheet pan separately then wrap in plastic and place the entire stack into a freezer bag. Now you can remove 1 or 2 or 4 when you get home from work and proceed with any recipe. The chicken breast (you can do this with pork tenderloin as well), will defrost almost immediately and you’ll have dinner on the table in ½ hour.

  • 1/3 cup flour plus more for mushrooms
  • Sea salt and pepper, to taste
  • Olive oil
  • 4 Chicken cutlets, pounded ¼” thick
  • 1 tablespoon unsalted butter
  • 6 ounces brown crimini mushrooms, sliced or quartered
  • 1 ½ tablespoon minced shallot
  • 2 teaspoons minced garlic
  • 1⁄2 cup chicken stock
  • 1⁄3 cup dry Marsala wine
  • 1 tablespoon lemon juice
  • 1 tablespoon lemon zest
  • 1 tablespoon Italian flat leafed parsley, minced

Season the flour with sea salt and pepper and dredge the chicken in the flour shaking off the excess.

Heat the slow cooker to sauté if you can or use a skillet, add enough oil to coat the bottom of the pan and lightly brown the chicken on both sides. Set aside.

If needed add a little more oil to the pan, just enough to coat the bottom and add the butter, when melted sauté the mushrooms until browned. Add the shallots and cook until translucent, add the garlic and stir briefly until it’s aromatic.

To finish on stove top:

Sprinkle the mushroom mixture with a little flour and cook, stirring until flour is incorporated and browned. Whisk in the chicken stock, Marsala wine and lemon juice, reduce until slightly thickened. Add the chicken back to the mixture and cook for about 2 minutes. Serve with chopped parsley and lemon zest over the chicken breasts.

*If you want to buy chicken breasts or cut from a whole chicken just butterfly them before pounding.

Leave a comment
Share
  • Pin it
  • Share
  • Tweet
  • Share
  • Email

Duck Breast with Grand Marnier Sauce

12 / 22 / 16

duck-breast


Duck Breast with Grand Marnier Sauce

Save
Print
  • Serves 4 - 6
  • 4 duck breast fillets
  • 3 tablespoons olive oil
  • Sea salt and fresh ground pepper
  • 1 tablespoon sugar
  • 1 cup freshly squeezed orange juice, strained
  • 1 tablespoon orange zest
  • 1/3 cup Grand Marnier liqueur
  • 3/4 cup chilled butter, cut into 6-7 pieces

Preheat oven to 350°.

Score the duck breast skin without cutting into the breast, cut in a criss cross pattern.

Season the duck breast on both sides with sea salt and pepper. Heat a sauté pan over medium high heat until hot and sear the breast skin side down, do not put oil or butter into the pan, you’ll have plenty of rendered duck fat shortly. When the breast is nicely browned turn and cook the other side, turn the heat down on the pan if needed.

Remove breast to a small baking sheet lined with parchment, a baking pan will do as well. Do not use a pan that’s too big or the fat will burn as it’s rendered, place a probe thermometer into the center of the breast and cook until temperature reaches 135°. Remove from oven and let rest while you finish the sauce.

Combine orange juice, sugar, orange zest, and half of the Grand Marnier in a small saucepan. Bring to a boil, uncovered, over medium-high heat. Reduce heat to medium and simmer until the liquid is reduced to 2–3 tablespoons. Remove the pan from the heat and whisk in butter, a few pieces at a time, until thoroughly blended, and then whisk in the remaining Grand Marnier.

Slice the duck breasts on an angle and serve with the Grand Marnier Sauce, top with some orange peel or zest.


Photo: Chef Jon

Leave a comment
Share
  • Pin it
  • Share
  • Tweet
  • Share
  • Email

Christmas Roast

12 / 6 / 16

A Christmas Roast, Dec. 2016

rib-roast

After the huge cooking spree for Thanksgiving I’m happy to create a simple elegant meal for Christmas and I always turn to a rib roast. Most people refer to them as a ‘prime rib’ yet that really refers to the grade of meat. While USDA Prime Grade is the best, it can also be on the expensive side, while a good ‘Choice’ grade is nearly as good as the prime, it can be purchased for much less. Both roasts are considered ‘standing rib roast’ and you treat them equally in cooking.

Costco has the absolute best deal on both Choice and Prime Grade roasts, choose bone in for the best flavor and juiciness. Either roast will need to cook a little longer with the bone in but the flavor is superior. A trick you can do is cut the bones off the roast and tie them back onto the roast, you’ll still get juicy flavor but won’t need to roast quite as long.

The roast will take some time to come to room temperature so remove from the refrigerator 3 house before roasting. Pre heat your oven for 30 minutes and roast for approximately 15 – 20 minutes per pound, start with a high heat, 450°, for 15 minutes, then turn the oven down to 325° and continue cooking. Use a digital probe thermometer for best results, it’s worth spending $15 or $20 on a digital thermometer for a $75.00 roast.

For rare roast remove from the oven when the thermometer reaches 120°, for medium rare, 125° or 130° for medium, the meat will continue to cook (called carry over cooking time) while it rests. I like to serve the roast with a Red Wine Sauce or Bordelaise Sauce but remember that your sauce will only be as good as the beef stock you use so use the best. Homemade is tops but if you must purchase a stock try More Than Gourmet Glace de Veau (veal stock). Standing rib roasts are great on the grill also but that’s another story.


Photo: Josh, The Meatwave

Prime Rib or Standing Rib Roast

Save
Print

Serves 8
Total preparation time: 1 hr. 30 min. – 2 hr.

  • 1 (7 lb.) Rib Roast, Bone-In or Boned & Tied
  • 2 tablespoons unsalted butter
  • 1 clove garlic, minced – optional use 1 teaspoon ground garlic (NOT garlic salt)
  • Sea Salt and ground pepper

Place roast in a shallow baking pan bone down, melt butter in small saucepan and add garlic and salt and pepper. Mix well, brush over roast, and let stand at room temperature for 2 hours.

Preheat oven to 450°F. Use a probe meat thermometer*, placed into the center of the roast but not touching bone. Roast for 10 minutes in uncovered pan, then reduce heat to 350°F and continue for 1 hour and 20 minutes for rare. Baste with pan drippings from time to time. Thermometer should read 120° - 125° for rare, 130° - 135° for medium rare. Do not cook beyond 140°, medium. Let the roast stand for 15 minutes, with the probe in the meat, before slicing. Slice either between the bones or cut off all the bones at once and the slice the meat into serving pieces.

Roast 15 minutes more if you want a medium roast, another 15 minutes for well done.

Remove from oven when done, and allow the meat to rest for a few minutes before carving. Transfer to a warmed serving platter.

• A digital probe meat thermometer – the probe remains in the meat while in the oven and the control sits outside on the stove or counter. See link below

Bordelaise Sauce

Save
Print
  • 3 tablespoons butter
  • 1 onion, chopped
  • 2 carrots, sliced in rounds
  • 2 cloves garlic, cut in half
  • 4 peppercorns
  • 1 bay leaf
  • 11/4 cups beef broth*
  • 1 sprig thyme
  • Sea Salt
  • 2 tablespoons flour
  • 1/2 cup dry red wine
  • 1 tablespoon Italian flat leaf parsley, chopped

Melt the butter in a heavy skillet and sauté the onion until transparent. Add the carrots and cook until soft.

Place garlic, peppercorns, and bay leaf in cheesecloth bag. Add to pan along with 1 cup of beef broth. Boil until broth has been slightly reduced, about 10 minutes, then season with thyme and salt.

Remove cheesecloth bag and put mixture through a coarse strainer. Return to pan.

Meanwhile, dissolve flour in the other 1/4 cup of broth and add gradually to sauce. Stir constantly until sauce thickens, then add the wine. Reduce heat and allow to simmer until ready to serve, and then sprinkle chopped parsley on top.

Use a quality beef broth if not making your own such as More Than Gourmet Glace de Veau (veal stock).

Related Posts Plugin for WordPress, Blogger...
Leave a comment
Share
  • Pin it
  • Share
  • Tweet
  • Share
  • Email

Posts navigation

Previous Page 1 2 … 11 12 13 14 15 … 25 26 Next Page
Deb

Meet Chef Debbi

READ BIO

Join-Us Sign up for our newsletter to receive exclusive tips 'n tricks, and special offers on classes, tours, and more!

Recent Posts

  • New E-Book!
  • From the Pantry
  • Spaghettini at Home
  • Growing Corn
  • Spring IS Coming!

Categories

BookCUT

What's in Your Pantry?

How to stock your pantry to create delicious dishes.

Learn Chef Debbi's pantry essentials and how to substitute ingredients for pantry staples in her basic recipes for quick and easy meals.
BUY BOOK>

FacebookTwitterInstagramGooglepinterest


© 2014, DEB'S KITCHEN
Angie Makes Feminine WordPress Themes