Deb's Kitchen - Farm, Food, Wine & Lifestyle Adventures
  • Facebook
  • Google
  • Twitter
  • Instagram
  • Pinterest
  • Email
Menu
Skip to content
  • Home
  • Blog
  • Events
    • Classes
    • Tours & Adventures
  • Edible Gardening
  • Preserving
  • Recipes
    • Appetizers
    • Soups and Salads
    • Main Dishes
    • Side Dishes
    • Desserts
  • About
    • Whats In Your Pantry
    • Ask Debbi
    • Deb’s Kitchen Botanicals
    • Press
  • Contact

Tag Archives: herbs

April Demo Cooking Class

3 / 1 / 18


Join us on

Thur.  April 12 or 26

6:30 – 8:30, approximately

Endive Spears with Blue Cheese, Pear, Candied Pepitas and Orange-Shallot Vinaigrette

Grilled Salmon with Citrus Salsa & Spring Micro Greens

Roasted Asparagus with Lemon Gremolata and Parmesan

Balsamic Strawberries in Meringue Nests with Crème Fraiche

$45.00

For reservations call

Temecula Olive Oil, 148 Main St. Seal Beach

(562) 296-5421

Sponsored by


Leave a comment
Share
  • Pin it
  • Share
  • Tweet
  • Share
  • Email

Feb 2018 Cooking Demo

1 / 6 / 18

Join us on

Thur. Feb 8th or 22nd

6:30 – 8:30, approximately


Menu

Crab Imperial Stuffed Mushrooms

Baby Spinach Apple Salad with Pecans & Dried Cherries

Skirt Steak with Shallot Pan Sauce

Roasted Smashed Potatoes

Chocolate-Orange Panna Cotta w/Fresh Berries

$45.00

For reservations call

Temecula Olive Oil, 148 Main St. Seal Beach

(562) 296-5421

Sponsored by


Leave a comment
Share
  • Pin it
  • Share
  • Tweet
  • Share
  • Email

Nov. Cooking Demo

10 / 18 / 17

Join us for our next cooking demo

Entertaining Menu’s

Thursday, 6:30-8:30, approximately

Nov 9th & 16th


Menu

Smoked Trout Canapés

Spinach Bacon Salad with Pine Nuts & Croutons

Roast Duck Breast with Blackberry-Orange Sauce

Pumpkin Risotto with Pomegranate Arils & Shaved Parmesan

Haricot Vert (French style Green Beans) with Bacon & Pearl Onions

Mini Pumpkin Cheesecakes

$45.00

For reservations call  Temecula Olive Oil, Seal Beach

(562) 296-5421

Sponsored by

Leave a comment
Share
  • Pin it
  • Share
  • Tweet
  • Share
  • Email

Lemon Roasted Chicken

6 / 12 / 17

This is by far my favorite dish with hints of Meyer lemon and sea salt and I like to add some roasted baby potatoes to the pan to soak up some of the juices. I use ‘Mary’s Organic Chicken‘ always for the best meat, always tender & juicy, it costs a little more but I think it’s worth the extra few bucks. (And they didn’t pay me to say that). And I love to tuck into the pan the ‘Baby Dutch Yellow Potatoes’ from Melissa’s Produce!

You can dress this up by making the ‘pan’ sauce listed in the recipe of you can by pass it. I’ve also made brioche dressing for the side and it makes a great holiday dish without the hassle of cooking a whole turkey dinner. Add a beautiful green vegetable and you’ll find an easy weeknight dinner. It pairs well with my Spring Asparagus recipe. Prep all the ingredients the night before & you can walk in the door, pop the chicken in a preheated oven and within the hour you’ll have the best meal in town, no drive through chicken can EVER take the place of a chicken roasted at home.

Lemon Roasted Chicken

Save
Print
  • Serves 4
  • 1 whole chicken -- rinsed, drained and dried
  • 1 medium onion -- peeled and chopped
  • 3 baby carrots -- peeled and chopped
  • 3 celery stalks -- cut into chunks
  • 1 lemon -- zested and juiced; preferably Meyer lemon
  • 1 bunch Italian flat leaf parsley -- minced
  • 1 bunch fresh sage -- minced
  • 1/2 bunch fresh thyme -- minced
  • 2 tablespoons butter -- room temperature
  • 1 tablespoon lemon olive oil, butter or regular olive oil
  • Salt and pepper
  • 1 cup white wine
  • 1 cup chicken stock
  • 2 tablespoons chicken demi glace -- optional for sauce

Preheat oven to 400°.

Wash and dry chicken inside and out then dry well. Fit chicken into a roasting pan (you want no more than 1" of space on any side of the chicken otherwise the juices will burn).

Mix together onion, carrot, celery, lemon zest, and 1/2 of the minced herbs. Loosely stuff cavity with some of the ingredients, place the remainder on the bottom of the roasting pan and place chicken on top of the aromatic vegetables.

Mix remaining minced herbs with butter. Gently separate the chicken skin from the breast meat and carefully rub herb butter on breast under the skin.

Rub the chicken with lemon olive oil and season with salt and pepper. Squeeze lemon over chicken and place rind into cavity. Insert probe thermometer into thigh and set for 165 degrees. Pour half of the wine and chicken stock in the bottom of the pan and place, uncovered in hot oven.

Baste after 1/2 hour, if you don't have enough juice in pan use some chicken stock. Do not cover bird until browned and then loosely place foil over breast. If wings start to brown to early wrap with foil.

Remove chicken to a warm plate and loosely cover with foil. Let rest for 10 minutes before carving.

Remove some of the fat in the pan by using a paper towel or ice cubes. (Dredge the paper towel through the juices to pull out some of the fat or pour off the juices into a heat proof measuring cup. Add a few ice cubes; the fat will stick to the cold cube, discard cube. You may have to do this several times).

Put the roasting pan on top of the stove over medium-high heat and bring a boil, add remaining wine and stock scraping the fond (the yummy pieces stuck to the pan) from the bottom of the pan. Reduce by half, add demi-glace if using and serve with chicken.

Leave a comment
Share
  • Pin it
  • Share
  • Tweet
  • Share
  • Email

Container Herb Gardens

4 / 12 / 17

I know some of you aren’t gardeners but like to have some fresh herbs around for creative cooking. Now you can buy herbs in the market and remove some of the bottom leaves and store them in a vase changing the water every day or you could easily grow some major herbs in pots on your patio or railing. You could choose to grow them in one big pot or give each herb it’s own container (then it’s a little easier to change out the plants). You could plant seeds and tend to them as they grow but if you’re not into gardening start as transplants.

Sun, most herbs like sun, at least 6 hours a day and a well draining potting soil. Use an organic potting soil and a liquid fertilizer like Dr. Earth. You should be able to find most herbs in the nursery right now but basil may be lagging because of the cold winter we had, the growers weren’t able to get the basil going as early as usual.

Here’s a little tip I picked up recently, if you are anywhere near a few pine trees (look in your local park) you could find tons of small pinecones. Place them in the bottom of the pot over the hole and it will help the soil from running out the bottom when you water the plant. The pinecone will slowly degrade into mulch helping to feed the plant. Put some potting soil on top of that and then squeeze the sides of the container the herb is growing in, turn the pot upside down holding the plant gently with your other hand. Squeeze the pot until the plant comes out (don’t pull on the plant or you may damage the stem and kill the poor baby before it evens hits the pot!), place the plant into the pot and fill the surrounding area with more soil. Water well and grow little baby herbs! Fertilize according to the directions on the box or the bottle and never snip off more than 1/3 of the plant. I let my herbs flower as it brings the bees and butterflies to the pots but you may not want that so just pinch back the flowers. The flowers are edible as long as you haven’t sprayed the plant with pesticides or herbicides (no no no). Many herbs are annuals such as basil and need to be planted every spring, but some are biennial (every other year) and many are perennial and will continue to grow. If they out grow the pot just move them up to the next size and plant new babies in the small container. When winter comes be mindful of cold weather, most herbs prefer warm sunny areas so you may have to move them or cover them during cold spells. But if that’s too much for you just toss them into a compost pile or chop them up and plant behind a shrub where they can decompose and plant a new herb baby next spring.

For more tips on growing and using herbs come and see me at The South Coast Plaza Garden Show. The seminars are free!

Thursday April 27th at noon

Friday April 28th at 12:30


Leave a comment
Share
  • Pin it
  • Share
  • Tweet
  • Share
  • Email

Puff Pastry Tart

4 / 11 / 17

This recipe is great as a side dish, an appetizer or a light lunch with a salad. It’s easy to make, most of it can be done ahead of time and assembled just before baking. Be sure to use a quality puff pastry dough such as Dufour’s which is made with 100% butter and no preservatives. It’s a little more expensive but if you want real puff pastry, this is it. Be sure to keep the dough refrigerated and if it warms up a little while you are rolling it out, pop it back in the refrigerator until cold. It won’t puff correctly unless the dough is as cold as possible into a hot oven. Be creative and add some chopped (blanched) asparagus to this, it’s a perfect spring time recipe. Enjoy!

Leek and Goat Cheese Puff Pastry Tart

Save
Print
  • 1 cup baby leeks, sliced thin
  • 1 tablespoon unsalted butter
  • 2 tablespoons extra-virgin olive oil
  • Sea salt
  • 1 teaspoon finely chopped fresh thyme
  • 1 box (14 ounces) frozen puff pastry, such as Dufour, thawed
  • 1 large egg beaten with 1 tablespoon water
  • 1/4 cup Nicoise olives, pitted
  • 6 ounces goat cheese, room temperature

Rinse leeks well, and drain; set aside.

Melt butter with oil in a medium sauté pan over medium heat. Add leeks and sprinkle with salt; cook, stirring occasionally, 5 minutes, cook until translucent and soft, add thyme. Leeks can be refrigerated in an airtight container up to 1 day; bring to room temperature before assembling tart.

Cut or roll out pastry to a 6-by-14-inch rectangle; place on a parchment-lined baking sheet (reserve remaining pastry for another use). Score a 3/4-inch border. Brush with egg wash; sprinkle with Parmesan. Refrigerate 30 minutes.

Preheat oven to 375°. Bake pastry until light brown; remove from oven, and press center area with spatula. Using an offset spatula or a spoon, smear the pastry with the cheese within the border, add leeks and olives, and bake until crust is golden brown, about 10 minutes. If bottom is soft, bake 3 to 5 minutes more.

Remove tart from oven place tart onto a wire rack; let cool slightly. Cut into pieces; serve warm or at room temperature (tart can stand at room temperature up to 1 hour).

Olive Magazine Photo

Leave a comment
Share
  • Pin it
  • Share
  • Tweet
  • Share
  • Email

Tips on Growing Tomatoes

3 / 16 / 17

How To Grow Great Tomato Plants
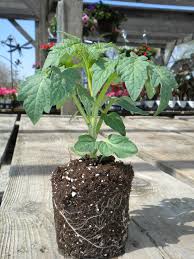
 

Buy transplants

Purchase healthy, stocky plants that have no flowers, fruits or buds

Choose a sunny location, rotate planting beds every year

Plant in an area where you may have grown peas or beans the previous year

Add compost to the soil and make sure the soil isn’t compacted.


Succession plant

Choose an early variety that can be planted in early spring. I like to plant my main crop in April and then another couple of plants in July for fall harvest. Check Sunset Gardening Guide for the best time in your area to plant.

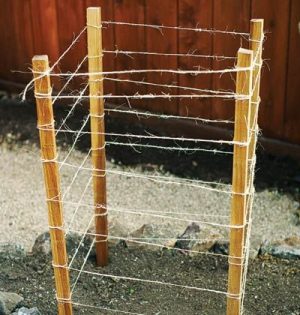
Depending on how you’re going to stake or cage tomatoes, have all the equipment ready for planting day, stake the plants at the same time you transplant.
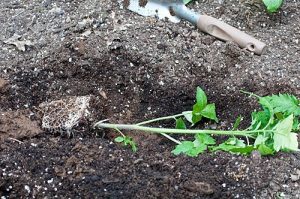
 

Planting

When planting remove lower leaves and plant the tomato deep, so that only about 3” are above ground. Tomato plants have the ability to grow roots from the buried stem. Water well after planting. Water well and deep but infrequently, keep your watering consistent, tomatoes need about 1” water a week.

Fertilize

Don’t over fertilize your tomato plants. Use a high phosphorus content fertilizer such as Dr. Earth Organic Tomato/Vegetable Fertilizer, 5-7-3. A high nitrogen content will give you lots of green leaves but little fruit.
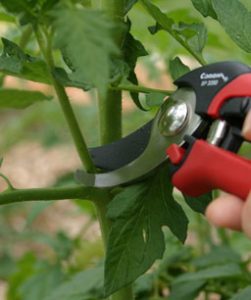
Pinch branches out

I always pinch out side shoots in the beginning to help the plant grow tall rather than gangly.

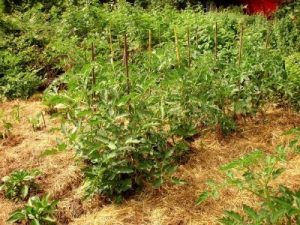
Mulch and Companion Planting

Tomatoes love carrots; basil and marigolds so plant them in the same bed and mulch the rest of the soil to keep the moisture in.
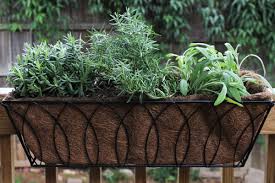
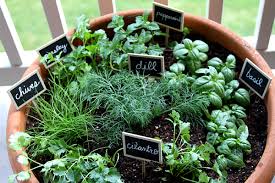
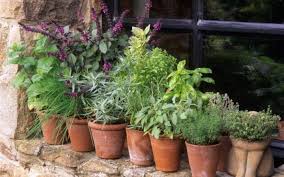


Leave a comment
Share
  • Pin it
  • Share
  • Tweet
  • Share
  • Email

Temecula Olive Oil Cooking Class March 2017

2 / 8 / 17

Celebrate the Irish with us in downtown Seal Beach !

Thur. March 2

(Additional class March 16th  if March 2nd sells out,) BYOB

6:30 – 8:30, approximately

See below for reservations

Guinness-Beef-Stew-Recipe-wonkywonderful

Kerrygold Aged Cheddar Cheese Sandwich Fingers with Sun Dried Tomatoes

Irish Pub Salad

 Beef & Guinness Stew

Potato Torte with Bacon & Cabbage

Guinness Chocolate Cake 

For Seal Beach Reservations please call:

562-296-5421

Sponsored by

Melissas logo small

Photo: Wonky Wonderful
Leave a comment
Share
  • Pin it
  • Share
  • Tweet
  • Share
  • Email

Fullerton Arboretum Demo Cooking Class with Chef Louise

1 / 22 / 17

Fullerton Arboretum Cooking Demo

I’ll be pairing up with my friend, Louise Mellor for monthly cooking demo’s and foodie tastings, tips on how to stock your pantry, cooking with seasonality and celebrations at the table with design and style

Sat. Feb 11th

11 – 2, approximately

See below for reservations

Cupid in the kitchen…

Chocolate Tasting

Beef Wellington Tarts with Mushroom Blue Cheese Sauce 800 2765

Roasted Spring Asparagus salad with Meyer Lemon vinaigrette

Elegant Beef Wellington Puff Pastry Tarts with Caramelized Onions, Maytag Blue Cheese, Sautéed Mushrooms

Dark chocolate hazelnut flourless cake with vanilla bean ice cream and fresh berries

Wine will be available in class

Sponsored by

Melissas logo small

For a full 6 month class schedule and to register for a class click

Fullerton Arboretum

Leave a comment
Share
  • Pin it
  • Share
  • Tweet
  • Share
  • Email

New Cooking Class Venue

1 / 11 / 17

Cooking at Fullerton Arboretum

New Events!

outdoor-table-setting 

Celebrating the seasons around the table with demonstration style cooking class and a specialty food tasting each month.

Join my friend Chef Louise Mellor and I in the beautiful gardens at Cal State Fullerton’s Arboretum for a meal as we celebrate the seasons.  Learn how to stock your pantry and together we’ll use garden fresh, seasonal ingredients with classic French techniques to create simple, exciting dishes for special occasions and everyday meals.

We will also be sharing how to entertain with simplicity and style.  Most importantly, we hope you will be inspired to get into the kitchen at home and share life around the table.

Full lunch servings will be offered and wine will be available if desired. Here are upcoming classes for Jan, Feb and March, take a look here for class registration and the schedule through summer! Hope to see you there~

Saturday, Jan. 21, 11 – 2
Book Signing and Demo

Soup from the pantry

Join us for a demonstration on soup basics and enjoy a hearty bowl of minestrone soup with puff pastry ‘rolls’.


February 11th, Saturday, 11 – 2
Cupid in the kitchen…
Chocolate Tasting

Roasted Spring Asparagus salad with Meyer Lemon vinaigrette

Elegant Beef Wellington Puff Pastry Tarts with Caramelized Onions, Maytag Blue Cheese, Sautéed Mushrooms

Dark chocolate hazelnut flourless cake with vanilla bean ice cream and fresh berries

March 25th Saturday, 11 – 2
I left my heart in San Francisco…
Olive oil tasting

Homemade herbed ricotta with lemon, Parmesan & blistered tomatoes served on sourdough crostini

San Franciscan style Cioppino with fresh seafood in a rich tomato white wine broth.

Blood orange olive oil cake with whipped Grand Manier marscapone


Leave a comment
Share
  • Pin it
  • Share
  • Tweet
  • Share
  • Email

Chicken Marsala for a Quick, Easy Weeknight Dinner

1 / 10 / 171 / 11 / 17

chicken-marsala


Chicken Marsala

Save
Print

There is a simple trick that you can do ahead of time to make life a little easier cooking during the week. Buy chicken cutlets*, place them between 2 sheets of plastic or parchment paper and pound to ¼” thickness. Stack them with parchment paper between each breast, freeze on a sheet pan separately then wrap in plastic and place the entire stack into a freezer bag. Now you can remove 1 or 2 or 4 when you get home from work and proceed with any recipe. The chicken breast (you can do this with pork tenderloin as well), will defrost almost immediately and you’ll have dinner on the table in ½ hour.

  • 1/3 cup flour plus more for mushrooms
  • Sea salt and pepper, to taste
  • Olive oil
  • 4 Chicken cutlets, pounded ¼” thick
  • 1 tablespoon unsalted butter
  • 6 ounces brown crimini mushrooms, sliced or quartered
  • 1 ½ tablespoon minced shallot
  • 2 teaspoons minced garlic
  • 1⁄2 cup chicken stock
  • 1⁄3 cup dry Marsala wine
  • 1 tablespoon lemon juice
  • 1 tablespoon lemon zest
  • 1 tablespoon Italian flat leafed parsley, minced

Season the flour with sea salt and pepper and dredge the chicken in the flour shaking off the excess.

Heat the slow cooker to sauté if you can or use a skillet, add enough oil to coat the bottom of the pan and lightly brown the chicken on both sides. Set aside.

If needed add a little more oil to the pan, just enough to coat the bottom and add the butter, when melted sauté the mushrooms until browned. Add the shallots and cook until translucent, add the garlic and stir briefly until it’s aromatic.

To finish on stove top:

Sprinkle the mushroom mixture with a little flour and cook, stirring until flour is incorporated and browned. Whisk in the chicken stock, Marsala wine and lemon juice, reduce until slightly thickened. Add the chicken back to the mixture and cook for about 2 minutes. Serve with chopped parsley and lemon zest over the chicken breasts.

*If you want to buy chicken breasts or cut from a whole chicken just butterfly them before pounding.

Leave a comment
Share
  • Pin it
  • Share
  • Tweet
  • Share
  • Email

Christmas Roast

12 / 6 / 16

A Christmas Roast, Dec. 2016

rib-roast

After the huge cooking spree for Thanksgiving I’m happy to create a simple elegant meal for Christmas and I always turn to a rib roast. Most people refer to them as a ‘prime rib’ yet that really refers to the grade of meat. While USDA Prime Grade is the best, it can also be on the expensive side, while a good ‘Choice’ grade is nearly as good as the prime, it can be purchased for much less. Both roasts are considered ‘standing rib roast’ and you treat them equally in cooking.

Costco has the absolute best deal on both Choice and Prime Grade roasts, choose bone in for the best flavor and juiciness. Either roast will need to cook a little longer with the bone in but the flavor is superior. A trick you can do is cut the bones off the roast and tie them back onto the roast, you’ll still get juicy flavor but won’t need to roast quite as long.

The roast will take some time to come to room temperature so remove from the refrigerator 3 house before roasting. Pre heat your oven for 30 minutes and roast for approximately 15 – 20 minutes per pound, start with a high heat, 450°, for 15 minutes, then turn the oven down to 325° and continue cooking. Use a digital probe thermometer for best results, it’s worth spending $15 or $20 on a digital thermometer for a $75.00 roast.

For rare roast remove from the oven when the thermometer reaches 120°, for medium rare, 125° or 130° for medium, the meat will continue to cook (called carry over cooking time) while it rests. I like to serve the roast with a Red Wine Sauce or Bordelaise Sauce but remember that your sauce will only be as good as the beef stock you use so use the best. Homemade is tops but if you must purchase a stock try More Than Gourmet Glace de Veau (veal stock). Standing rib roasts are great on the grill also but that’s another story.


Photo: Josh, The Meatwave

Prime Rib or Standing Rib Roast

Save
Print

Serves 8
Total preparation time: 1 hr. 30 min. – 2 hr.

  • 1 (7 lb.) Rib Roast, Bone-In or Boned & Tied
  • 2 tablespoons unsalted butter
  • 1 clove garlic, minced – optional use 1 teaspoon ground garlic (NOT garlic salt)
  • Sea Salt and ground pepper

Place roast in a shallow baking pan bone down, melt butter in small saucepan and add garlic and salt and pepper. Mix well, brush over roast, and let stand at room temperature for 2 hours.

Preheat oven to 450°F. Use a probe meat thermometer*, placed into the center of the roast but not touching bone. Roast for 10 minutes in uncovered pan, then reduce heat to 350°F and continue for 1 hour and 20 minutes for rare. Baste with pan drippings from time to time. Thermometer should read 120° - 125° for rare, 130° - 135° for medium rare. Do not cook beyond 140°, medium. Let the roast stand for 15 minutes, with the probe in the meat, before slicing. Slice either between the bones or cut off all the bones at once and the slice the meat into serving pieces.

Roast 15 minutes more if you want a medium roast, another 15 minutes for well done.

Remove from oven when done, and allow the meat to rest for a few minutes before carving. Transfer to a warmed serving platter.

• A digital probe meat thermometer – the probe remains in the meat while in the oven and the control sits outside on the stove or counter. See link below

Bordelaise Sauce

Save
Print
  • 3 tablespoons butter
  • 1 onion, chopped
  • 2 carrots, sliced in rounds
  • 2 cloves garlic, cut in half
  • 4 peppercorns
  • 1 bay leaf
  • 11/4 cups beef broth*
  • 1 sprig thyme
  • Sea Salt
  • 2 tablespoons flour
  • 1/2 cup dry red wine
  • 1 tablespoon Italian flat leaf parsley, chopped

Melt the butter in a heavy skillet and sauté the onion until transparent. Add the carrots and cook until soft.

Place garlic, peppercorns, and bay leaf in cheesecloth bag. Add to pan along with 1 cup of beef broth. Boil until broth has been slightly reduced, about 10 minutes, then season with thyme and salt.

Remove cheesecloth bag and put mixture through a coarse strainer. Return to pan.

Meanwhile, dissolve flour in the other 1/4 cup of broth and add gradually to sauce. Stir constantly until sauce thickens, then add the wine. Reduce heat and allow to simmer until ready to serve, and then sprinkle chopped parsley on top.

Use a quality beef broth if not making your own such as More Than Gourmet Glace de Veau (veal stock).

Related Posts Plugin for WordPress, Blogger...
Leave a comment
Share
  • Pin it
  • Share
  • Tweet
  • Share
  • Email

Posts navigation

Previous Page 1 2 3 4 5 6 Next Page
Deb

Meet Chef Debbi

READ BIO

Join-Us Sign up for our newsletter to receive exclusive tips 'n tricks, and special offers on classes, tours, and more!

Recent Posts

  • New E-Book!
  • From the Pantry
  • Spaghettini at Home
  • Growing Corn
  • Spring IS Coming!

Categories

BookCUT

What's in Your Pantry?

How to stock your pantry to create delicious dishes.

Learn Chef Debbi's pantry essentials and how to substitute ingredients for pantry staples in her basic recipes for quick and easy meals.
BUY BOOK>

FacebookTwitterInstagramGooglepinterest


© 2014, DEB'S KITCHEN
Angie Makes Feminine WordPress Themes