Deb's Kitchen - Farm, Food, Wine & Lifestyle Adventures
  • Facebook
  • Google
  • Twitter
  • Instagram
  • Pinterest
  • Email
Menu
Skip to content
  • Home
  • Blog
  • Events
    • Classes
    • Tours & Adventures
  • Edible Gardening
  • Preserving
  • Recipes
    • Appetizers
    • Soups and Salads
    • Main Dishes
    • Side Dishes
    • Desserts
  • About
    • Whats In Your Pantry
    • Ask Debbi
    • Deb’s Kitchen Botanicals
    • Press
  • Contact

Category Archives: Appetizers

Summetime Cooking

6 / 1 / 18


Easy Chicken Chilaquiles

Save
Print
  • 1 ½ cups roasted chicken, shredded
  • 1 1/2 cups red or green salsa
  • 3/4 cup chicken broth
  • 1/2 cup sour cream
  • 1 bag tortilla chips
  • 1/4 cup chopped cilantro
  • 2 cups shredded cheese, any cheddar-jack blend or Mexican crumbled cheese
  • 1 large Ca. Hass avocado, sliced
  • ½ cup sliced jalapenos, optional

Preheat your oven to 350°.

Combine the salsa and chicken stock into a large saucepan and bring to a simmer. Add the chicken and cook for 10 minutes over low. Remove from heat and add the sour cream and cilantro, stir to blend.

In a 9 x 12 baking dish, layer half of the chips and top with half the chicken mixture, and top with half the cheese. Repeat layer with remaining ingredients and bake for about 30 minutes or until all hot and gooey! Top with avocado slices and jalapenos if using.

Leave a comment
Share
  • Pin it
  • Share
  • Tweet
  • Share
  • Email

Bacon Wrapped Dates

1 / 23 / 18

Bacon Wrapped Stuffed Dates with Maple Glazed Walnuts and Boursin Cheese

Save
Print

Easy to make ahead of time and bake off at the last minute, make extra they go fast!

  • Maple Glazed Walnuts
  • ½ cup maple syrup
  • 1/8 teaspoon sea salt
  • 2 cups walnut halves
  • For the Dates
  • 1 package of dried Medjool Dates, 16 oz.
  • 1 12 oz. package of bacon, slices cut in half widthwise
  • 4 oz. package of Boursin cheese

Preheat the oven to 350° and line a baking sheet with parchment paper.

Mix the maple syrup and salt together, add the walnuts and stir until coated.

Spread the nuts on the baking sheet and bake for 12 - 15 minutes or until the glaze is bubbly and coats the walnuts well. Remove from oven and let cool.

Turn the oven up to 425° and line a baking sheet with a new piece of parchment paper.

Slice dates lengthwise and remove pits.

Scoop a small amount of Boursin cheese with a spoon and fill the date with the cheese, press a glazed nut into the cheese.

Wrap dates with a slice of bacon, and secure with a toothpick to hold bacon onto date. Place the dates on the parchment on their side and bake for about 7-8 minutes or until browned on the bottom and turn to the other side continue to cook for another 7-8 minutes or until the bacon is cooked and a little crispy, and the cheese is slightly melted.

Let cool and serve warm or at room temperature.

Photo: La Tienda

Leave a comment
Share
  • Pin it
  • Share
  • Tweet
  • Share
  • Email

Roasted Red Pepper Dip

11 / 29 / 17

Cooking from the Pantry

Save
Print

An easy roasted red pepper dip for any occasion. Quick and easy to prepare; serve with pita bread, cocktail bread or any cracker.

  • 1 cup walnuts -- toasted
  • 1 slice Italian bread -- torn into pieces
  • 1 cup red peppers -- roasted
  • 2 tablespoons extra virgin olive oil
  • 2 tablespoons pomegranate molasses
  • 1 tablespoon tomato paste
  • 1 teaspoon kosher salt
  • 1 teaspoon ground cumin, or to taste
  • 1/2 teaspoon Aleppo pepper -- ground or Hungarian paprika
  • 1/2 teaspoon sugar -- optional
  • pita bread -- sliced into wedges

Place all ingredients into a food processor or blender and puree into a

smooth paste, stopping occasionally to scrape down the sides. Refrigerate

if not serving immediately. Let come to room temperature before serving.

Serve with pita wedges.

Leave a comment
Share
  • Pin it
  • Share
  • Tweet
  • Share
  • Email

December Cooking Demo

11 / 7 / 17


Last Class of the Year

Festive Family Dinner

Thursday December 7th

6:30 – 8:30, approximately

Menu

Artichoke Bruschetta

Tomato Bisque with Gruyere & French Ham Croutons

 Italian Roasted Beef in Barolo Wine Sauce

Balsamic Butternut Squash, Brussels Sprouts & Pecans

Stuffed Shells with Homemade Ricotta

Cranberry-Orange Olive Oil Cake

$45.00

For reservations call  Temecula Olive Oil, Seal Beach

(562) 296-5421

Sponsored by

Leave a comment
Share
  • Pin it
  • Share
  • Tweet
  • Share
  • Email

Hatch Chile & Potato Rajas

7 / 25 / 177 / 25 / 17


Hatch Chile & Potato Rajas

Save
Print
  • 1 large potato, peeled and cut into ½ inch dice, cooked
  • 2 tablespoons vegetable or canola oil
  • 1 small onion, cut into small strips
  • 4 mild Hatch chiles, roasted, peeled, seeded, and julienned *
  • ½ cup cream
  • ½ cup shredded Monterey Jack cheese
  • 12 corn tortillas

Heat a large sauté pan over medium heat. Add oil; add onions, season with salt and pepper and sauté until lightly browned.

Add chiles, and cream, bring to a boil and reduce to a simmer and cook 4 minutes.

Add cheese and potatoes, stirring occasionally, until just heated through. Remove from heat.

Wrap tortillas in plastic wrap or paper towel and heat in microwave on low until warm.

Leave a comment
Share
  • Pin it
  • Share
  • Tweet
  • Share
  • Email

Zucchini Blossom Quesadilla

6 / 26 / 17


 I first tasted these at The Santa Monica Farmers Market about 15 years ago when The Two Hot Tamale girls were doing a demo for their restaurant, Border Grill (now closed, sadly). It’s a perfect little snack for an early summer day, zucchini plants are going wild with flowers and are daring to be picked & stuffed. Make sure you pick all male blossoms rather than female blossoms or you won’t have any fruit. To tell the difference look at the bottom of the flower, you’ll see a round little nub or small zucchini attached, this is a female blossom….move on. The male blossoms are attached just by them stem with no nub at the bottom, you’ll be able to tell. Open the flowers gently as there may be a bee inside collecting pollen, he will fly away when you open the petals, be gentle. If you want to wash them use cool water and dry well but do this just before you’re ready to prepare the dish. Or you can buy them at your local farmers market, the blossoms are delicate and will last no more than a day so pick right before you’re going to make the quesadillas.

Squash Blossom Quesadilla

Save
Print
  • 4-6 squash blossoms, stems and stamens removed, chopped
  • 4 roasted red peppers, drained and chopped
  • 2 ears of corn, roasted, cut off the cob
  • 4 tablespoons cilantro, chopped
  • 1-2 cups Monterrey Jack cheese, grated
  • 8 flour tortillas
  • Salt and pepper to taste
  • Tomatillo Salsa
  • 1/2 pound tomatillos, husked, rinsed, and quartered

  • 1/2 - 1 jalapeño pepper, chopped
(depending on how much heat you want)
  • 1 clove garlic, peeled and chopped

  • 1/2 cup packed cilantro leaves

  • 1/2 teaspoon salt,
or more to taste,
  • squeeze of fresh lime juice

Mix together all ingredients together seasoning with salt and pepper, to taste.

Heat a grill pan or griddle, add 1 Tb. butter. Add a tortilla and cook it on one side until it puffs (about 30 seconds).

Flip tortilla over and sprinkle over entire surface 1/4 cup of squash blossom filling.

Top with another tortilla, and after cheese has melted and the two tortillas stick together (a couple of minutes), flip quesadilla and cook for a couple of minutes more.

Repeat for the remainder of the filling and tortillas.

For the Tomatillo Salsa

Place all ingredients in a blender or food processor and pulse to combine. Blend on low speed until a coarse puree is formed.

Pour into a bowl, taste and add more salt or lime if desired. Salsa can be thinned with a bit of water if desired.

2 Comments
Share
  • Pin it
  • Share
  • Tweet
  • Share
  • Email

Puff Pastry Tart

4 / 11 / 17

This recipe is great as a side dish, an appetizer or a light lunch with a salad. It’s easy to make, most of it can be done ahead of time and assembled just before baking. Be sure to use a quality puff pastry dough such as Dufour’s which is made with 100% butter and no preservatives. It’s a little more expensive but if you want real puff pastry, this is it. Be sure to keep the dough refrigerated and if it warms up a little while you are rolling it out, pop it back in the refrigerator until cold. It won’t puff correctly unless the dough is as cold as possible into a hot oven. Be creative and add some chopped (blanched) asparagus to this, it’s a perfect spring time recipe. Enjoy!

Leek and Goat Cheese Puff Pastry Tart

Save
Print
  • 1 cup baby leeks, sliced thin
  • 1 tablespoon unsalted butter
  • 2 tablespoons extra-virgin olive oil
  • Sea salt
  • 1 teaspoon finely chopped fresh thyme
  • 1 box (14 ounces) frozen puff pastry, such as Dufour, thawed
  • 1 large egg beaten with 1 tablespoon water
  • 1/4 cup Nicoise olives, pitted
  • 6 ounces goat cheese, room temperature

Rinse leeks well, and drain; set aside.

Melt butter with oil in a medium sauté pan over medium heat. Add leeks and sprinkle with salt; cook, stirring occasionally, 5 minutes, cook until translucent and soft, add thyme. Leeks can be refrigerated in an airtight container up to 1 day; bring to room temperature before assembling tart.

Cut or roll out pastry to a 6-by-14-inch rectangle; place on a parchment-lined baking sheet (reserve remaining pastry for another use). Score a 3/4-inch border. Brush with egg wash; sprinkle with Parmesan. Refrigerate 30 minutes.

Preheat oven to 375°. Bake pastry until light brown; remove from oven, and press center area with spatula. Using an offset spatula or a spoon, smear the pastry with the cheese within the border, add leeks and olives, and bake until crust is golden brown, about 10 minutes. If bottom is soft, bake 3 to 5 minutes more.

Remove tart from oven place tart onto a wire rack; let cool slightly. Cut into pieces; serve warm or at room temperature (tart can stand at room temperature up to 1 hour).

Olive Magazine Photo

Leave a comment
Share
  • Pin it
  • Share
  • Tweet
  • Share
  • Email

Grilled Pizza

7 / 6 / 167 / 6 / 16

Pizza on the grill 1

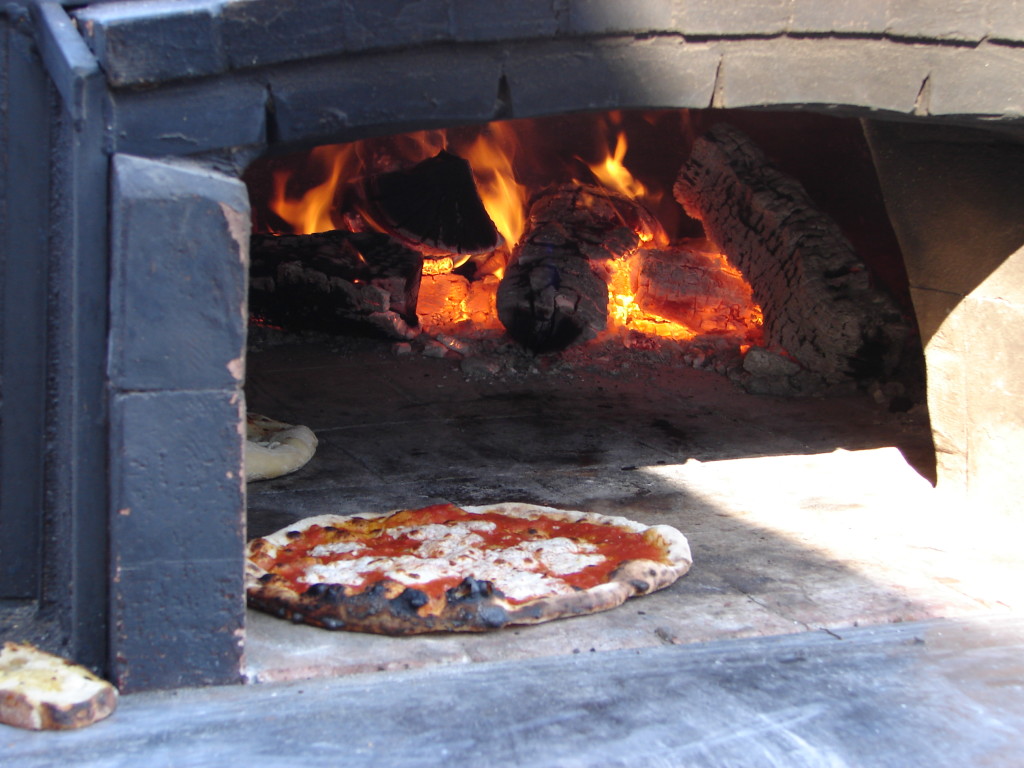
I love pizza on the grill! The first time I cooked pizza on the grill I was worried the dough would slip through the grates but it doesn’t! The grill is a perfect tool for a backyard dinner, the house stays nice and cool and you can relax with a cold drink while your pizza cooks. First you have to heat your grill to it’s hottest! Pizza likes a good 500° – 600° oven to produce a great crust.

Buy or make your crust in the morning so it’s ready to go when you are. Prep your ingredients ahead of time. Grate or slice the cheese, pepperoni or salami, slice the mushrooms (store in a small bowl with a slightly damp paper towel over them), cut or tear your herbs such as basil, thyme and/or make a pesto for your pizza. Be creative and be organized.

Once your grill is at its hottest, roll out your dough on a lightly floured surface (or if you’re into hands on-flour your hands and stretch the dough out into any shape you like). Put your dough on a pizza peel that has been lightly dusted with flour or cornmeal, make sure the dough slides around on the peel so that when you put it on the grill it will slide off easily.

Brush your grill with oil and slide the dough onto that spot. Turn down the burners if you’re using a gas grill.* Grill for 2-3 minutes or until lightly charred. Turn your pizza over, brush the cooked side with a little olive oil if you like, add your sauce and any of the toppings you’ve chosen. Close the grill lid and let the pizza cook until the bottom is nicely charred and your toppings have melted and cooked. Remove from the grill with the pizza peel, let sit for a minute or two before slicing. Enjoy with a cold beer and tossed salad! That’s how to beat the heat at my house. Have a great summer!

*If using a grill with charcoal or wood you’ll want to make a direct heat side and an indirect heat side. You’ll be cooking the pizza on the indirect side.

Here’s the recipe

No Knead Pizza Dough

Save
Print

This is Jim Lahey’s no knead recipe for pizza dough, it’s easy and so much better than store bough pizza dough. The hardest part is to remember to make it ahead of time. You can store the dough up to 3 days in the refrigerator so it’s easy to plan ahead. This recipe makes 4 balls of dough (4 pizza’s). Jim likes to weigh all the ingredients and in reality you do get a much better and more consistent product but if you insist on measuring, I’ve included his instructions for that also.

  • 500 grams all-purpose flour, 17 ½ ounces or 3 ¾ cup, plus a little extra for shaping
  • 1 gram active dry yeast, ¼ teaspoon
  • 16 grams fine sea salt, 2 teaspoons
  • 350 grams water, 1 ½ cups

In a medium bowl, thoroughly blend the flour, yeast, and salt. Add the water and, with a wooden spoon or your hands, mix thoroughly.

Cover the bowl with plastic wrap or a kitchen towel and allow it to rise at room temperature for 18 hours or until more than doubled. It will take longer in a cook room and less time in a warm one.

Flour a work surface and scrape the dough out of the bowl, divide into 4 equal parts and shape them.

For each portion, start with the right side of the dough and pull it toward the center, then do the same with the left, then the top, then the bottom. (The order doesn't actually matter; what you want is four folds.) Shape each portion into a round and turn seam side down. Mold the dough into a neat circular mound. The mounds should not be sticky; if they are, dust with more flour.

If you don't intend to use the dough right away, wrap the balls individually in plastic and refrigerate for up to 3 days. Return to room temperature by leaving them out on the counter, covered in a damp cloth, for 2 to 3 hours before needed.

Leave a comment
Share
  • Pin it
  • Share
  • Tweet
  • Share
  • Email

Tomato Confit

6 / 11 / 166 / 12 / 16

Is your garden overflowing with tomatoes? I always grow too many and one of my favorite ways to make them go a little farther is to oven dry them. Much like sun dried, these concentrated gems pack a powerful punch and can be used in any dish where you’d use tomatoes. Especially nice on a cheese plate with some creamy goat cheese nearby.

tomatoconfit-chez pim 2006


To preserve them I turn them into a tomato confit and keep in my ‘pantry’ refrigerator. They can’t be water bath canned because of the oil, but they will keep for about 6 months in the refrigerator, if they last that long. The refrigeration will also help to preserve the oil and keep it from going rancid quicker. Use only fresh organic herbs and make sure you wash and dry them very well, you don’t want any water going into your beautiful confit.

Mangia (Eat!)

Save
Print
  • 1 pound tomatoes, cut in half lengthwise
  • Sea salt and freshly ground black pepper
  • 1/4 cup olive oil, approximately
  • 1 tablespoon basil, chiffonade
  • 2 teaspoon fresh thyme
  • 1 clove garlic -- minced

Preheat the oven to 350°.

Arrange the tomato halves cut side up and close together on a baking sheet, season with salt and pepper.

In a bowl, combine olive oil, garlic, and herbs. Drizzle over tomatoes and bake until the tomatoes are soft and shriveled but still retain some moisture, 1-2 hours or more.

Let cool completely. Tomatoes can be stored in a glass jar, cover tomatoes with olive oil, add a fresh sprig of thyme, seal and refrigerate.

Photo: Chez Pim

Leave a comment
Share
  • Pin it
  • Share
  • Tweet
  • Share
  • Email

Grilled Artichokes

6 / 2 / 16

Grilled Artichoke


Save
Print
  • 2 large artichokes
  • 1-2 lemons
  • Sea salt and pepper

Place a steamer basket into a large pot, fill with water to just above steamer bed, bring to a boil while you prepare the artichokes.

Cut about 1” – 2” off the top of the artichokes with a serrated knife. Trim the stem to the desired length. Pull off any of the smaller leaves near the bottom and take a pair of kitchen shears to cut the prickly edge off the remaining leaves. Cut the artichoke in half lengthwise, rub the artichoke with a cut lemon, add the lemon juice and rind to the pot of boiling water and place the artichokes in the steamer. Cook for 30 minutes, remove the artichokes and let cool. Remove the choke with a spoon and set the artichoke halves into a large bowl. Toss the artichokes with olive oil and season with a little sea salt and pepper.

Heat your grill to medium-high heat and grill artichokes until slightly charred, turning occasionally, about 8 minutes. Serve with Walt's Wharf dipping sauce.

Walt’s Wharf Dipping Sauce

Leave a comment
Share
  • Pin it
  • Share
  • Tweet
  • Share
  • Email

Easy Chicken Chilaquiles

5 / 3 / 16

chicken chilaquiles


Save
Print
  • 1 ½ cups roasted chicken, shredded
  • 1 1/2 cups red or green salsa
  • 3/4 cup chicken broth
  • 1/2 cup sour cream
  • 1 bag tortilla chips
  • 1/4 cup chopped cilantro
  • 2 cups shredded cheese, any cheddar-jack blend or Mexican crumbled cheese
  • 1 large Ca. Hass avocado, sliced
  • ½ cup sliced jalapenos, optional

Preheat your oven to 350°.

Combine the salsa and chicken stock into a large saucepan and bring to a simmer. Add the chicken and cook for 10 minutes over low. Remove from heat and add the sour cream and cilantro, stir to blend.

In a 9 x 12 baking dish, layer half of the chips and top with half the chicken mixture, and top with half the cheese. Repeat layer with remaining ingredients and bake for about 30 minutes or until all hot and gooey! Top with avocado slices and jalapeños if using.

Leave a comment
Share
  • Pin it
  • Share
  • Tweet
  • Share
  • Email

Easy Pizza Margherita

2 / 2 / 162 / 2 / 16

Pasolivo Pizza


Pizza, Flatbread & Calzone

Save
Print

Makes 2 flatbreads

*Stir the flour with a table knife to lighten the flour; it becomes compacted as it rests. Dip your measuring cup into the flour and use the knife to sweep the excess flour off the top of the cup. According to King Arthur Flour it should weigh 4 ¼ ounces.
Dough recipe adapted from ‘Artisan Bread in 5 Minutes a Day’

Sauce recipe will yield 2 cups and hold for several days. Adapted from Sunset Magazine

  • 1 ½ cups lukewarm water
  • 1 packet granulated yeast, 2 ¼ teaspoons
  • ½ teaspoon sea salt
  • 3 ¼ cups King Arthur unbleached white flour, measured with the scoop and sweep method*
  • Sauce:
  • 2 tablespoons olive oil
  • ½ small onion, chopped
  • 2 small cloves garlic, minced
  • 1 pound fresh tomatoes, quartered or 1 lg. can whole or crushed tomatoes
  • 1 small can tomato paste
  • 2 teaspoons dried oregano
  • 1 teaspoon dried thyme
  • 1 granulated sugar or more as needed
  • 2 tablespoons chopped fresh basil
  • Sea Salt and fresh pepper, to taste
  • Pinch crushed red pepper flakes (optional)
  • Pizza Margherita Topping
  • Sauce
  • Mozzarella, torn into pieces
  • Fresh basil, torn into pieces

Dough: (Make at least 1 day up to 5 days ahead of time)

The water should be warm to the touch but not more than 110°, and add the yeast to the water.

Add salt to the flour and whisk to distribute using a large bowl or a plastic food container with lid. Add the water to the flour all at once and mix with a wooden spoon or wet hands, the dough will be sticky. No kneading is necessary.

Loosely cover with lid and let stand at room temperature approximately 2 hrs. The dough can rise longer, up to 5 hours without affecting the results. The dough is easier to handle if you can make it the night before and refrigerate overnight.

Working on a lightly floured surface, pinch off a palm sized piece of dough, shape into a round, rectangular or square shape. Dough is sticky so keep some extra flour nearby, dust your hands as necessary to shape the dough. If the dough starts to snap back you should let it rest for a few minutes and then resume shaping. I use a rolling pin to thin the dough out to my desired style

Place onto parchment paper, a dusted pizza peel or the bottom of a dusted baking sheet. You can use anything you want providing the pizza can slip right off onto the rack.

If you are baking in an oven, preheat your oven to 500° or as high as it will go. Top the dough with anything you like, slid it into the hot oven and bake for 12-14 minutes.

Sauce:

Heat a deep saucepan big enough to hold all the ingredients, add the oil and onions and sauté until translucent. Add the garlic and stir briefly.

Place all the ingredients along with the garlic and onions into a blender, or use an immersion blender and puree.

Ladle or spoon onto pizza dough leaving an clean edge around the outside of the dough. Sprinkle or place the cheese on top and bake on a hot pizza stone for about 6-8 minutes, checking frequently. Sprinkle with fresh basil and let rest for a minute or two before slicing. Mangia!

Related Posts Plugin for WordPress, Blogger...
Leave a comment
Share
  • Pin it
  • Share
  • Tweet
  • Share
  • Email

Posts navigation

Previous Page 1 2 3 Next Page
Deb

Meet Chef Debbi

READ BIO

Join-Us Sign up for our newsletter to receive exclusive tips 'n tricks, and special offers on classes, tours, and more!

Recent Posts

  • New E-Book!
  • From the Pantry
  • Spaghettini at Home
  • Growing Corn
  • Spring IS Coming!

Categories

BookCUT

What's in Your Pantry?

How to stock your pantry to create delicious dishes.

Learn Chef Debbi's pantry essentials and how to substitute ingredients for pantry staples in her basic recipes for quick and easy meals.
BUY BOOK>

FacebookTwitterInstagramGooglepinterest


© 2014, DEB'S KITCHEN
Angie Makes Feminine WordPress Themes