Deb's Kitchen - Farm, Food, Wine & Lifestyle Adventures
  • Facebook
  • Google
  • Twitter
  • Instagram
  • Pinterest
  • Email
Menu
Skip to content
  • Home
  • Blog
  • Events
    • Classes
    • Tours & Adventures
  • Edible Gardening
  • Preserving
  • Recipes
    • Appetizers
    • Soups and Salads
    • Main Dishes
    • Side Dishes
    • Desserts
  • About
    • Whats In Your Pantry
    • Ask Debbi
    • Deb’s Kitchen Botanicals
    • Press
  • Contact

Category Archives: Food

Growing Corn

5 / 26 / 23

It’s time to start late spring and summer flowers & veggie’s


Photo: Farmers Almanac


Corn can be fickle, it likes warm weather and the bugs and four-legged critters may eat all of yours before you can get to it. Native Americans planted corn with beans and once the beans sprout they planted squash at the base of the corn. The beans will use the corn stalk as a trellis and the squash leaves will protect the base of the corn which grows very shallow. This is called The Three Sisters or Companion Planting.
Plant corn directly in the garden where it will receive at least 6 hours of sun, water well and help the pollen to reach the tassels. Each tassel that gets pollinated turns into a kernel. To make sure the plant is getting pollinated, shake the tassels so the pollen falls onto them, nature will take it from there. 
The ears are ready to harvest when the silks turn from light yellow to dark brown.

To cook, grill, steam or pop in the microwave. Leave the husk on the corn if you microwave and cook on high for 3 minutes (for two ears), add an extra minute with more ears. Let them slightly cool and peel the husk and silk off the corn.

NOW Booking for Vegetable & Flower Garden consult & Design

[email protected]
Leave a comment
Share
  • Pin it
  • Share
  • Tweet
  • Share
  • Email

Hatch Chile Roast

8 / 1 / 218 / 1 / 21

Hatch Chile Time!

 
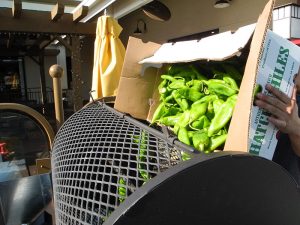
New Mexico Hatch Chiles are here in Southern California and we’ve been waiting all year to replenish our supplies! These chiles are only here for a short month or so before being gone again until next season. A favorite Southwestern chile, the Hatch chiles are grown in Hatch, New Mexico where everyone celebrates their harvest. Roasters are going hot on every street corner and people are buying them by the case. 
 
Here in So. California, Melissa’s Produce brings us these gorgeous chiles in mild and hot, buy both! Melissa’s has teamed up with several local grocery stores to provide roasting your chiles by the case. Click on the Hatch Chile Roasting link and it will take you to a list of roastings by Melissa’s Produce.
 
Try Hatch Chile’s in all your dishes, from omelets to soups, stews, Chile Verde and even maybe a Hatch Chile Sorbet, mmmmm. Click here for one of my favorite recipes.The list is endless! 
Click here for local Hatch Chile Roasting with Melissa’s Produce
Leave a comment
Share
  • Pin it
  • Share
  • Tweet
  • Share
  • Email

The Mushroom Farm Tour

7 / 2 / 217 / 2 / 21

We are all scheduled for our first local farm tour for 2021! Join us for farm, food & fun.

No transportation is provided, we suggest carpooling as much as possible. Please wear sturdy, flat shoes, this is a real farm and perhaps carry a hat just in case, Sept. can be warm if we’re out in the sun at all.


Guest Count


Leave a comment
Share
  • Pin it
  • Share
  • Tweet
  • Share
  • Email

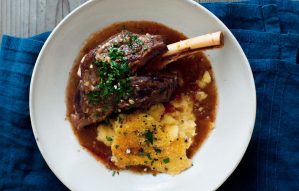
Braised Lamb, Veal or Beef Shanks

4 / 2 / 21

Warm, hearty shanks usually like a long cook in the oven, these are done in an Instant Pot or pressure cooker and take only a few hours. Sauté the shanks and the vegetables and then set the timer, take a nap or have a glass of wine and relax, let the cooker work its magic. A great dish for any special occasion or holiday.


Braised Lamb, Veal or Beef Shanks

Save
Print
  • 5 sprigs of fresh thyme
  • 2 dried bay leaves
  • 4 lamb, veal or beef shanks (make sure they will fit into your pot or have the butcher cut them for
  • you
  • Sea salt and fresh ground pepper
  • 2 - 3 tablespoons sunflower or olive oil
  • 1 medium onion, about the size of your palm cup onion, finely diced
  • 1 garlic clove, minced
  • 3 large stalks celery, finely diced
  • 2 medium carrots finely diced
  • 2 ½ cup dry red wine
  • 2 cups chicken stock
  • 1 large can crushed or peeled and chopped tomatoes
  • 2 tablespoons tomato paste

Place the thyme and bay leaves into a piece of cheesecloth, close by tying the ends of the cheesecloth together. This is your bouquet garni. Set aside.

Set your Instant Pot to sauté and add a little sunflower or olive oil.

Dry the shanks with a cloth or paper towels, season with salt and pepper.

Brown the shanks on all sides, then set aside. Add the onion, garlic, celery and carrots and sauté until the onions start to turn translucent. Add wine, stock tomatoes, tomato paste and bouquet garni. Stir well, snug the shanks into the liquid until they are completely or nearly covered with liquid.

Close and set the vent to seal. Set the Instant Pot to Manual pressure cook high for 50 minutes. Let the pot naturally release pressure, 20 min. or so.

Remove the shanks and set them aside on a plate and keep warm by covering with foil.

Strain the liquid squeezing out as much liquid as possible. Measure liquid and for each cup of liquid, make gravy in the Instant Pot using the following method.

Per 1 cup of liquid:

1 ½ tablespoons of butter or olive oil

1 ½ tablespoons all-purpose flour

Melt butter or oil in the pot on sauté, whisk in flour and let cook, while continuing to whisk until the flour turns slightly browned.

Remove as much fat from the cooking liquid as possible; slowly add the liquid into the flour mixture while whisking. As the liquid begins to thicken add more liquid and whisk until the gravy is thick, taste and season with salt and pepper. If gravy is too thick, add a little stock or water until it’s the consistency you like, it should be on the thinner side for this dish.

Serve atop a good helping of mashed potatoes or polenta.

If you’d like to serve the cooking vegetables, remove bouquet garni and stir the vegetables into the gravy.

Leave a comment
Share
  • Pin it
  • Share
  • Tweet
  • Share
  • Email

Citrus Season!

1 / 19 / 21


Nutritious and healthy we all know that citrus fruits are high in vitamin c which helps your immune system; they are loaded in plant compounds that have various health benefits, including anti-inflammatory and antioxidant effects. They contain B vitamins, potassium, phosphorous, magnesium and copper as well. A versatile fruit they can be made into jams, jellies, drinks and savory or sweet dishes or just eaten out of hand. Try this Roasted Chicken with Lemon and Herbs along with Melissa’s Dutch Yellow Potatoes for a tasty, comforting dinner.

Lemon Herb Roasted Chicken With Dutch Yellow Potatoes®

Save
Print
  • 1 Meyer lemon, zested and juiced
  • 2 tablespoons unsalted butter, softened
  • ½ teaspoon minced fresh thyme
  • Sea Salt and freshly ground pepper
  • 1 large onion, rough chopped
  • 2 small carrots, rough chopped
  • 1 stalk celery, rough chopped
  • 4 sprigs Italian flat leafed parsley
  • 1 bag Melissa’s Dutch Yellow Potatoes®, cut in half
  • ½ cup chicken stock

Preheat the oven to 425° and place the rack in the lower third of the oven.

Mince the lemon zest and mix with the butter and minced thyme.

Rinse and pat the chicken dry. Slide half of the butter mixture under the skin and the rest over the chicken, season with salt and pepper.

Scatter the onion, carrots, celery and parsley over the middle of a roasting pan*. Place the chicken on top of the vegetables and place the potatoes around the chicken.

Roast for approximately 50 minutes, using a probe type or instant read thermometer placed into the thigh and it should read 165° - 175°. Let the chicken rest in the pan for 15 minutes. Remove to a cutting board, remove vegetables from pan and place the pan over a medium high heat. Add the stock and scrape any bits from the bottom of the pan, reduce the liquid to about ½ and serve along with the chicken.

Use a roasting pan with no more than 2” sides

Leave a comment
Share
  • Pin it
  • Share
  • Tweet
  • Share
  • Email

Late Summer/Early Fall Menu’s

9 / 21 / 20

While it’s still pretty hot out in So. California it’s hard to go into the kitchen to cook. Here are some light recipes that are quick and easy to prepare. Mangia!

Spinach Salad, Traditional

Save
Print

Serves 2

  • 6 ounces baby spinach, washed and dried well
  • 1/4 small or medium shallot, minced
  • 2 pieces thick-sliced bacon, finely diced
  • ¼ cup Champagne Vinegar, or Red Wine Vinegar
  • 1/2 teaspoon smooth Dijon mustard
  • Sea salt and freshly ground black pepper, to taste
  • 4 large white mushrooms, thinly sliced
  • 2 large egg, hard-boiled, chilled, peeled and thinly sliced

Remove any stems from the spinach and place in a salad serving bowl.

In a heated sauté pan add bacon and cook until crisp, drain on paper towels. Remove all but 2 Tb. of bacon grease and add vinegar, whisk in Dijon mustard and taste for seasoning. Pour over salad and toss quickly, scatter with mushrooms and eggs.

Serve while still warm.

Roasted Tomato & Goat Cheese Flatbread with Artichoke Pesto

Save
Print
  • 1 jar artichoke hearts, 12 oz., drained
  • 1 cup walnuts, toasted
  • 1/4 cup grated Parmesan cheese
  • 2 cloves garlic, peeled
  • 1/3 cup lemon juice, to taste
  • 1/2 cup olive oil, to taste
  • 1/4 cup minced fresh parsley
  • Salt and pepper, to taste
  • 1 pizza dough
  • 1 large heirloom tomatoes or ½ basket cherry tomatoes, cut in half
  • 4 ounces soft goat cheese

Drain the artichoke hearts. If they are marinated in oil, you can omit draining the hearts and adjust the oil measure downwards appropriately.

Add the artichoke to the food processor with the nuts, cheese, and garlic and pulse until you have a paste. Add in the lemon juice and with the motor running, drizzle in the olive oil. Scrape down the sides of the processor as needed and pulse until you have a uniform paste-like consistency.

Taste and season with salt, pepper, oil, and lemon juice to taste.

Heat oven to 450°. Roll pizza dough out to desired shape, place onto parchment lined baking pan. Brush 1” of the edge of the pizza dough with olive oil, spoon on the artichoke dip to the remaining dough, top with tomatoes, goat cheese and bake for 12 – 15 minutes.

Spinach Bacon Cheese Puffs

Save
Print

Baked pastry puffs stuffed with a cream cheese, feta, bacon and spinach filling. These are great appetizers that you can put together ahead of time and bake off as needed.

Yield: 10 puffs

  • 4 ounces cream cheese, softened
  • 1 large egg
  • 1 tablespoon olive oil
  • 1/2 teaspoon dried dill
  • 2 packed cups chopped fresh spinach
  • 3/4 cup crumbled feta
  • 3 slices crispy cooked bacon, crumbled
  • Sea salt and fresh ground black pepper
  • 1 sheet frozen puff pastry, thawed and cut into 10 squares (cut on a floured board), Keep the pastry cold until ready to use.
  • 1 tablespoon butter, melted

Preheat oven to 400°. Grease round or square muffin pan.

Place the cream cheese into a food processor, add egg, oil and dill and pulse until combined.

In a separate bowl mix the spinach, feta and bacon. Pour the cream cheese mixture over top, season it with salt and pepper and stir until combined.

Line the muffin pan with the pastry squares, stretching them out a little if needed; press them into the bottom of the cups. Divide the spinach among the cups as evenly as possible. Bring the 4 points together over the filling and press them together.

Lightly brush with the melted butter.

Bake about 25 minute until golden brown and puffy. Allow to cool in pan on wire rack 10 minutes then run a knife around the edges to loosen them and help pop them out.

Bird's Nest Pesto With Stuffed Tomatoes

Save
Print
  • Pesto
  • 1/2 cup pine nut -- lightly toasted; plus, some for garnish
  • 1 clove garlic -- peeled
  • 2 cups basil leaf -- loosely packed
  • 1/2 cup Parmesan cheese -- grated
  • Salt and pepper
  • Tomatoes
  • 11 ounces goat cheese -- room temperature
  • 1/4 cup heavy cream
  • Salt and pepper
  • 6 small tomatoes -- plum
  • Olive oil
  • 1 pound spaghetti -- or angel hair pasta

Pesto

In a food processor, rough chop pine nuts and garlic. Add basil and process using pulse until the leaves start to break down. Add the cheese and blend until you have a rough paste. With machine running add olive oil to emulsify. Season with salt and pepper.

Preheat oven to 425° and put a pot of water on to boil for the pasta.

Mix the goat and Boursin cheese with enough cream to make it soft and spreadable. Season with salt and pepper.

Cut the tops off of the tomatoes and scoop out the insides. Lightly salt and place, cut side down, on paper towels to drain for 20 min. Spread a little pesto on the inside of the tomato and fill to the top with the goat cheese mixture. Place in a lightly oiled baking dish. Drizzle a little olive oil over each one and bake until they start to shrivel, and the cheese is lightly browned, about 20 min.

Cook the pasta until al dente, reserving about 1 cup of the cooking water.

Transfer to a large serving bowl and toss with the pesto, adding a bit of the pasta water if necessary, to loosen the pesto. Plate the pasta and add a tomato in the center. Top with a sprinkling of toasted pine nuts.

Sea Bass Provençal

Save
Print
  • Olive oil
  • 1 small leek, cut in half and then into half moons
  • 1 clove garlic
  • 1 small can whole tomatoes, drained and chopped or 2 large fresh garden tomatoes
  • ¼ cup dry white wine
  • 2 teaspoons fresh thyme
  • ¼ cup Greek olives, halved
  • 1 teaspoon capers, drained
  • 4 4 ounce Sea Bass fillets, or any white fish

Heat a medium sauté or saucepan. Add enough oil to coat the bottom of the pan, add onion and sauté until lightly translucent. Add garlic and stir for about a minute. Crush or squish tomatoes and add tomatoes and remaining ingredients except the fish then simmer about 10 minutes. Set aside and keep warm.

Heat a large sauté pan over medium heat; add enough oil to coat the bottom of the pan. When oil is hot carefully place dried fish fillets into oil, it should start to simmer right away. Cook about 3-4 minutes and turn carefully for another 4 minutes.

Serve with sauce.

French Apple Cake

Save
Print
  • 1 cup all-purpose flour, spooned into measuring cup and leveled-off
  • 1 teaspoon baking powder
  • 1/4 teaspoon salt
  • 1 stick (1/2 cup) unsalted butter, at room temperature
  • 2/3 cup granulated sugar, plus more for sprinkling over cake
  • 2 large eggs
  • 1 teaspoon vanilla extract
  • 3 tablespoons dark rum
  • 2 baking apples, peeled, cored and cut into 1/2-inch cubes (I like Honeycrisp, Fuji or Granny Smith)
  • Confectioners' sugar (optional), for decorating cake

Preheat the oven to 350°F. Grease a 9-inch springform or regular cake pan with butter or nonstick cooking spray. If using a regular cake pan, line the bottom of the pan with parchment paper and grease again.

In a small bowl, whisk together the flour, baking powder and salt.

Using a handheld mixer with beaters or a stand mixer with the paddle attachment, cream the butter and granulated sugar until light and fluffy, about 3 minutes. Add the eggs, one at a time, beating well and scraping down the sides of the bowl after each addition. Beat in the vanilla and rum. Don't worry if the batter looks grainy at this point; that's okay. Add the flour mixture and mix on low speed until just combined. Using a rubber spatula, fold in the chopped apples.

Scrape the batter into the prepared pan and even the top. Sprinkle evenly with 1 tablespoon of granulated sugar. Bake for about 40 minutes, or until the cake is golden and a toothpick inserted into the center comes out clean. Allow the cake to cool on a rack. Run a blunt knife around the edges of the cake. If using a springform pan, remove the sides. If using a regular cake pan, carefully invert the cake onto the rack, remove the parchment paper, then gently flip the cake over and place right-side-up on a platter. Using a fine sieve, dust with Confectioners' sugar (if using). Cake can be served warm or room temperature, plain or with lightly sweetened whipped cream or vanilla ice cream.

Freezer Friendly Instructions: The cake can be frozen for up to 3 months. After it is completely cooled, cover it tightly with aluminum foil or freezer wrap. Thaw overnight on the countertop before serving.


Leave a comment
Share
  • Pin it
  • Share
  • Tweet
  • Share
  • Email

Too Hot to Cook

8 / 21 / 20

I’m guessing you all noticed that summer finally arrived and so did the desire NOT to cook anything. Here are a few recipes to help you navigate through this heat wave, some recipes are no cooking at all but there are a couple using an Instant Pot or Pressure Cooker and a Slow Cooker. So, break out those appliances that are probably stashed away somewhere.

Antipasto Salad

Save
Print
  • For vinaigrette
  • 1/4 cup red-wine vinegar
  • 1 teaspoon dry mustard
  • 1 tablespoon basil, chopped
  • salt and pepper, to taste
  • 1/2 cup olive oil, approximately
  • For salad
  • 1 medium red onion, halved lengthwise and thinly sliced
  • 2 hearts romaine lettuce, torn into bite-size pieces
  • 1 jar roasted red peppers, drained and sliced
  • 1 jar marinated artichoke hearts, drained and quartered
  • 1 cup assorted brine-cured olives
  • 1 cup pepperoncini pepper
  • 1 pint cherry tomatoes, halved
  • 1/2 pound assorted Italian cold cuts, sliced or cubed

Make vinaigrette:

In a small bowl whisk together vinegar, mustard, basil, salt and pepper. Slowly add oil while whisking constantly to emulsify. If using right away, let sit at room temperature. Refrigerate after using but let come to room temperature before using.

Spoon dressed romaine onto a large plate and arrange with peppers, artichokes, olives, pepperoncini, tomatoes, onion and cold cuts.

Whisk vinaigrette again and drizzle over salad. Serve with some crusty bread and butter.

Gazpacho

Save
Print

Serves 2-4

  • 1 small red onion
  • 2 small cucumbers
  • 2 ribs celery
  • 1 small jalapeno, optional
  • 1 roasted red bell pepper
  • 6 medium tomatoes
  • 1 cup French bread, cut into cubes and soaked in a little water
  • 1/4 cup red wine vinegar
  • 1/4 cup olive oil
  • Sea salt and freshly ground pepper
  • 1 lemon, zested
  • 1 Tablespoon lemon juice, to taste
  • 1 teaspoon Worcestershire sauce
  • ½ Hass avocado, chopped
  • ½ pound cooked, cold shrimp, optional

Rough chop the vegetables and add to a blender, for a chunkier texture process in a food processor instead of a blender.

Squeeze the water from the French bread cubes and add to a blender along with the vegetables. Add olive oil and vinegar and blend to a puree. Season with salt, pepper (if needed), lemon juice, zest and Worcestershire sauce. Refrigerate over night for best flavor.

To serve, check for seasoning again before pouring into a bowl. Garnish the top of the soup with the chopped avocado and shrimp if using.

Goes very well with a nicely toasted slice of cheesy garlic bread.

Italian Chicken Wrap

Save
Print
  • 1 extra-large tortilla flatbread or lavash bread
  • 2 tablespoons roasted red peppers, sliced
  • 5-6 slices cooked chicken breast about 3 ounces
  • Handful of arugula or spinach
  • 2 slices provolone cheese
  • 3-4 thin slices of tomato
  • 2 tablespoons artichoke bruschetta or marinated artichoke hearts
  • 10 sliced kalamata or black olives
  • Sliced red onion
  • Balsamic glaze

Lay the tortilla or flatbread on a flat surface. Starting on the edge closest to you, layer a stripe of red pepper about 1/2 inch inside the outer edge. Place the chicken slightly overlapping the peppers, add a strip of arugula, provolone cheese and tomato. Top with the artichoke bruschetta then olives, sliced red onion and drizzle lightly with the balsamic glaze.

Starting from the edge closest to you, fold the portion of the tortilla with the red pepper and chicken into itself, and fold the outer edges of the sides inward, then continue to tightly roll and wrap the sandwich. Slice the wrap in half and serve or cut the halves into even portions to serve as pinwheels. Make the day before or refrigerate for 2-3 days.

Cuban Sandwich

Save
Print

Makes 4 Cuban sandwiches

  • 1 loaf Cuban bread
  • 3 tablespoons butter
  • yellow mustard
  • 1 pound ham
  • 1 pound roasted pork
  • 1/2 pound Swiss cheese
  • dill pickles

Preheat a pancake griddle or large fry pan to medium hot.

Cut the bread into sections about 8 inches long. Cut these in half and generously spread butter & mustard on both halves (inside.)

Make each Cuban sandwich (Cubano) with the ingredients in this order: pickles, roasted pork, ham, and cheese. Be generous!

Spread a little butter on the hot griddle or fry pan and place the Cubano sandwich on the pan. Use a heavy skillet, bacon press, or foil-wrapped brick to flatten the sandwich. (You really want to smash the Cubano sandwich, compressing the bread to about 1/3 its original size!)

Grill the sandwiches for two to three minutes then flip them over to toast the other side. Once the cheese is melted and the bread is golden brown on both sides, the Cubano sandwiches are done.

Make sure your griddle or fry pan is not TOO HOT! Otherwise, the crust will burn before the cheese melts.

Slice the sandwich in half diagonally and serve.

Tip: Let your meats and cheese come to room temperature. This way you avoid over toasting the bread and the cheese melts perfectly! This is especially helpful when you have a lot of meat in your Cubano sandwich.

You may substitute French bread if you must, but NOT a baguette! Additional bread options: hoagie roll, Mexican bolillo, or ciabatta bread rolls.

Tuscan Summer Salad

Save
Print
  • Dressing
  • ¼ sherry vinegar (can substitute any vinegar that you like)
  • 1 teaspoon garlic powder
  • 1 tablespoon finely chopped shallots
  • 1 teaspoon Dijon mustard
  • 1 teaspoon Italian herbs, crushed
  • ½ cup oil, approximately use olive
  • Sea salt and pepper, to taste
  • Salad
  • 1 head romaine lettuce
  • 1 head radicchio lettuce
  • 4 ounces green beans, cut into 1 to 2-inch pieces, blanched and cooled*
  • 1 basket cherry tomatoes, cut in half
  • 1 can gigante white beans, drained and rinsed
  • ½ small red onion, cut into slivers
  • ½ cup chopped roasted red peppers
  • 2 small Persian cucumbers, cut in half then into half moons
  • 2 cups chopped cooked chicken, optional

Put vinegar, garlic powder, shallots, mustard and herbs together in a bottle or medium bowl, whisk in enough oil to emulsify dressing. Season to taste with salt and pepper. Set aside.

Toss all salad ingredients together in a large bowl. Add a little dressing and toss again, taste and add more dressing as necessary.

*Blanch and cool green beans: Bring a large pot of water to a boil. Meanwhile prepare an ice water bath, a large bowl filled with ice and water.

When the water boils add the green beans and a good amount of salt, boil for 3 minutes then plunge them into the ice water bath.

Steak Fajitas Crockpot Style

Save
Print
  • 1-2 pounds beef flank steak*
  • 2 tablespoons lime juice
  • 1 tablespoon oil
  • 1 large onion quartered and sliced into thin pieces
  • 1 red pepper, sliced into strips
  • 1 tablespoon or more, seeded and chopped jalapeno pepper
  • 1 tablespoon chopped cilantro
  • 1 clove minced garlic
  • 1 teaspoon chili powder
  • 1/2 teaspoon salt
  • 1 cup diced tomatoes
  • 1 dozen flour tortillas

Serve with optional ingredients sour cream, guacamole, shredded Mexican blend cheese, chopped tomatoes, shredded lettuce, salsa

Cut flank steak into 6 or 8 pieces and marinate in lime juice and oil for about 30 minutes.

Add all the ingredients except tortillas into the crockpot and mix well.

Cook on low for 8 or 9 hours, until the beef is tender and can be shredded easily.

Remove from slow cooker and shred the meat. Return meat to slow cooker and stir.

For the fajitas, spread meat mixture onto warm flour tortillas and add your favorite toppings.

If you can’t find flank steak, you can substitute skirt steak, london broil or flat iron steak

Pulled Pork I Instant Pot

Save
Print
  • 1 boneless pork shoulder, about 4 or 5 pounds
  • Sea salt and ground pepper
  • 1 onion, cut into large pieces
  • 1 rib celery, roughly chopped
  • 1 carrot, roughly chopped
  • 1-2 cups chicken stock

Cut the pork into several pieces so that it fits into the Instant Pot below the fill line. Season the pork with salt and pepper, then brown it on all sides on the searing or frying setting.

Add the onion, celery and carrot around the pork and cover with chicken stock keeping below the fill line. Add the lid to the pot and make sure to turn the steam release vent to the sealing position. Cook on manual for 1 hour. Let the pressure release naturally for 10 to 20 minutes

Remove the pork and slice or shred, add any sauce you like. I use plain shredded or sliced pork for my Cuban Sandwiches.

The meat freezes well for up to 6 months.

Black Forest Mousse Parfait

Save
Print

Serves 4

  • 1 package chocolate instant pudding and pie filling, 4 serving size
  • 2 cups cold milk
  • 1 can cherry pie filling
  • 1 cup whipped cream

Mix together pudding mix and milk according to package directions. Let

thicken slightly and spoon into parfait glasses leaving 2" at the top.

Before serving, whip cream and add a little powdered sugar to your liking. Top

pudding with a layer of pie filling and finish with a spoonful of whipped

cream.

Order your produce today from ….


Leave a comment
Share
  • Pin it
  • Share
  • Tweet
  • Share
  • Email

Mushroom Risotto with Chicken

7 / 6 / 20


Here’s a ‘pantry’ style dish, use leftover or rotisserie chicken, frozen (defrosted) shrimp, lobster or leave all protein out and just enjoy.

The best rice to use is Arborio  or  Carnaroli rice from Italy. This short grain rice will release its starch into the dish as you add stock and stir making the risotto nice and creamy.

Another pantry ingredient is dried mushrooms, keep them around all year to add deep flavor to any dish. You could add some sliced fresh mushrooms as well if you like. I also keep lots of chicken stock in my pantry/freezer, organic and low sodium if I don’t make it myself. Be sure to soak the dried mushrooms in chicken stock for at least 20 minutes to rehydrate. Drain the mushrooms, strain the liquid and use as part of the stock  in the recipe, the liquid gives a rich deep flavor to the dish. Use a drinkable dry white wine, unsalted butter and freshly grated parmesan cheese, which you should also have in your pantry.

Optional ingredients are chopped garlic (you all know I’m allergic so it’s a no-no for me), a teaspoon of saffron threads.

That’s it, all you need to make a great risotto with items from your pantry. Need to stock your pantry? Check out my first book, ‘What’s In Your Pantry’.


Mushroom Risotto with Chicken

Save
Print

Serves 4

  • 1 small package dried mushrooms, such as porcini or mixed mushrooms
  • 1 quart chicken broth
  • 1 tablespoon olive oil
  • 1 tablespoon chopped shallot
  • Sea salt and fresh ground pepper
  • 1 cup arborio rice
  • ½ cup dry white wine
  • 1 cup cooked chicken, room temperature
  • ½ cup grated Parmesan cheese, plus more for serving

Place the mushrooms in a bowl and cover with chicken broth. Let stand at least 20 minutes to soften. Drain and place the stock into a saucepan with the rest of the 1 qt. of stock. Heat and keep warm. Chop the mushrooms and set aside.

In a large sauté pan heat the oil over moderate heat. Add the shallot and cook, stirring occasionally, until translucent. Add the rice and stir until it begins to turn opaque, about 2 minutes.

Add the wine and cook until all of the wine has been absorbed.

Add about 1/2 cup of the simmering broth and cook, stirring frequently, until it has been absorbed.

Continue to cook the rice, adding broth 1/2 cup at a time and allowing the rice to absorb it before adding the next 1/2 cup. Cook the rice in this way for about 20 -25 minutes in. If you use all the broth but the rice isn’t cooked through you can add water and cook until it’s done.

Add the chicken, mushrooms, Parmesan cheese and heat through. Taste for seasoning and add salt and pepper as needed.

Serve the risotto with additional Parmesan.


Leave a comment
Share
  • Pin it
  • Share
  • Tweet
  • Share
  • Email

More Summer Recipes

6 / 21 / 206 / 21 / 20

Summer Recipes

Cast Iron Skillet Rib Eye

Bay Shrimp Salad

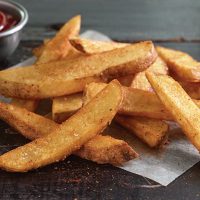
Oven Baked Steak Fries

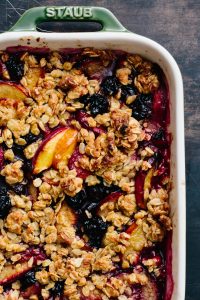
Any fruit Crisp

Leave a comment
Share
  • Pin it
  • Share
  • Tweet
  • Share
  • Email

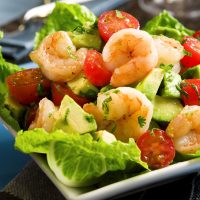
Bay Shrimp Salad

6 / 21 / 20


Bay Shrimp Salad with Sherry Vinaigrette

Save
Print
  • ½ pound cooked, deveined Bay shrimp
  • ½ pint cherry tomatoes, halved
  • 1 avocado, cut into ½” chunks1
  • 1 tablespoon finely chopped shallots
  • 1 teaspoon Dijon mustard
  • ¼ cup sherry vinegar, plus a little more, if needed*
  • 1 cup extra-virgin olive oil
  • Sea salt and fresh ground pepper
  • 2 cups baby leaf lettuce, red, green or mixed

Combine the cooked shrimp, tomatoes and avocado in a bowl, season with a little salt and gently toss to combine.

For the vinaigrette, mix together the shallots, Dijon mustard and sherry vinegar. Whisk in olive oil until slightly thickened. Season with sea salt and pepper.

Toss the greens with enough dressing to coat, then top with cooked shrimp, tomato and avocado mixture and add the remaining dressing if necessary.

*You can get sherry vinegar from a store that sells fine vinegar and oils or order it from www.ooliveoil.comYou could also use champagne or red wine vinegar, but it will change the flavor of the salad slightly.

Leave a comment
Share
  • Pin it
  • Share
  • Tweet
  • Share
  • Email

All Fruit Crisp

6 / 21 / 20


Any Fruit Crisp

Save
Print

Recipe from The Kitchn

  • For the filling:
  • ½ cup granulated sugar
  • 2 tablespoons cornstarch
  • 6 cups sliced fresh or thawed frozen fruit
  • 1 tablespoon freshly squeezed lemon juice
  • For the topping:
  • 1 ½ cups old-fashioned rolled oats
  • 1 cup all-purpose flour
  • ½ cup packed light brown sugar
  • 1/2 teaspoon salt
  • 12 tablespoons unsalted butter, melted and cooled, plus more for buttering the baking dish
  • 1 teaspoon vanilla extract

Arrange a rack in the middle of the oven and heat to 350°F. Coat a 9x9-inch or 11x7-inch glass baking dish with butter; set aside.

Whisk together the sugar and cornstarch in a medium mixing bowl until lump-free. Add the fruit and lemon juice and toss gently to coat. Transfer to the baking dish.

Topping: Combine the oats, flour, sugar, and salt in a large bowl and stir until combined. Drizzle the butter and vanilla over the oat mixture and stir to combine. Set aside or store in the freezer in a zip-top freezer bag for later use.

Scatter the crisp topping evenly over the fruit mixture, leaving large clumps intact. Bake until the fruit juices are bubbling around the edges of the baking dish and the topping is golden and firm to the touch, 30 to 35 minutes.

Let the crisp cool on a wire rack for at least 15 minutes before serving. If transporting to a picnic or party, let the crisp cool completely to give the fruit filling time to set. Crisps will keep, covered and refrigerated, for up to 1 week. Serve cold, room temperature, or re-warmed in a low oven for 20 minutes.

Notes:

Make ahead: Crisp topping can be made and frozen up to 3 months in advance.

Storage: Cover and refrigerate leftover crisp for up to 3 days. Enjoy cold for breakfast or gently rewarm in a low oven for 20 minutes before serving.

Leave a comment
Share
  • Pin it
  • Share
  • Tweet
  • Share
  • Email

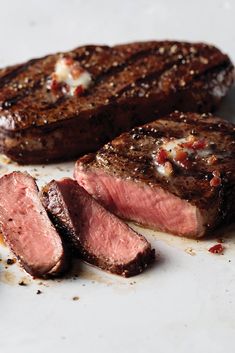
Cast Iron Skillet Rib Eye

6 / 20 / 206 / 21 / 20


Cast Iron Skillet Rib Eye

Save
Print
  • 1 16- ounce ribeye steak, 1 1/2 inch thick
  • 2 tablespoons unsalted butter
  • 1 tablespoon peanut or sunflower oil

Preheat oven to 500°.

Season the steak on both sides with sea salt and fresh ground pepper.

Heat a cast iron skillet large enough to fit the steak snugly.

Add the butter and oil to skillet and when butter is melted add the seasoned steak and sear on each side, about 1 minute each.

Slide the pan into the oven for approximately 5 minutes, be sure to use a probe type thermometer. Cook the steak to 130° for medium rare and let rest for about 4 minutes before serving. Slice on the bias, against the grain and serve.

Related Posts Plugin for WordPress, Blogger...
Leave a comment
Share
  • Pin it
  • Share
  • Tweet
  • Share
  • Email

Posts navigation

1 2 3 … 6 7 Next Page
Deb

Meet Chef Debbi

READ BIO

Join-Us Sign up for our newsletter to receive exclusive tips 'n tricks, and special offers on classes, tours, and more!

Recent Posts

  • New E-Book!
  • From the Pantry
  • Spaghettini at Home
  • Growing Corn
  • Spring IS Coming!

Categories

BookCUT

What's in Your Pantry?

How to stock your pantry to create delicious dishes.

Learn Chef Debbi's pantry essentials and how to substitute ingredients for pantry staples in her basic recipes for quick and easy meals.
BUY BOOK>

FacebookTwitterInstagramGooglepinterest


© 2014, DEB'S KITCHEN
Angie Makes Feminine WordPress Themes